

I was blown away by the demand for more photography posts, and friends, I am really happy to create these mini lessons for you! My entire goal with today’s post is to take the mystery out of your camera’s manual settings and get you excited to capture those small (yet aren’t they really big?) moments. When you know how your camera works, magic happens.
Most Requested Topics: 6 Things You Can Do for Better Interior Photos | Take Awesome Photos With Your Smart Phone| A Look Inside My Camera Bag | Reader Q + A
As I read through your feedback, I heard many of you say the same thing: It seems so complicated! And, yeah, I can understand why you would say that. Just a quick Google search for the most basic of photo tutorials can get lengthy. There are graphs and numbers and fractions for goodness sake! So to take the stress out of the topic, I’m going to break down the photography basics as simply as possible. Let’s talk about the f-stop, shutter speed and ISO – and most importantly, how they all work together.
In This Post
What Is An F-Stop?
An f-stop is a number that corresponds to the size of the aperture hole. The smaller the number, the larger the hole and the more light is allowed in. The larger the number, the smaller the hole and the less light is allowed in. I remember learning this in my Photography 101 class and thinking, everything is opposite in photography! When my professor drew a diagram on the board, it began to click. It looked like this:
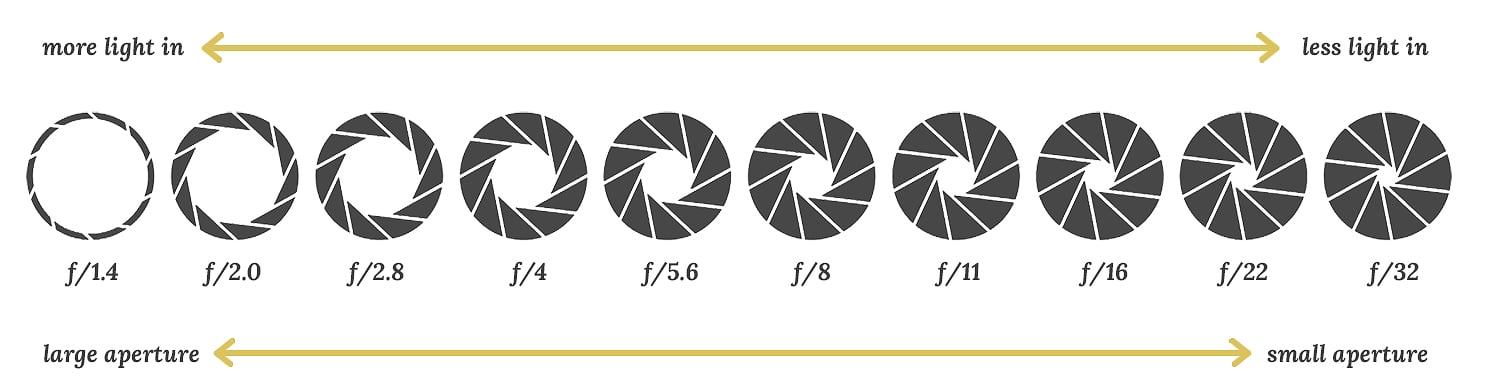
For example, if you take a photo on a manual setting and the image looks dark, you may try moving to a smaller numbered f-stop. Remember, the smaller the number, the larger the aperture hole, and the more light the image receives! So by stepping from, say, f/8 to f/5.6 (and changing nothing else), you’ll produce a brighter photo.
Using Depth of Field (DOF) Creatively
You know those images you see where the subject is perfectly in focus, but everything behind it is beautifully, softly blurred (sometimes referred to as ‘bokeh’)? The f-stop is what helps you to get that result!
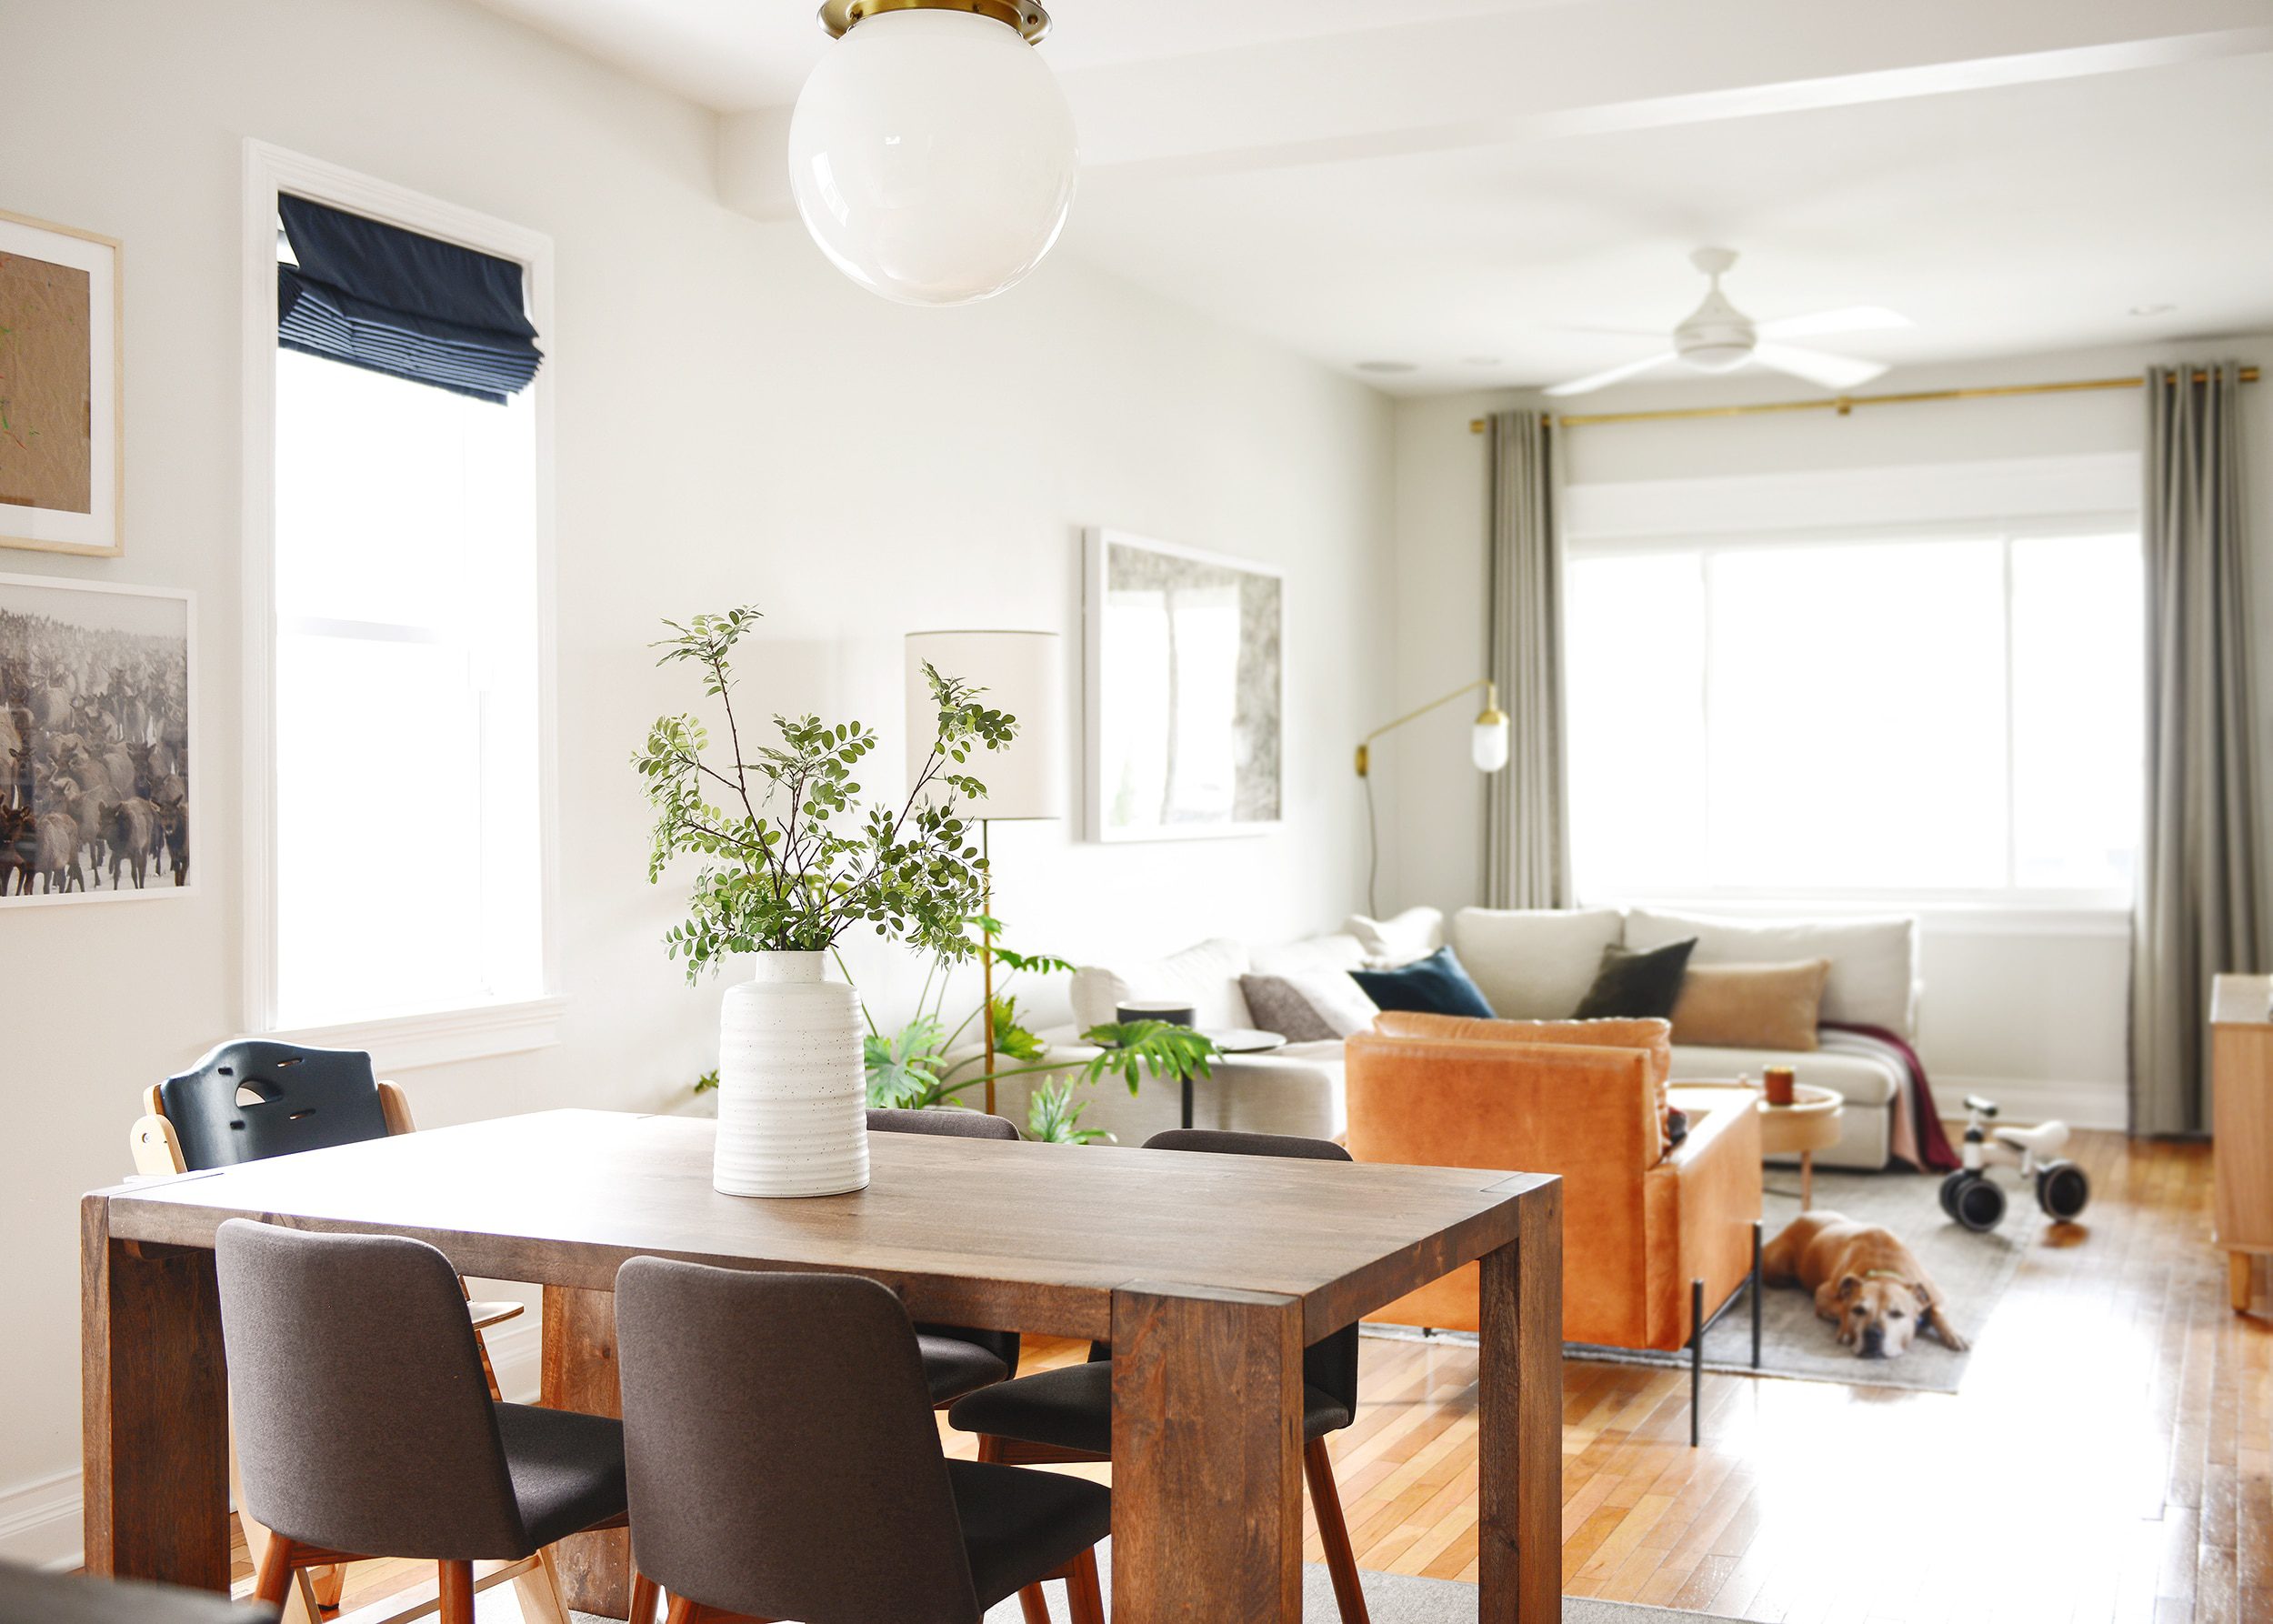
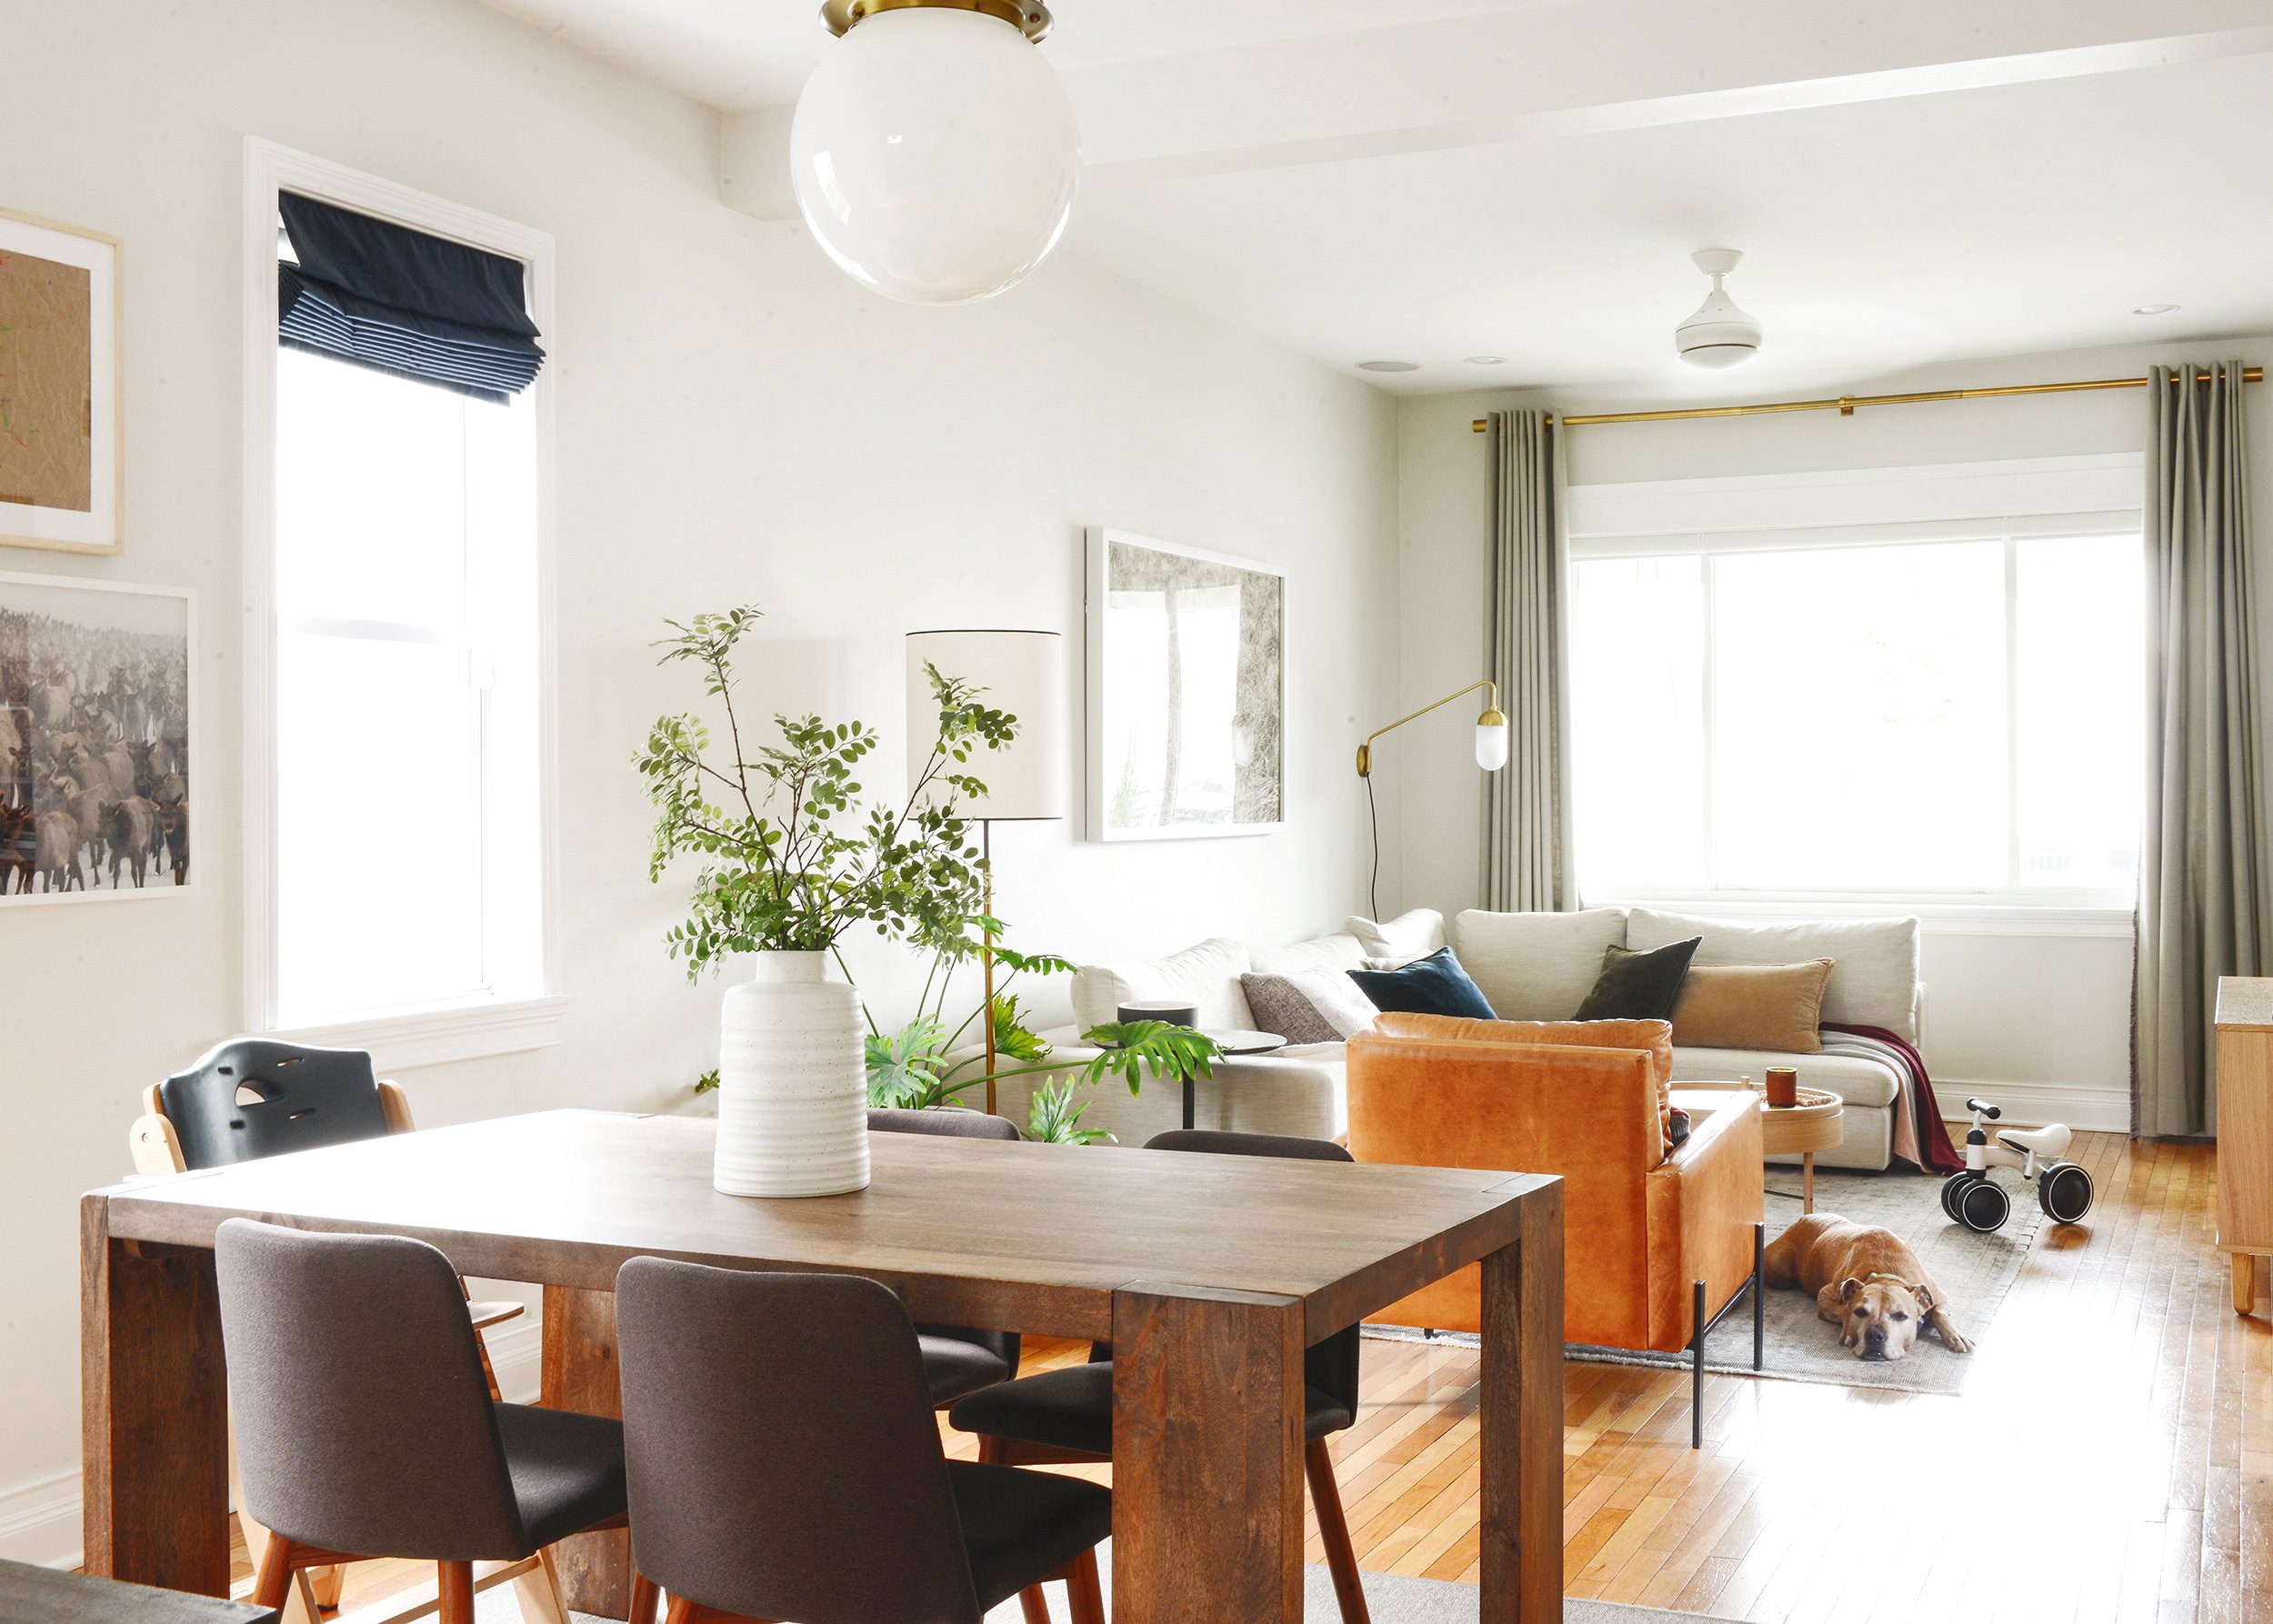
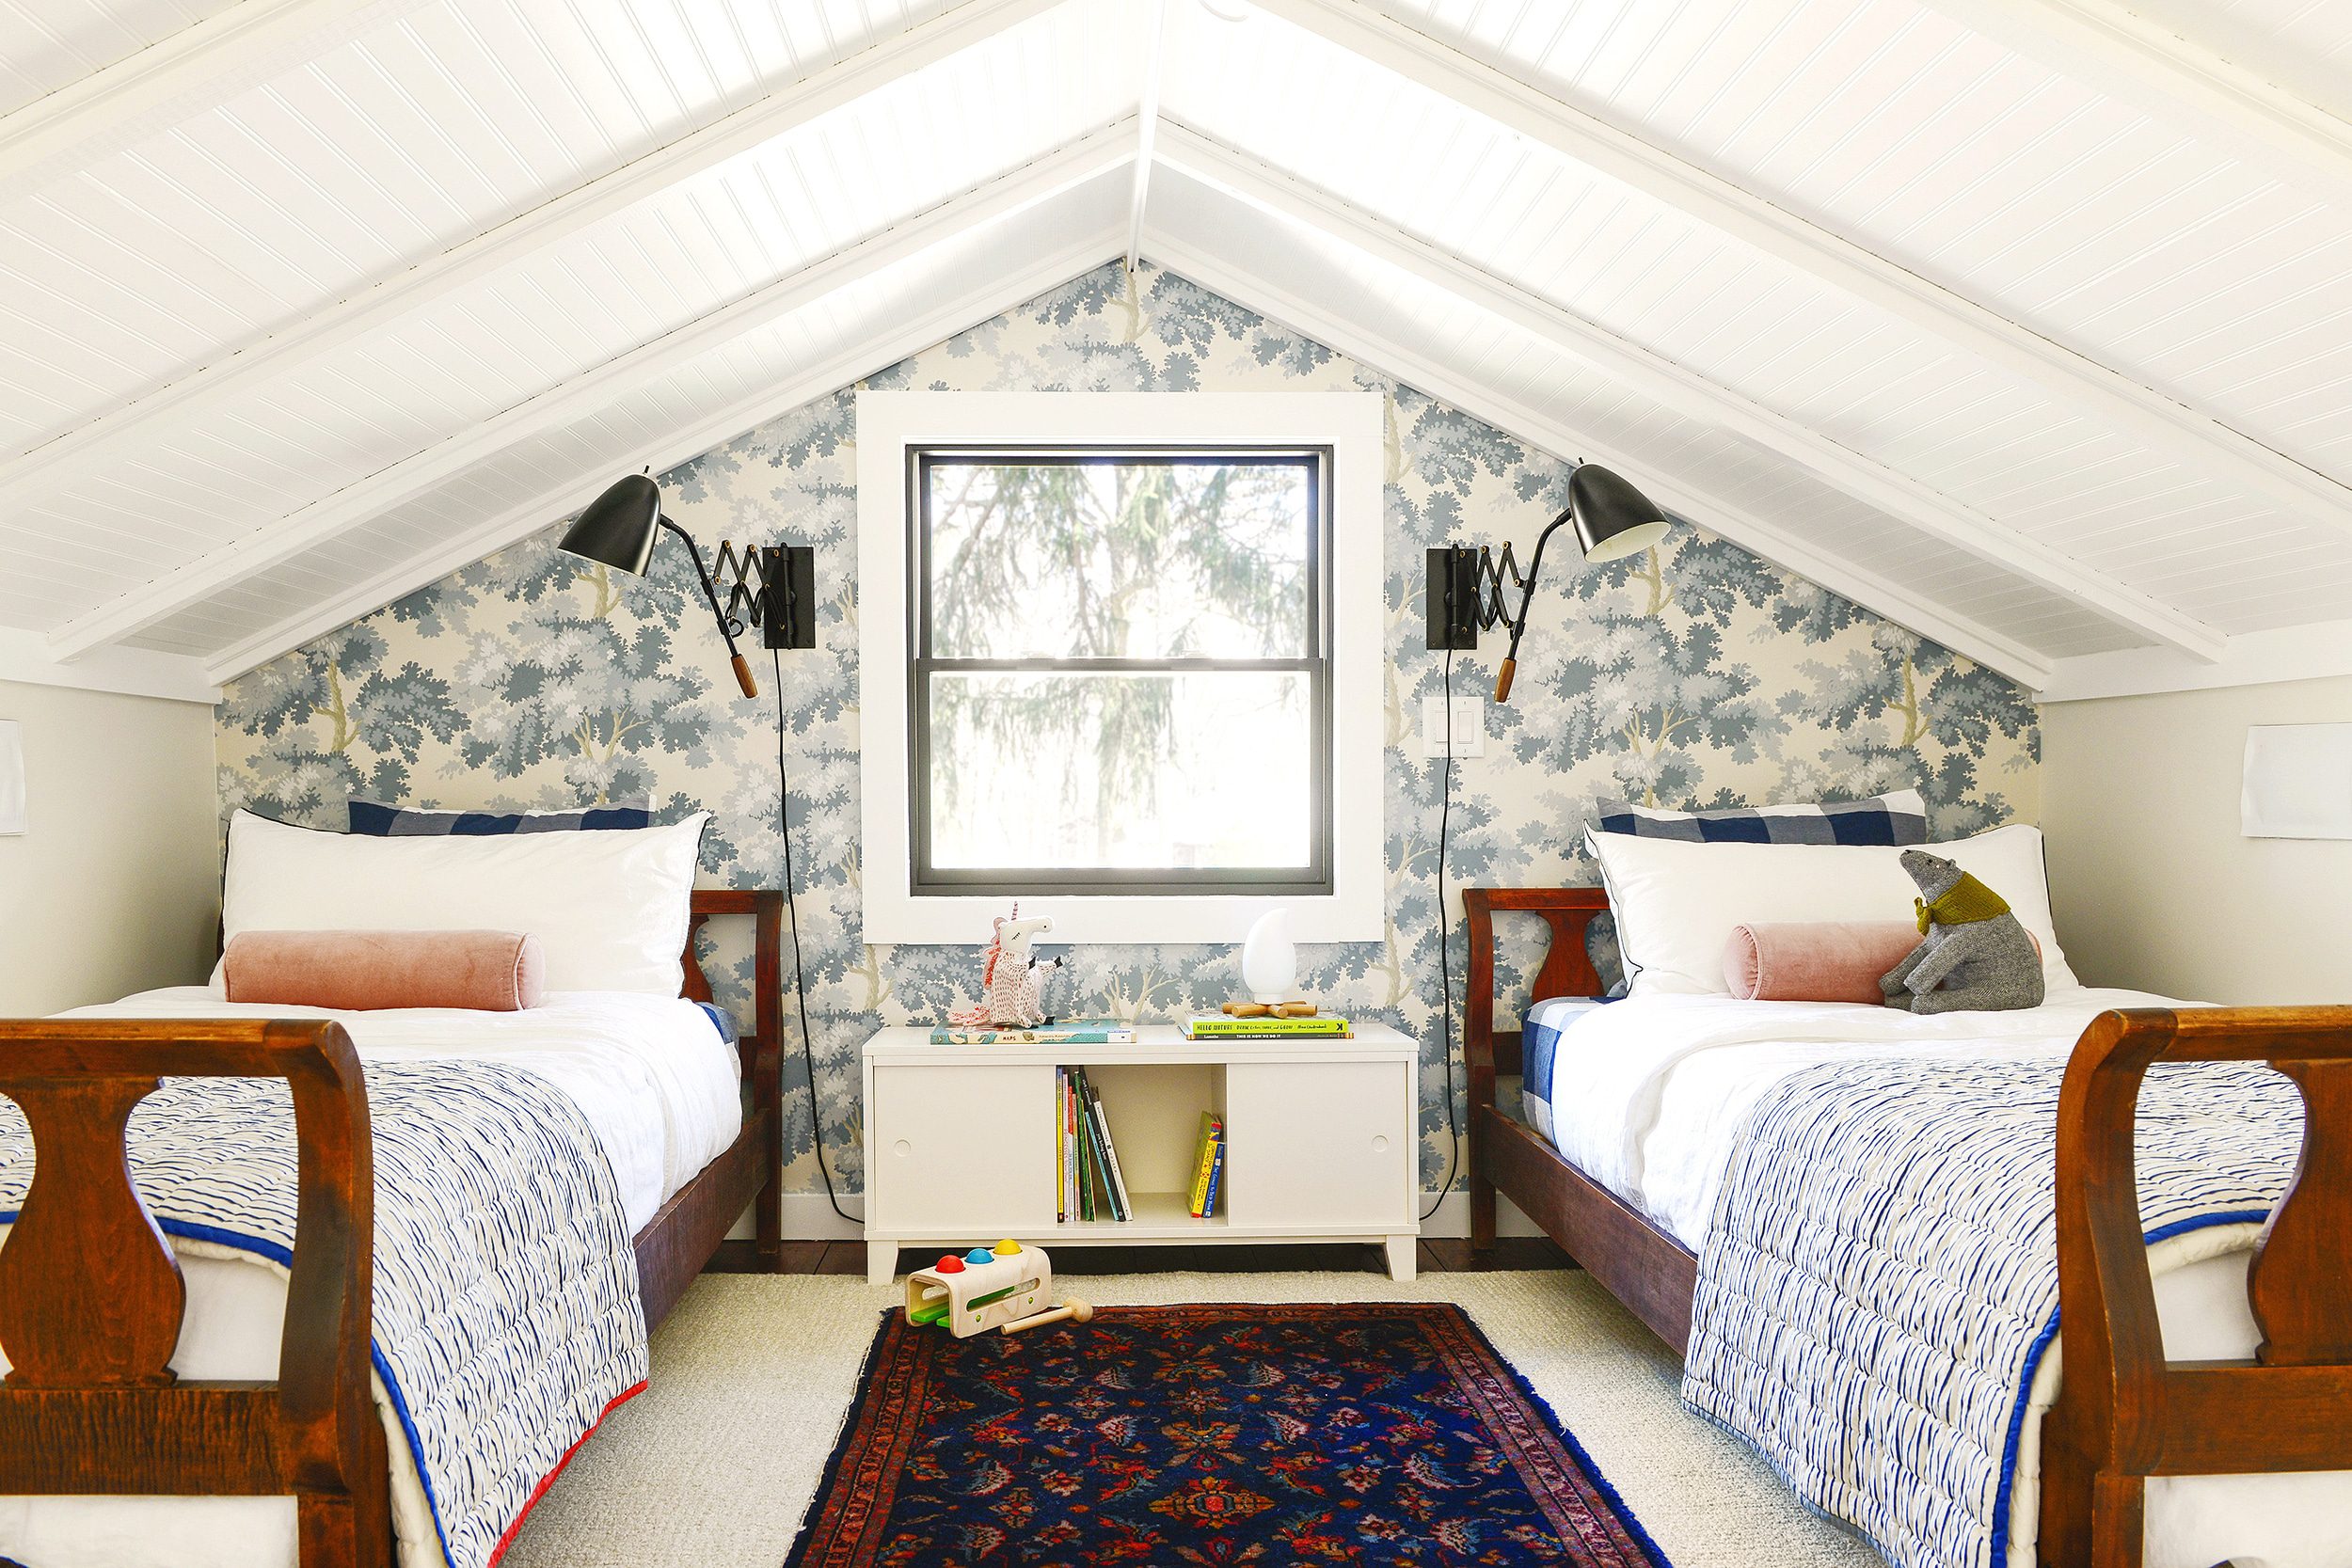
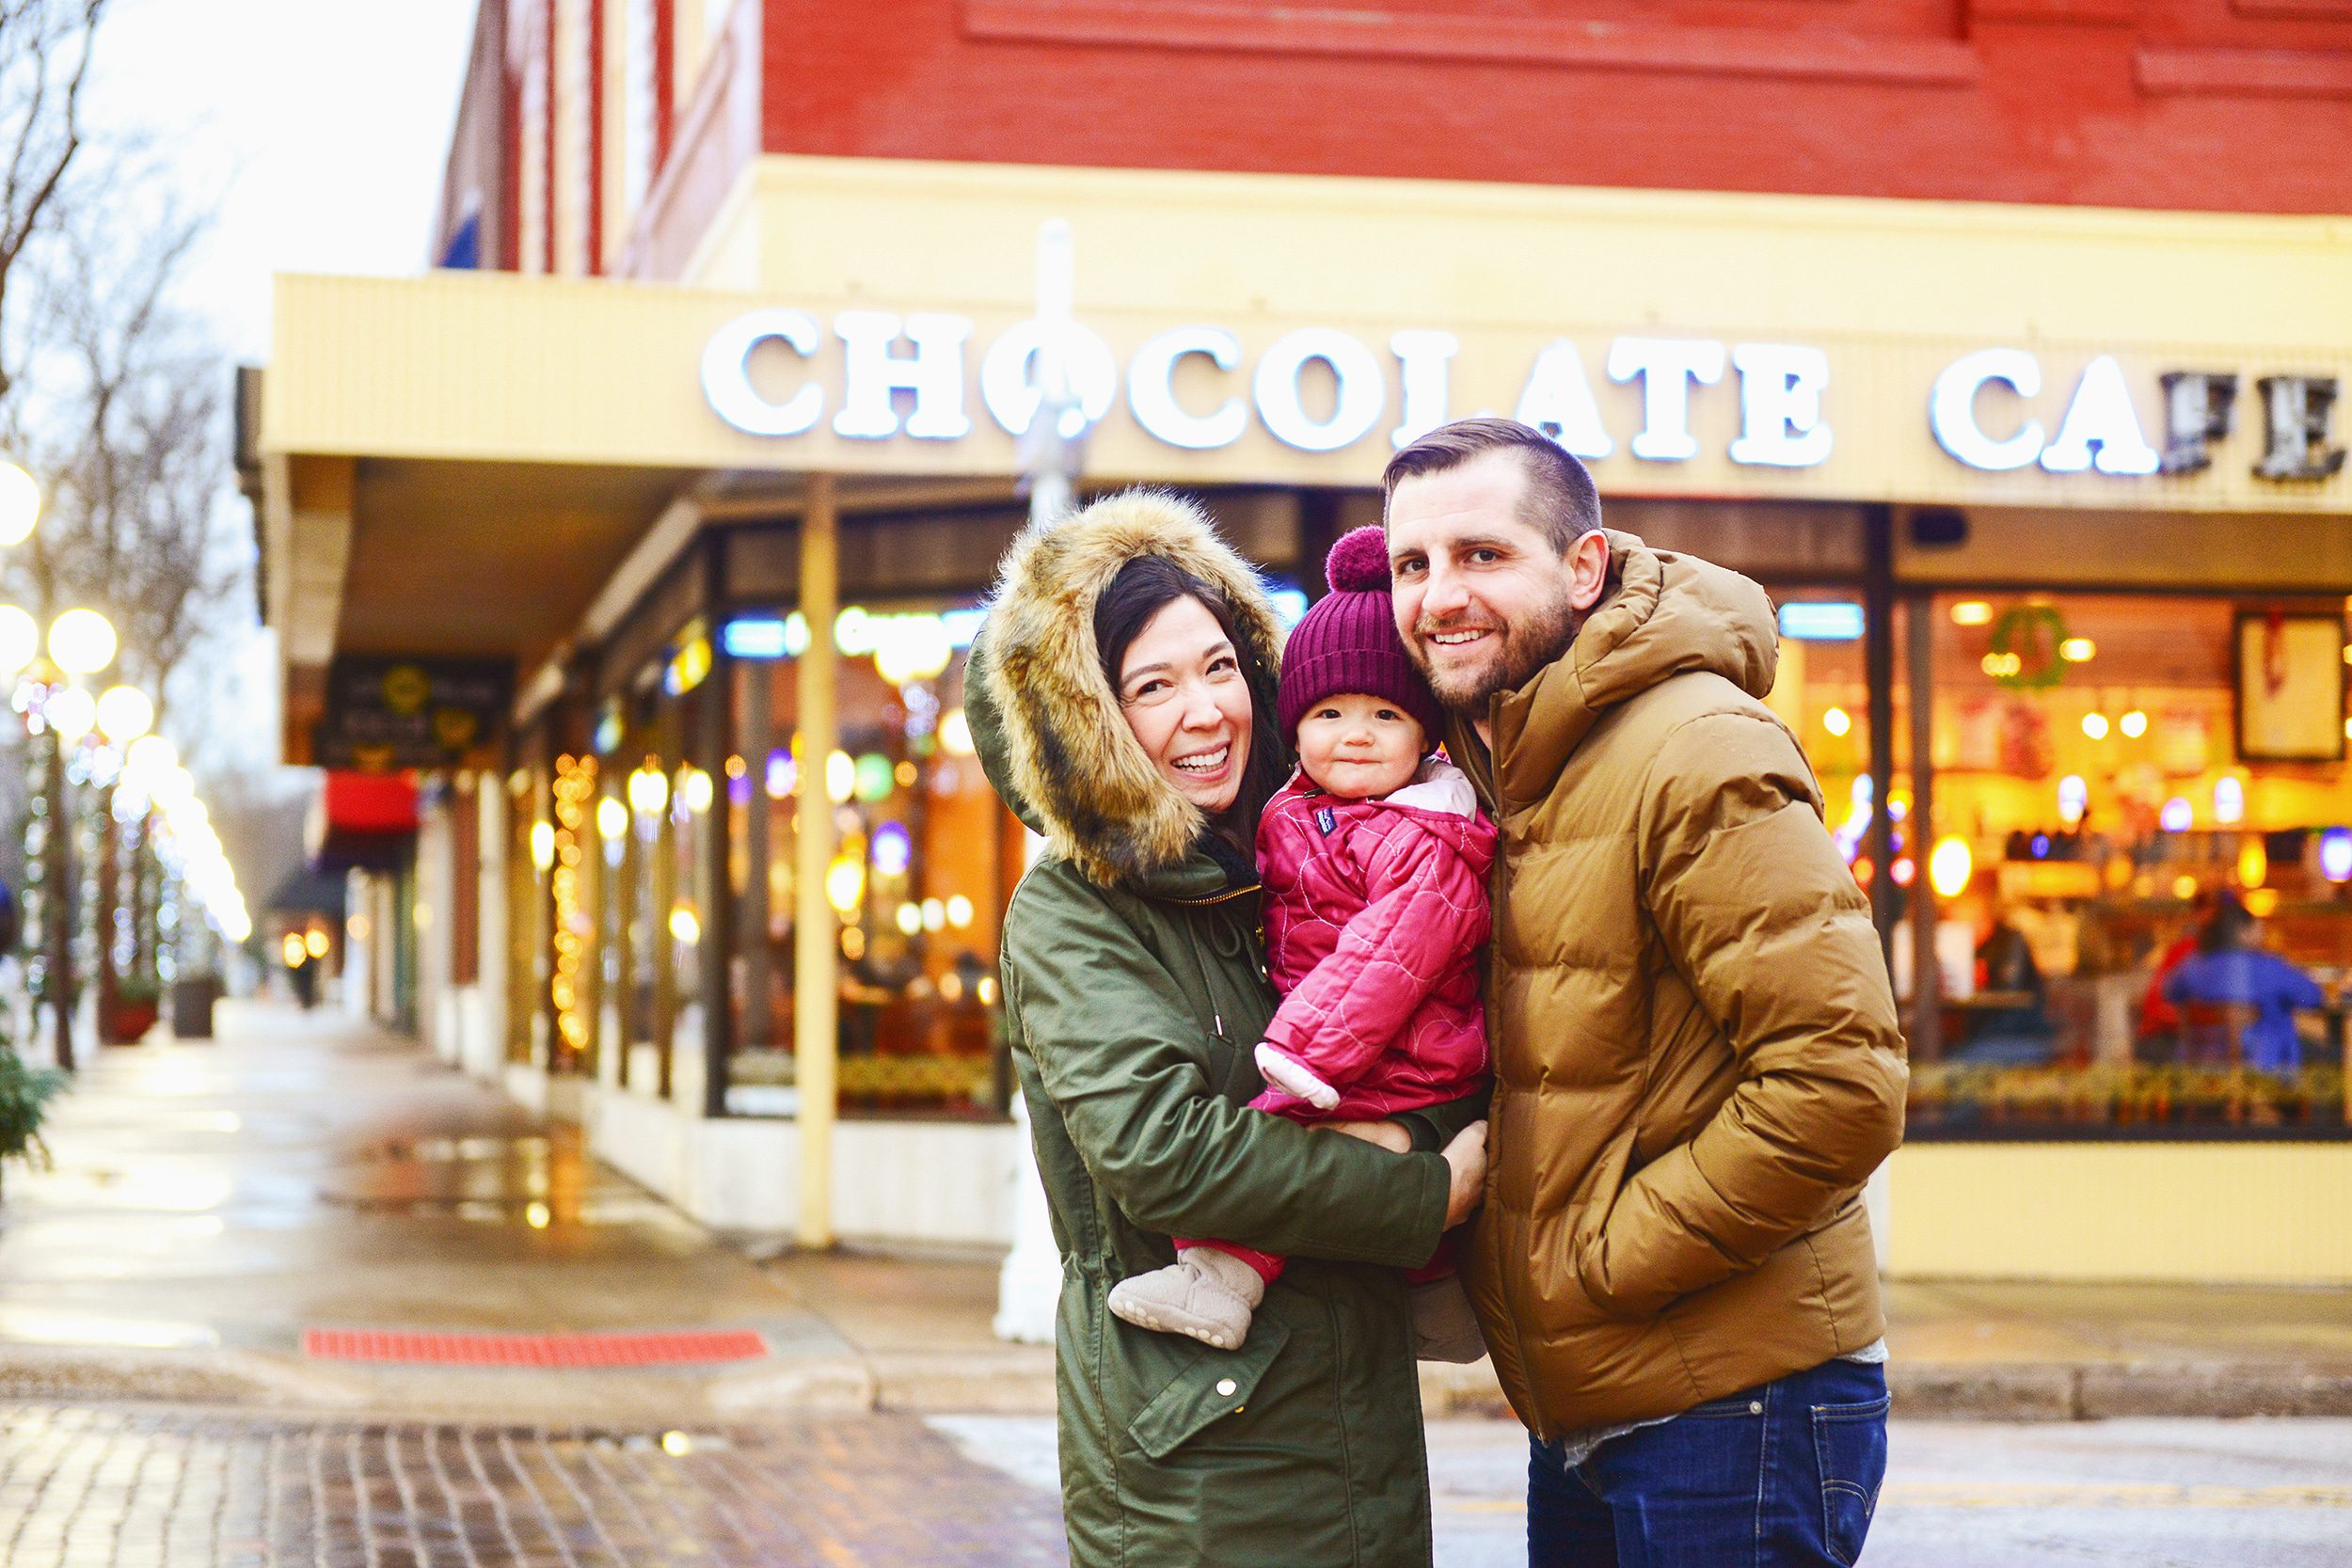
Those photos with the blurred background have a shallow depth of field and is the result of an f-stop with a low number. Photos where the background is more in focus have a large depth of field and is the result of an f-stop with a high number. It’s up to you as the photographer to determine how much of the image you’d like to be in focus around the subject. It’s one way to use your creativity! Below is an example of shallow DOF vs. large DOF. My focus was on the dining table vase in both cases, but you can see how the background is in soft focus when using f/2.8, whereas the whole room (including Jack!) is in focus when using f/22:
Shallow DOF using f/2.8
Large DOF using f/22
Understanding Shutter Speed
The shutter speed is the length of time the shutter is open, allowing light to enter the camera. Shutter speed is displayed in fractions of a second, so for example, a shutter speed of 1/250 is 250th of a second. If you are taking a photo at 1 second or longer, the shutter speed will be displayed as 1″, 2″ and so on.
The smaller the fraction (i.e. 1/250), the less light enters the camera. The larger the fraction (i.e., 1/30), the more light enters the camera. This is important if you’re shooting something by hand (no tripod) or a subject in motion. As a general rule of thumb, I never take a hand-held photo at less than 1/30 if I can help it, for fear of a blurry photo! I still remember my photography professor preaching the importance of ‘hand-held above 1/60 only!’, but what can I say, I’m a rebel. (Ha!)
Why ISO Matters
ISO seems to be the topic that stumps most of you, and more often than not, I feel like it’s the most overlooked. Simply put, ISO controls the sensitivity of the camera’s sensor to light. The smaller the ISO number, the less sensitive it is to light. The larger the ISO number, the more sensitive it is to light. Here’s a diagram that illustrates what I mean:
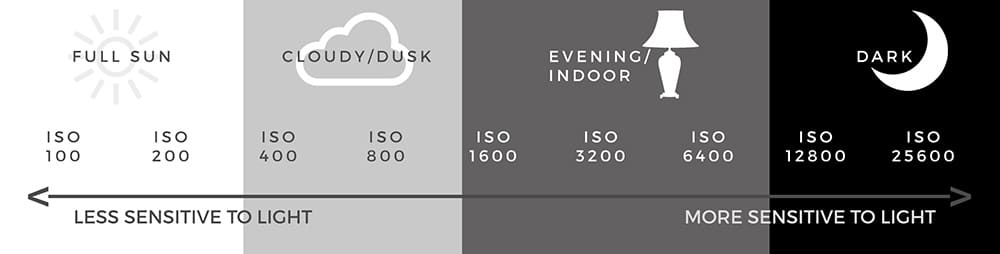
Let me break it down even further. On sunny days, I’ll choose to set my ISO to 200 or 400. If it’s gloomy or getting dark, I’ll set my ISO to 800 or 1000. As a personal rule, I prefer to stay away from ISOs higher than 1000, since most cameras will produce digital noise when the ISO is set to a high sensitivity.
Have you ever seen a ‘grainy’ photo? That ‘grain’ or ‘noise’ on the photo was likely the result of a high ISO number. Chances are, the photographer was shooting in low light conditions, and they bumped up the ISO to increase the camera sensor’s sensitivity. If I find myself needing to shoot a still subject in low light, I will always use a tripod so that I can keep my ISO around 400.
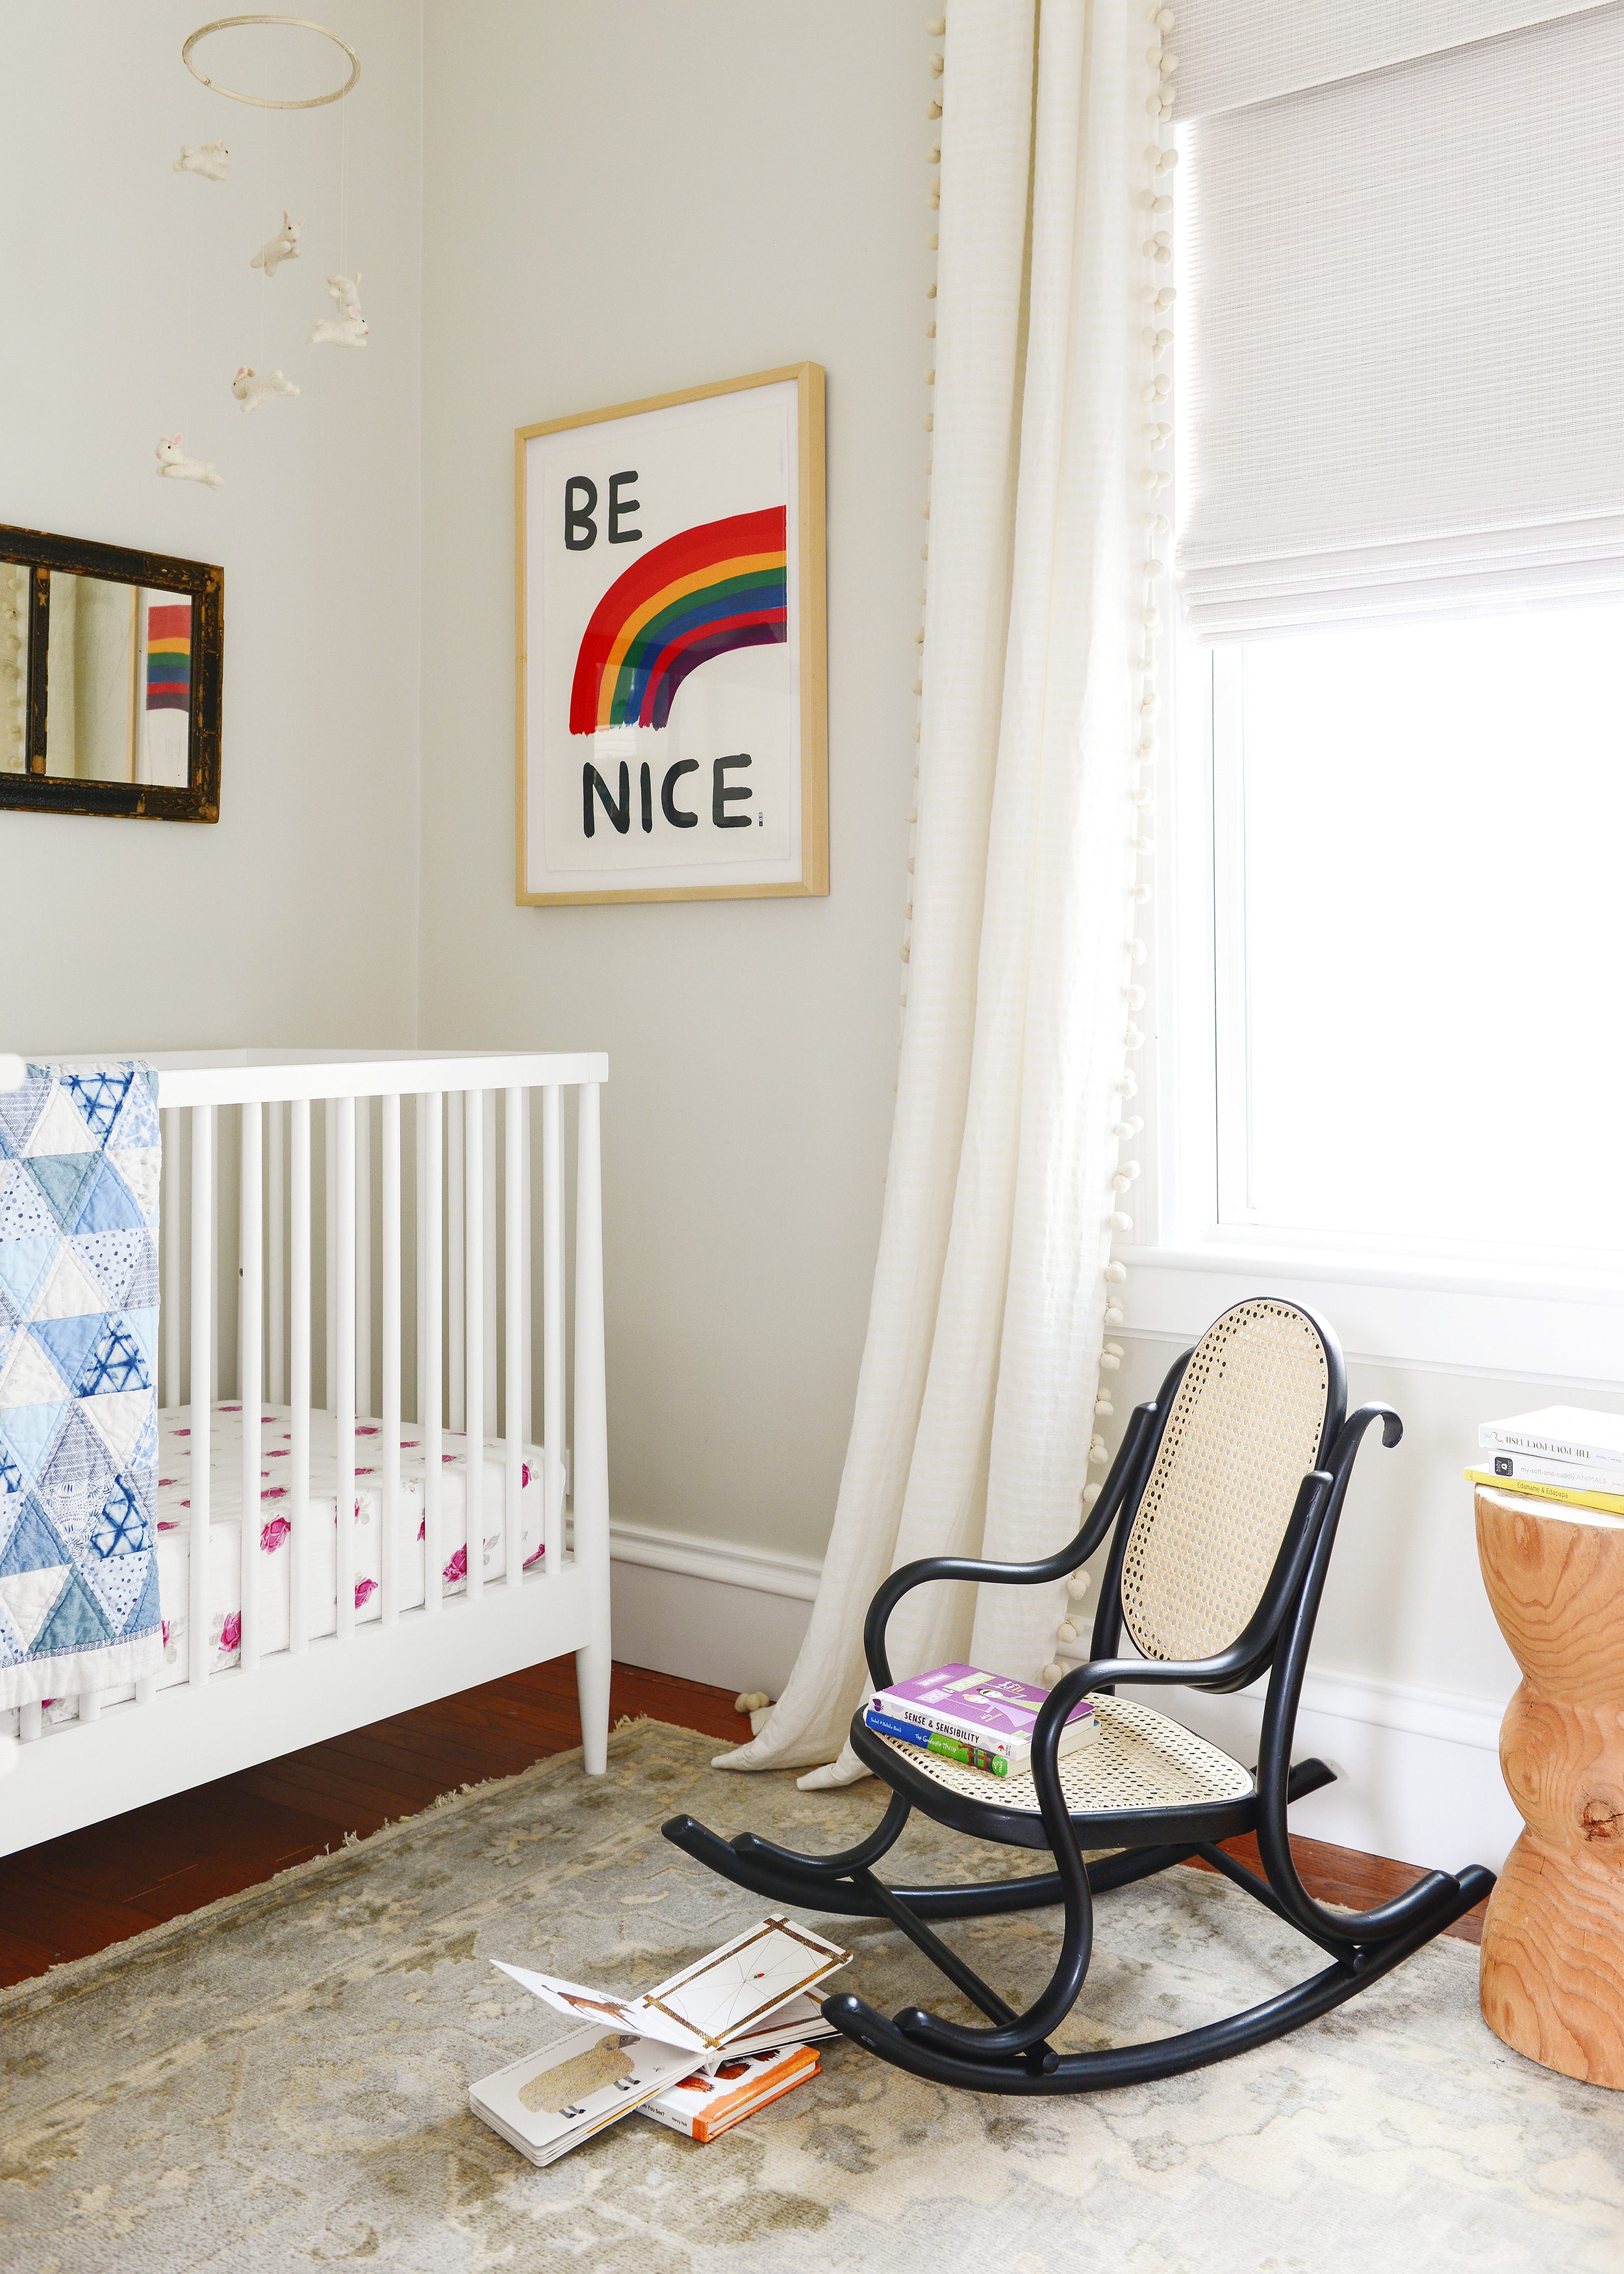
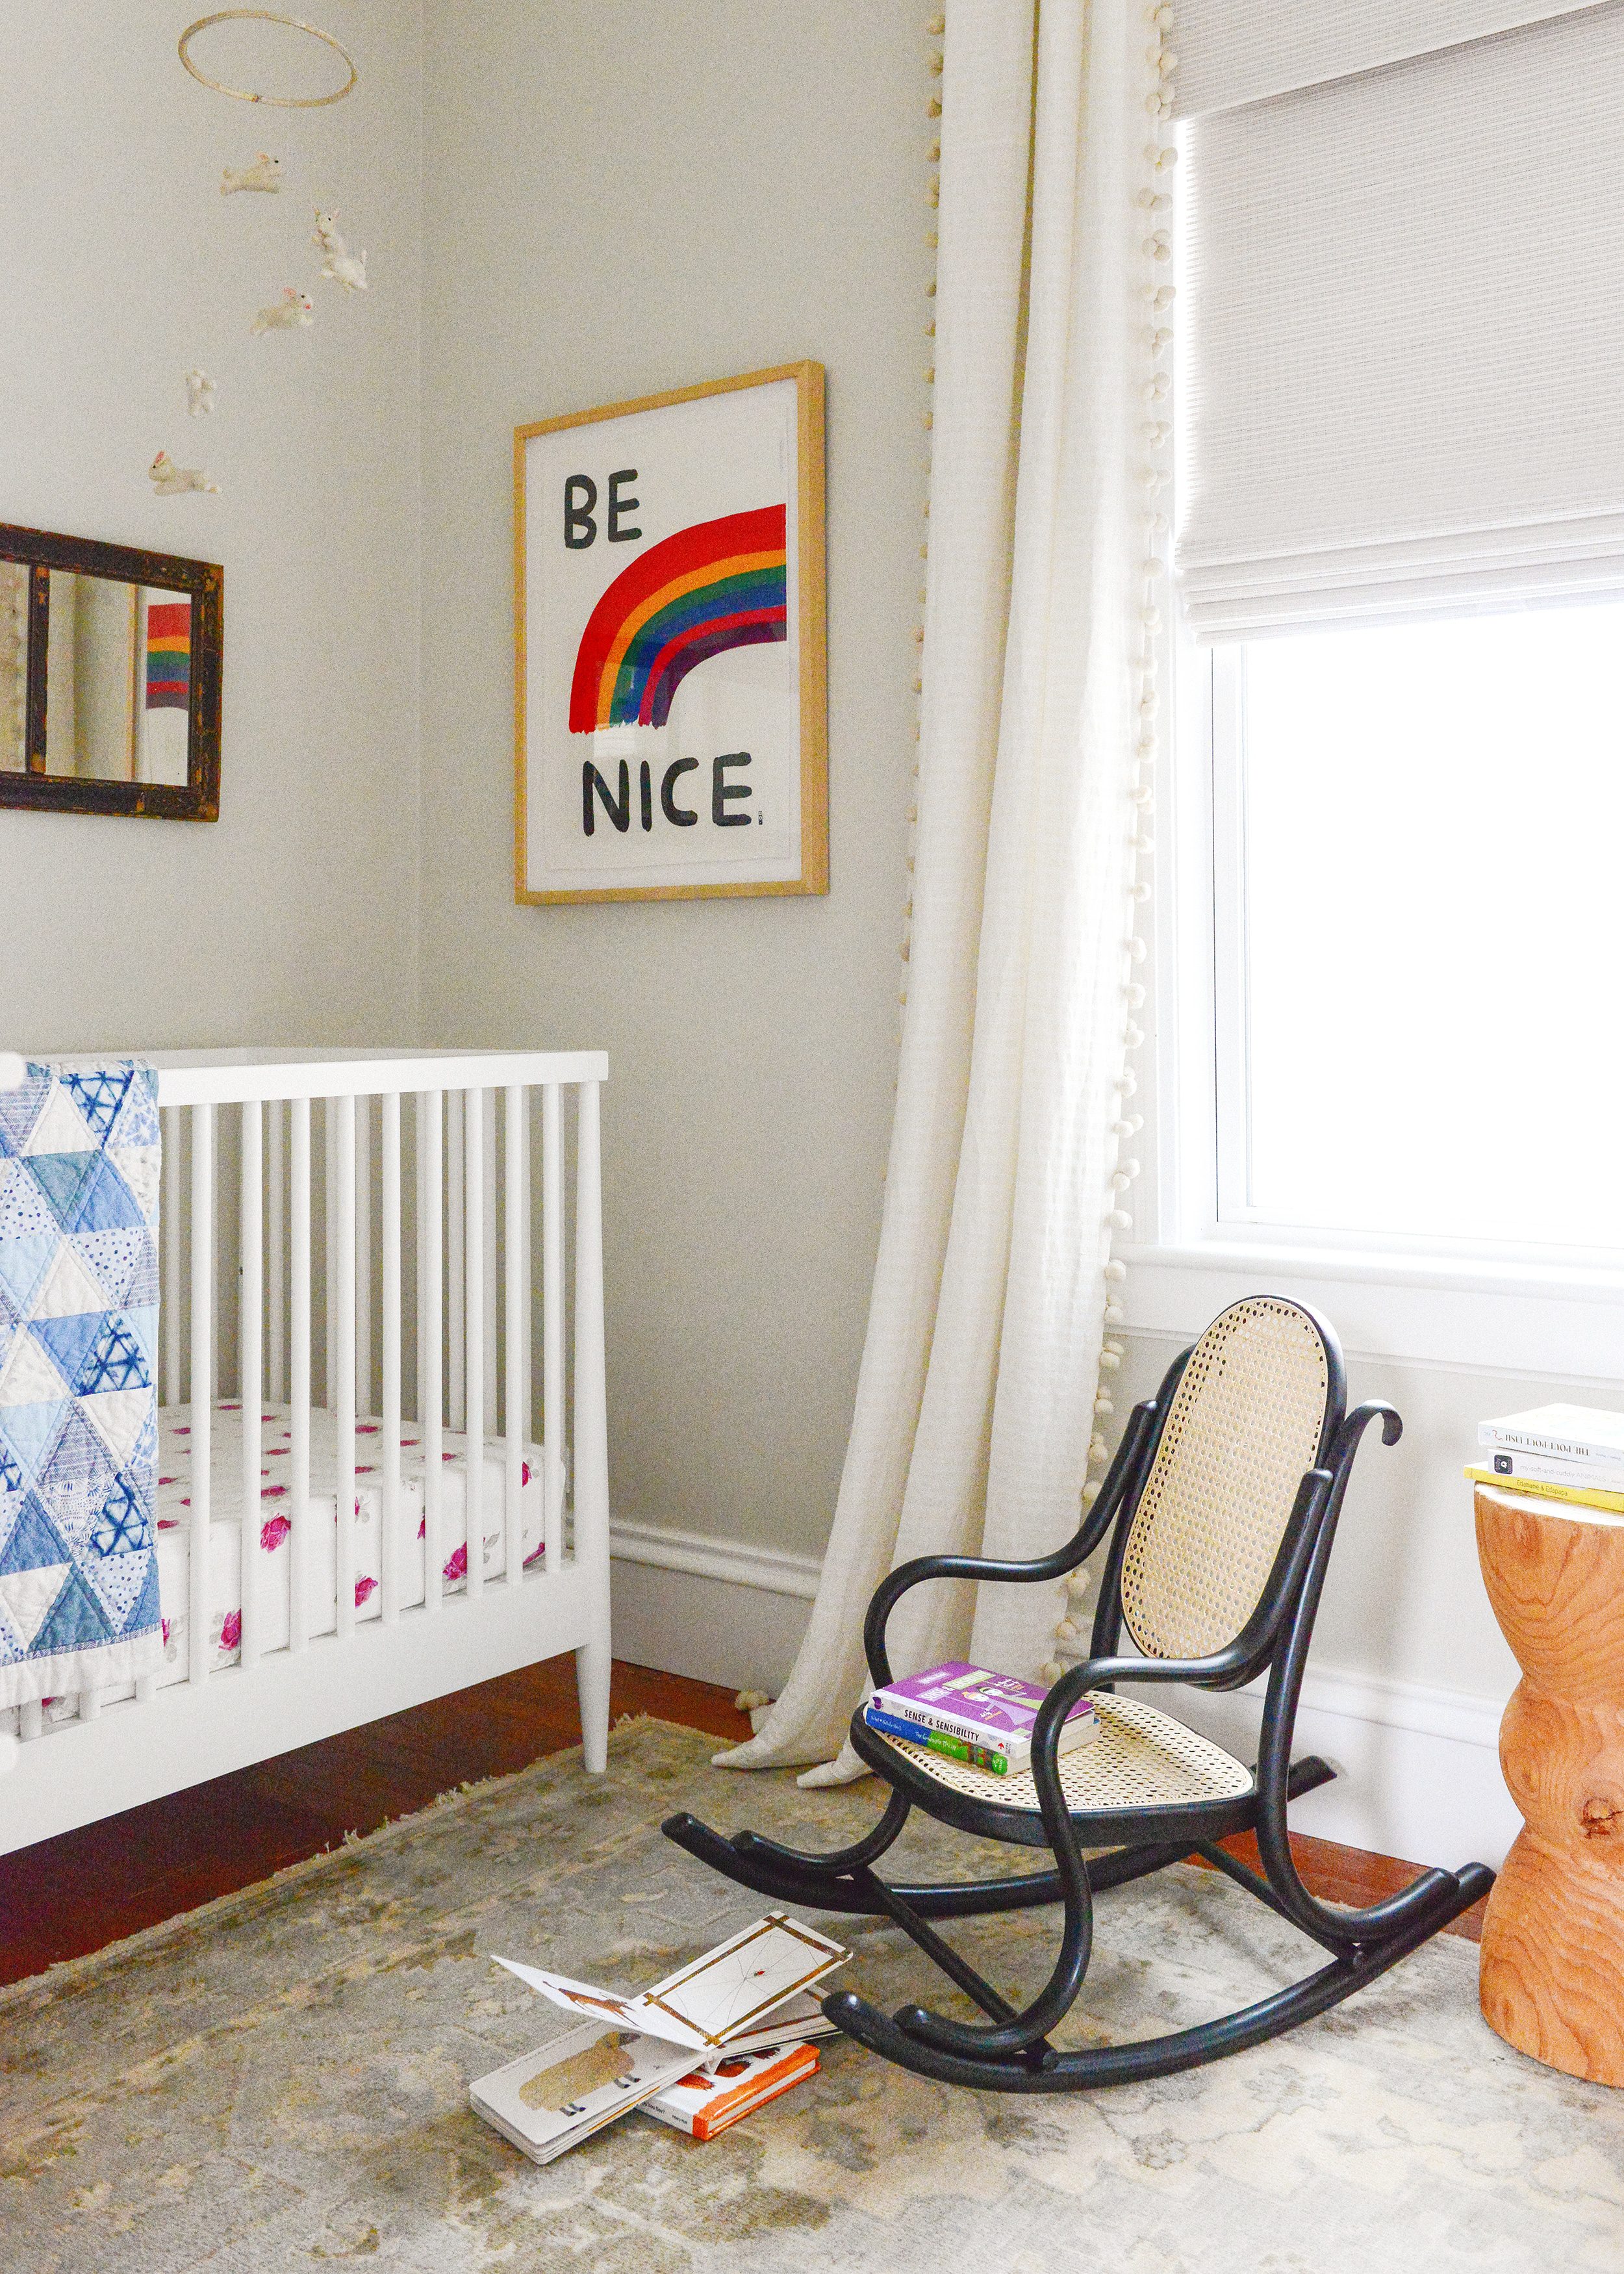
Below, can you see how the same image shot at ISO 6400 is ‘grainy’ compared to the one shot at ISO 200? The graininess really shows through in the shadows, like under the crib! You’ll also notice that I adjusted my shutter speed between the two images to allow for the difference in light sensitivity caused by the ISO setting. This shows that while you may make a sacrifice with a higher ISO, it allows you to have a faster shutter speed (which is especially handy if shooting a subject in motion).
f/5.6 | shutter speed: 1/30 | ISO: 200
f/5.6 | shutter speed: 1/500 | ISO: 6400
Putting It All Together
I’ve been shooting photos in manual mode for-e-ver. (I guess since my Photo 101 days when I was 18 – half of my lifetime ago!) Every single image you’ve ever seen on this blog has been shot in manual, and I’m so used to it, that I often like to challenge myself to see if I can guess my DSLR settings based on any lighting situation! Yeah, I’m really dorky about this stuff.
Essentially, I like to choose my f-stop first. When it comes to interior photography, I prefer much of the room to be in focus, so I’ll choose a higher numbered f-stop for a large depth of field, set my ISO to 400 and then base my shutter speed around those settings.
When it comes to portrait photography, I do like a bit of that ‘blur’ or ‘bokeh’ or, as you now know, a shallow depth of field! I’ll choose a smaller numbered f-stop and set my ISO to 800 (a pretty safe bet for a wiggly subject, like Lucy!). Between the small f-stop and high ISO allowing more light in, I’m also able to shoot with a higher shutter speed.
tl;dr?
Alright, I did my best to keep this brief, but maybe you skipped over most of the text? In that case, I would suggest…
- Start by choosing the f-stop that gives you the DOF you desire.
- Set your ISO based on the lighting conditions (and do your best to keep it under 1000!).
- Use the light meter inside your DSLR to set the appropriate shutter speed. When your light meter is happy with your settings, you’ll see the dashed lines aligned in the center.
- When shooting interiors, use a tripod, and/or only take handheld photos with your DSLR if your shutter speed is faster than 1/60!
What Questions Do You Have?
I’ll be rounding up your questions and sharing them in a big Reader Q + A in a few weeks! I sincerely hope this was helpful, but most of all, I hope this encourages you to pick up your DSLR, switch it to manual mode and practice, practice, practice. You got this.
In This Post:


I’ve been trying to figure out why my dark conditions photos have that digital fuzzy graininess for ages! Now I know it’s a too high ISO. I’d been using the ISO to alter the lighting more than I should. Thanks for all the tips!
Ahhhh, Laurel! So happy to help. Instead of setting your ISO too high, try keeping it around 400 or 640 (or even 800 if you need to), but instead, allow for a longer shutter speed. And use a tripod if it’s going to be longer than 1/30th of a second. ;)
This is so helpful! ISO is the thing that stumps me too. I’m actually gonna be wandering around a wedding reception shooting photos in 11 days, and was freaking out a bit wondering what settings to use. (It’ll be outdoors, late afternoon.) I’ll definitely bump up my ISO! I usually shoot on aperture priority. Is there anything else you’d suggest? There are gonna be a lot of kids under the age of 6 running around at this thing!
Can your camera handle a higher ISO? Some cameras are great with this, others not as much. If you have a camera from the last 3-4 years (no later!), then you’re probably okay. That said, try ISO 800 during the golden hour with aperture priority around f/4 (or go to 2.8 if you need a little more light), assuming you can keep your shutter around 1/100 (bc of the kids)! If you need more of a boost, bump the ISO up to 1000 or 1200. It’s almost better to have a little bit of digital noise, rather than photos that are slightly blurry.
Thank you, thank you! Taking notes! My camera is actually pretty old– it’s a Nikon D80. It does get grainy at high ISOs, but I think you’re right that clarity is more important than noise. I’ll take some test shots tomorrow afternoon & see if I can find my camera’s sweet spot.
I used to have the D80 before I upgraded to the D800 several years ago! The D80 is a great camera. I would never go above ISO 800 on that model, because that’s when I started to notice digital noise.
These tips are gold! Totally bookmarking this post!
Paige
http://thehappyflammily.com
WOW!! This is so helpful,now I got to know that why my photos are always dark. Thanks for the amazing lessons.
I actually want to get my camera out and try these tips. You made it sound all so easy! I still don’t get the fundamental basic of ISO, but I’ll get there…
I love hearing this!! I’m happy to answer ANY questions as you practice!
You are the BEST! Thank you so much for putting this together, and so quickly after the last one! Thank you, thank you!
We love knowing that you’re enjoying it!
This post is wonderful, thank you SO MUCH! I haven’t used my DSLR camera in years, but this post makes me want to find it and try it again. Can’t wait to try family photos for Christmas cards with your tips!
Yay! You got this!
I wanted pin this post, but It was imposible… Never found the pin button…
You can using the bookmarklet on your browser!