

My girl, Kalli, continues to inspire us with her creative vision. I’ve shared parts of her sunny LA home with you in the past and the (literal) pinboard she gifted us over the holidays – and together, we’ve shared our snaps while skipping around southern California this past winter. So when I saw her latest art installation, I couldn’t wait to share that, too. Here’s what she had to say:
Recent roommate reshuffling led to a serious lack of furniture and decor, so the apartment looked like a blank slate in need of a few statement pieces to snazz it up. I don’t have much disposable income right now, and my roommates are both new to LA (owning only what could fit in their cars) so I wanted to make something in the living room that spoke for itself (ha), and would be inexpensive and quick to build.
")
New roommate Blake lived in Hawaii for a while, so instead of spelling “HELLO” like I originally planned, he suggested “ALOHA” and I went with it.

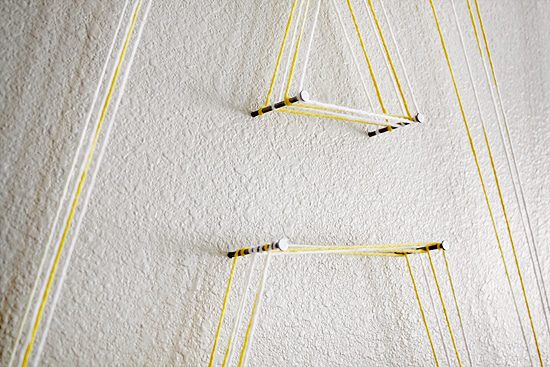
For letters 2 feet tall, I chose a yarn color that was kind of subtle, so it would be more of a textural/3D piece, rather than letters so colorful they look like they’re yelling at you. Variegated-color yarn made the effect softer than a solid color.

I roughly taped up the letters (with blue painters’ tape) and worked on adjusting and straightening everything as best as I possibly could. To eyeball this, I kept stepping back as far as possible from the wall to get the larger picture. Straight lines are easy with tape, but the “O” was a headache.
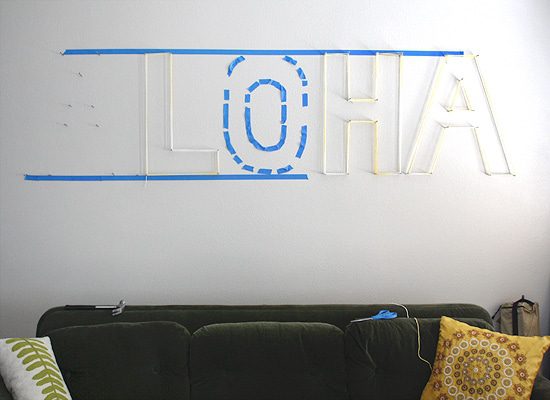
With round shapes, the more nails (and points along a curve), the better, so buy more nails than you think you’ll need! This took about sixty-four 2.5 inch nails, which I bought from a bulk bin at my local hardware store.
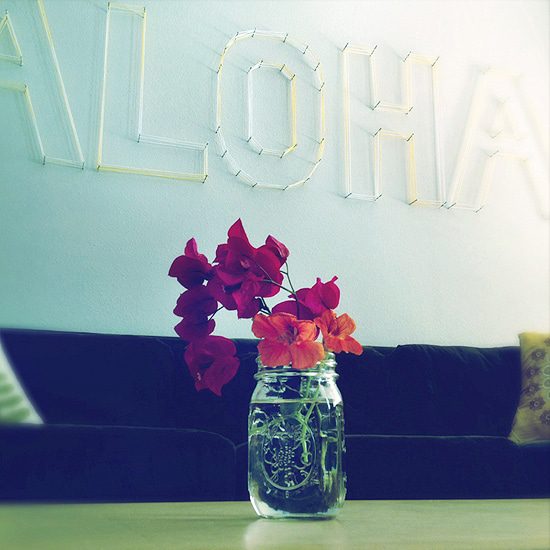
 It looks different throughout the day as the sunlight shifts and hits the strings at different angles. This project only cost about $9 – including a roll of tape. Now we just need a new lamp and a chair in there! I may also paint or photograph some waves for the adjacent wall since we live 12 miles from the Pacific, for a slight surfer vibe.
")
See? Creative genius. She also suggested initials in the master bedroom (above the headboard, perhaps?) or the name of a kiddo in their bedroom as a fun spin on this project. And weI’ll certainly be keeping an eye as her home evolves with new roommates and merging styles; we can’t wait to see what else she does.
Thank you, Kalli!


omg i love this. i love how subtle it is when the sun is hitting it while still being a big statement piece. this is fantastic!
This is really amazing. I might have to steal the idea for our Braid logo in our office!
This is very cool. I really like it.
Kathleen, you must do it!
That’s rad. LOVE IT! Aloha was definitely the way to go.
Love this idea! What about the loose ends??
Jessika, great question! I suppose your loose end could be tied and cut as close as possible to the nail. Perhaps a spritz of hairspray can keep it from fuzzing? Hopefully Kalli can let us know just how she tied them up!
Jessika- Once I had wrapped the yarn around each letter roughly four times, I just double-knotted the yarn around a nail and cut it off about 1/4 inch from the nail. The ends are essentially invisible (especially using a light colored yarn). As insurance, you could use a dab of clear-drying glue, like Elmer’s or hot glue, on each knot.
[…] a very simple decor idea can make a huge impact on room. Take this example from Yellow Brick Home: with just nails and yarn, Kalli was able to create an elegant and inexpensive piece of wall art. […]
I think this is quite a nifty idea! I can think of a million and one ways to customize this idea for gifts and decor. Out of curiosity, does the color of the nails add to the art? Do you think painting the nails a matching or complimentary color would change the way it looks drastically?
Hey Tina, I bet painting the nails would completely change the look and feel of the yarn art. Especially if it was a high contrast to the yarn you choose. You could even choose nails with a larger head to emphasize the color. Good thinking!
Oh my goodness, I MUST copy this for my living room!! Thank you for such a simple, yet amazing, idea.