

This post is in partnership with Troy-Bilt as a part of their Flip the Yard challenge. We’ll be taking you on a tour of the space during an Instagram live tonight at around 7pm EST @yellowbrickhome. You can ask questions on our most recent Instagram post, or leave a comment below, and we’ll address as many as possible this evening. See you then!
If it feels like the backyard at Tree House has been through so many rounds of revisions in the last year, it’s because it has! It started off innocently enough, but after pulling the plug on our 8 giant, overgrown yews, several arborists let us know that our even more giant maple tree was full of rot. And because that tree was precariously dangling over the roof of our little home, we made the difficult decision to have it removed. Luckily, we were able to make a big batch of lemonade from those lemons!
At some point during that initial wave of landscape removal, we had a new fence installed to replace the former that had begun to fall in on itself. The yard was (and still kind of is) a muddy mess, but we’ve been overseeding here and there, and much to our pleasant surprise, a fair amount of new growth continues to sprout. Hooray!
That brings us to this past weekend. We teamed up with Troy-Bilt to Flip the Yard once and for all, and what better way to kick off the fall season? We had 3 days to whip our outdoor area into shape using their tools, and we called in the help of our take-charge friends Daniel and Meghan (you may remember them from our demolition vlog!; love them so much). After peeling back the chaos of the yard we initially inherited, our idea was to keep the yard feeling calm and tidy by incorporating clean-lined arborvitaes, muted colors and a black backdrop. But first, let’s cheat and dive right into a few before, progress and afters!
In This Post
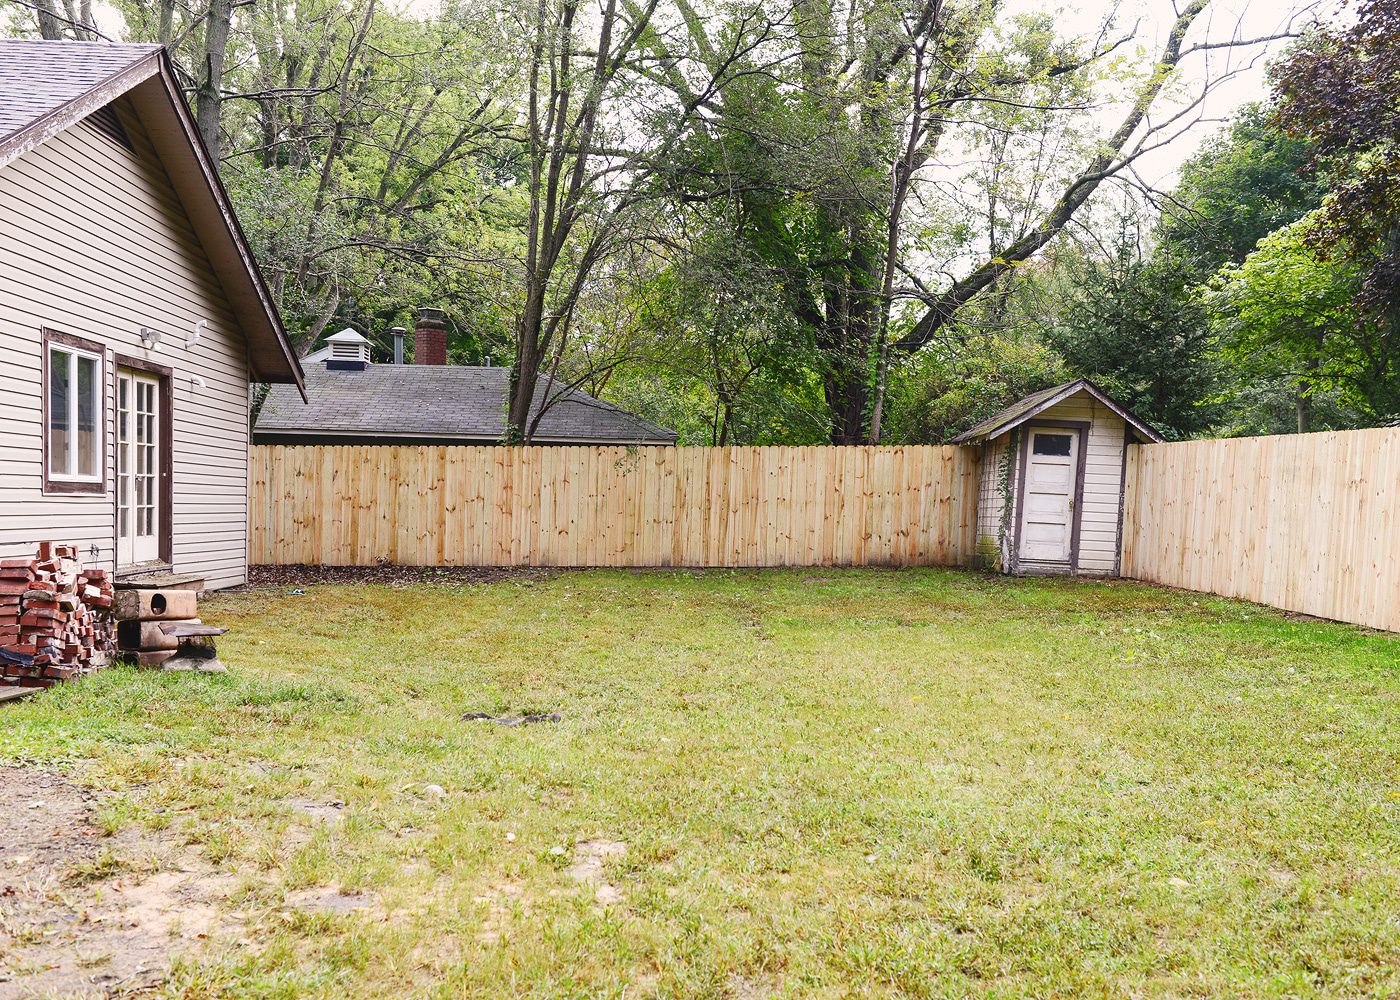
View From House | (Way) Before
View From House | Progress
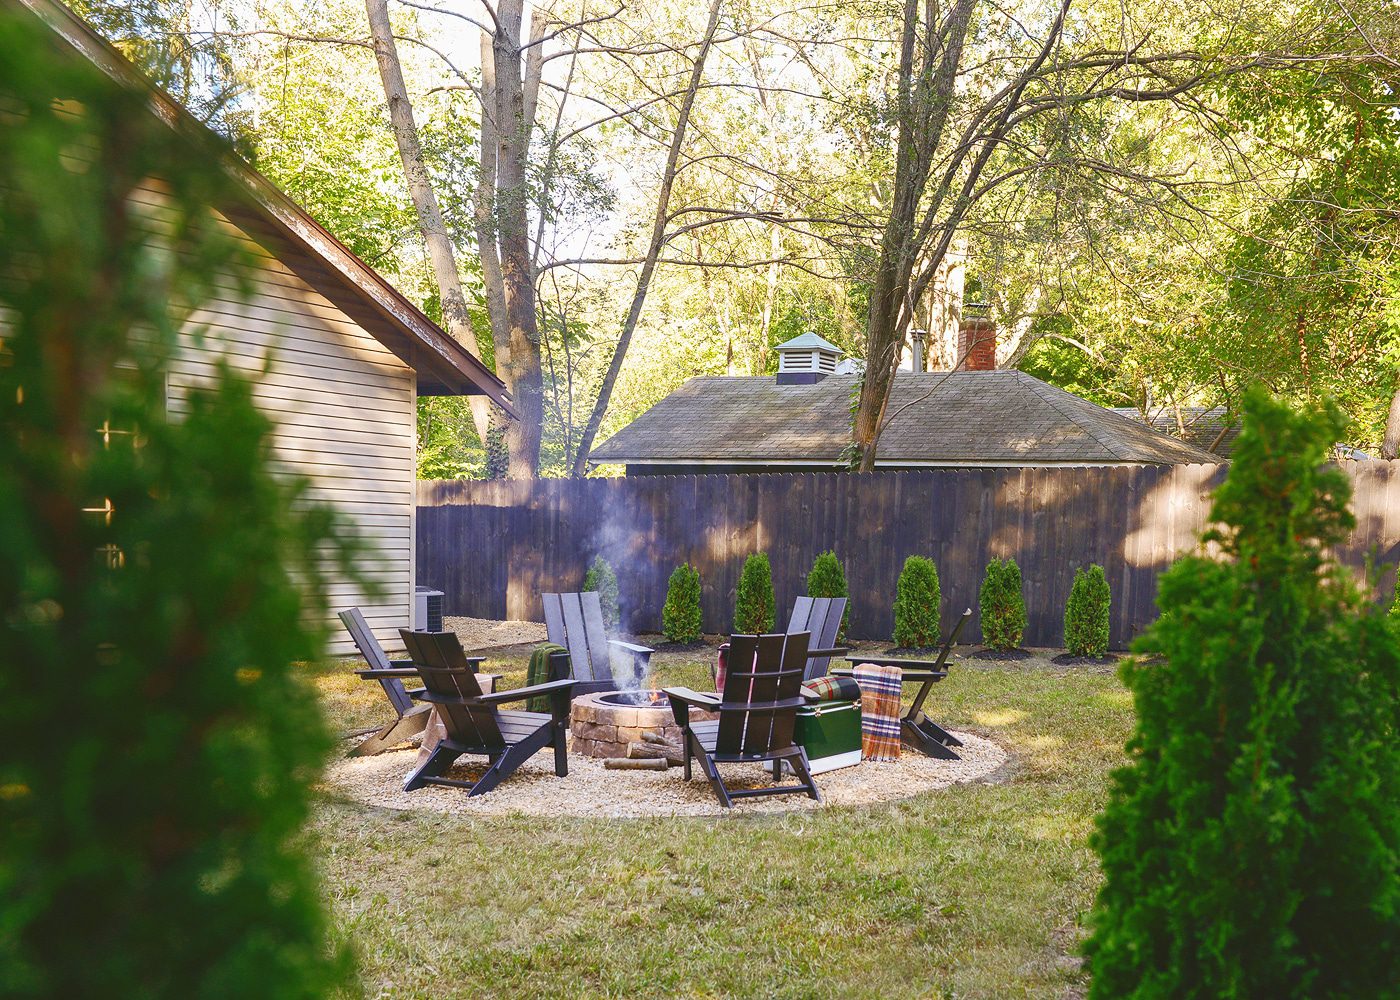
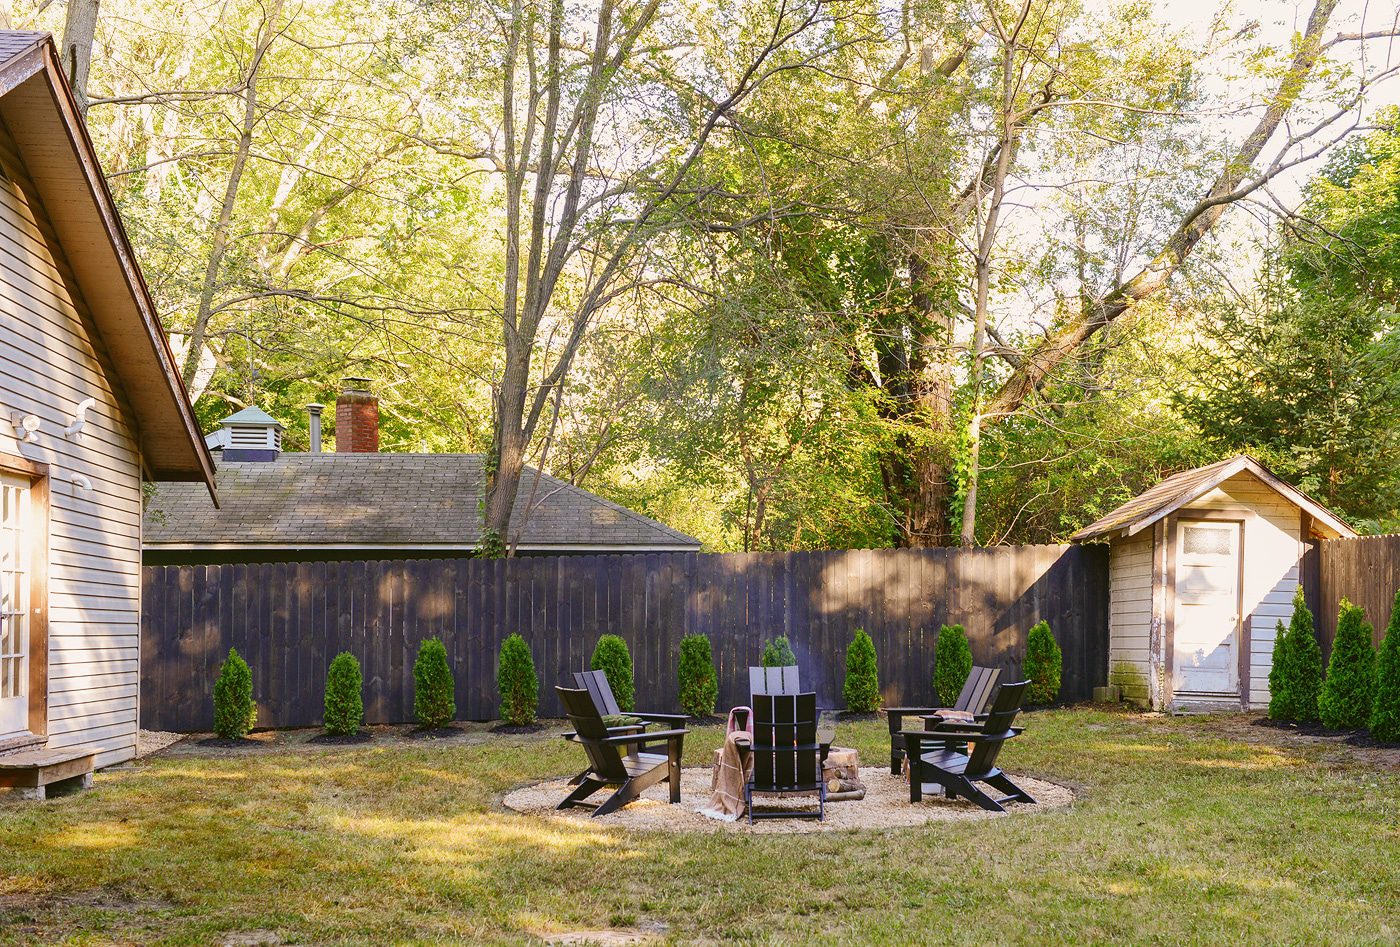
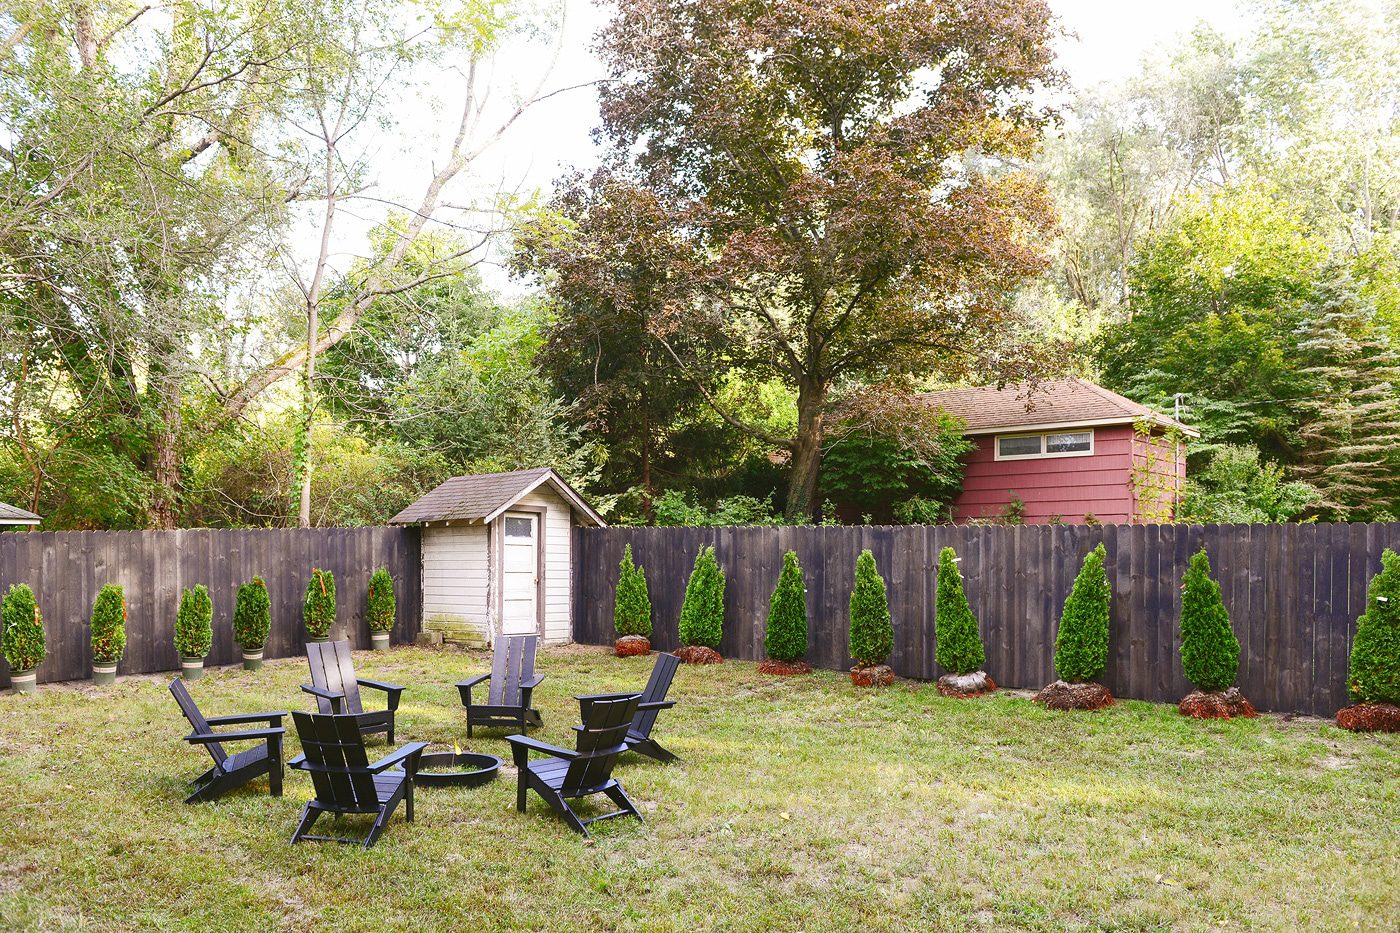
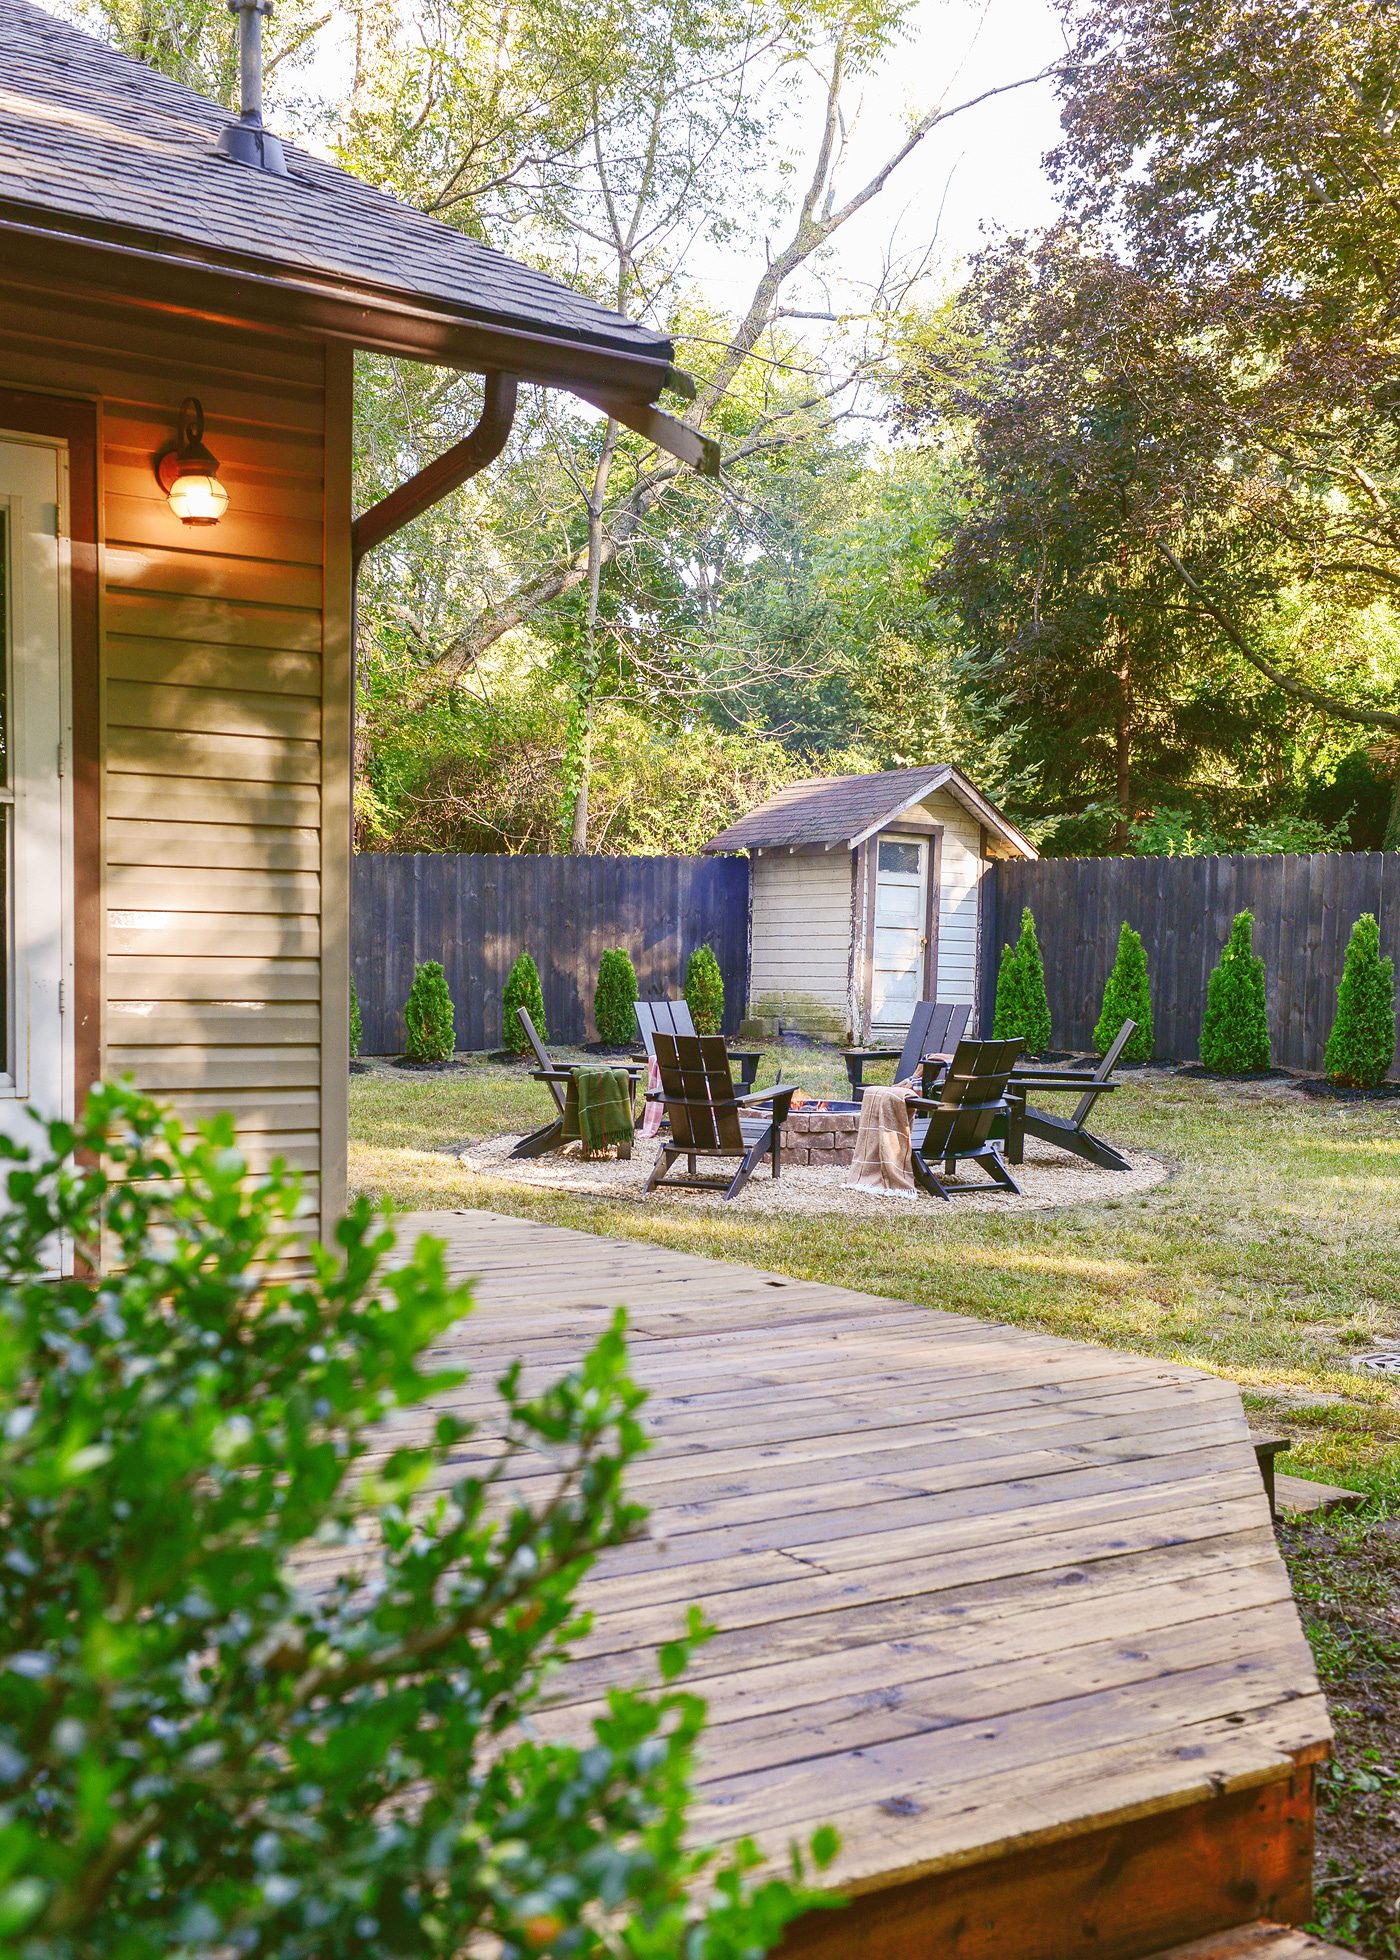
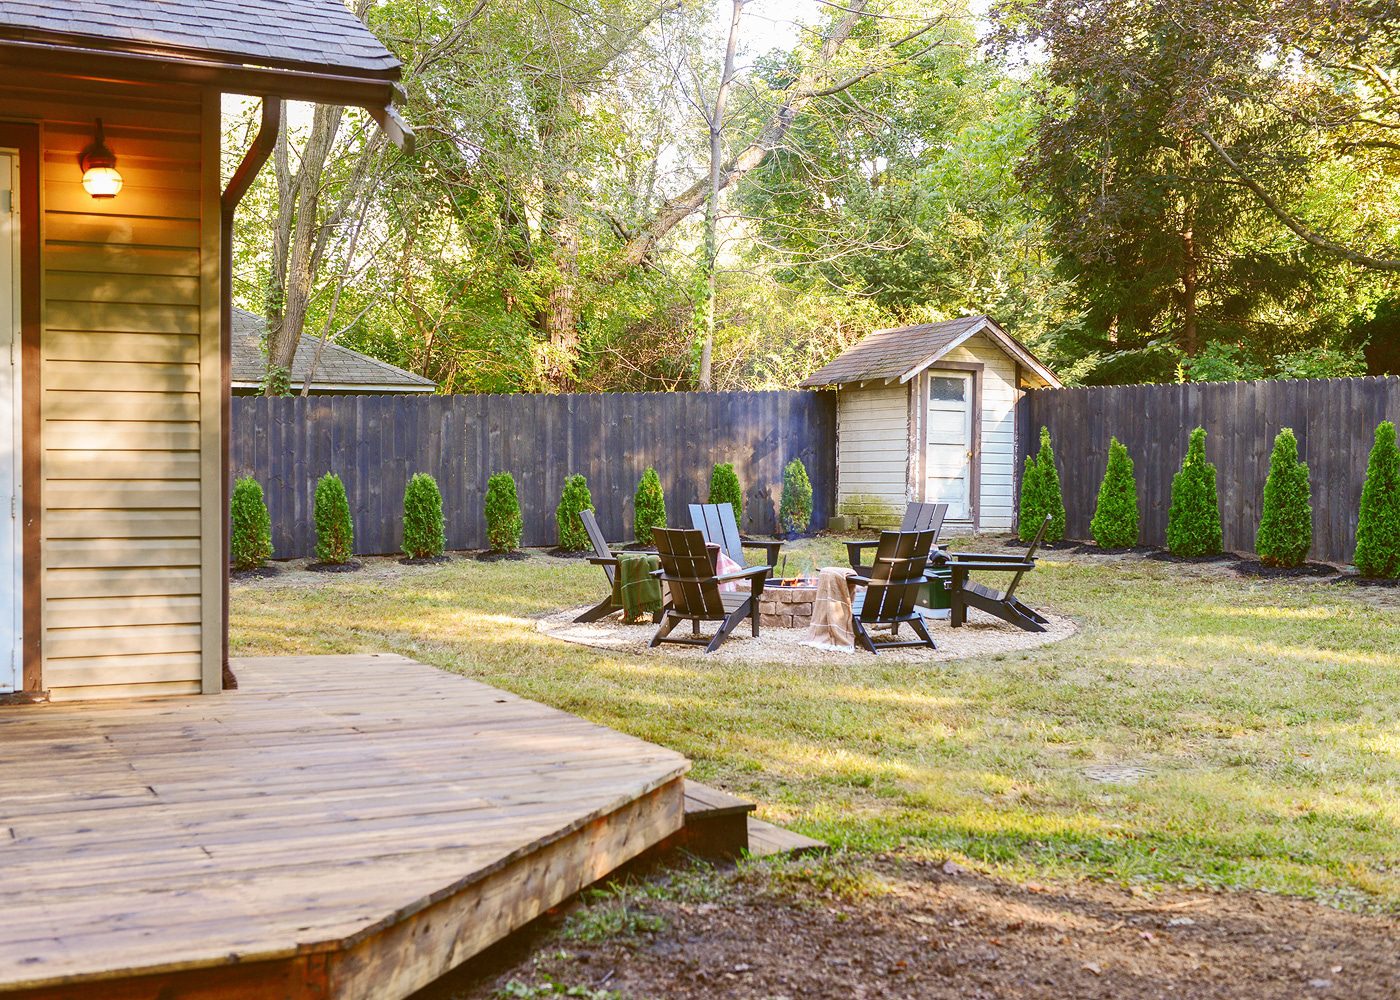
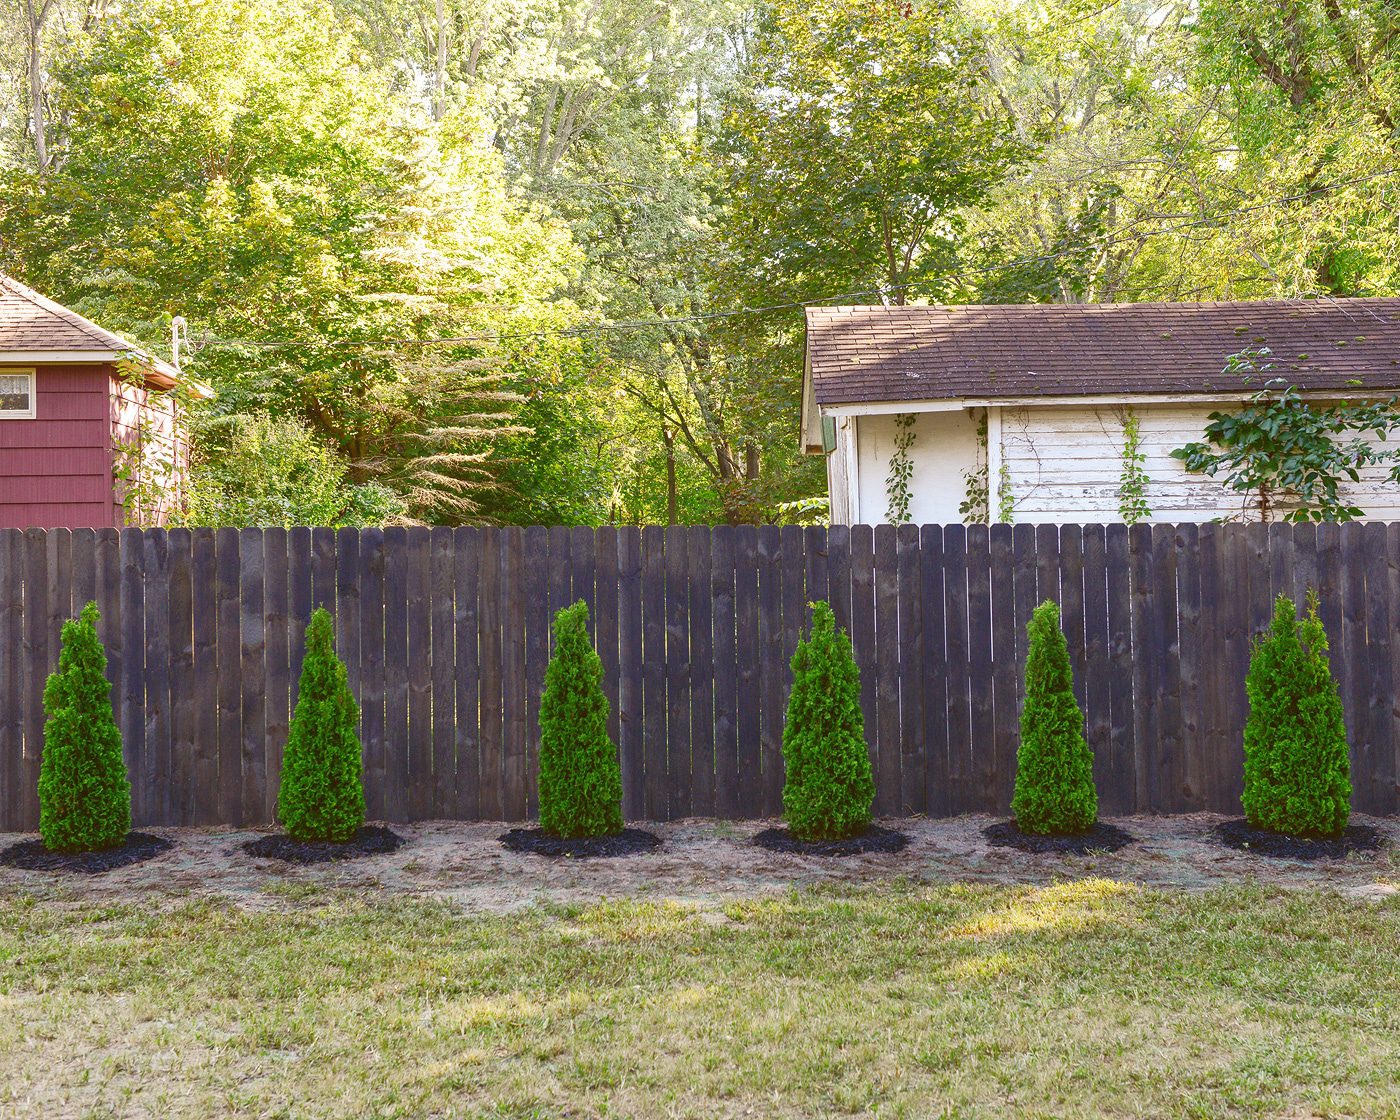
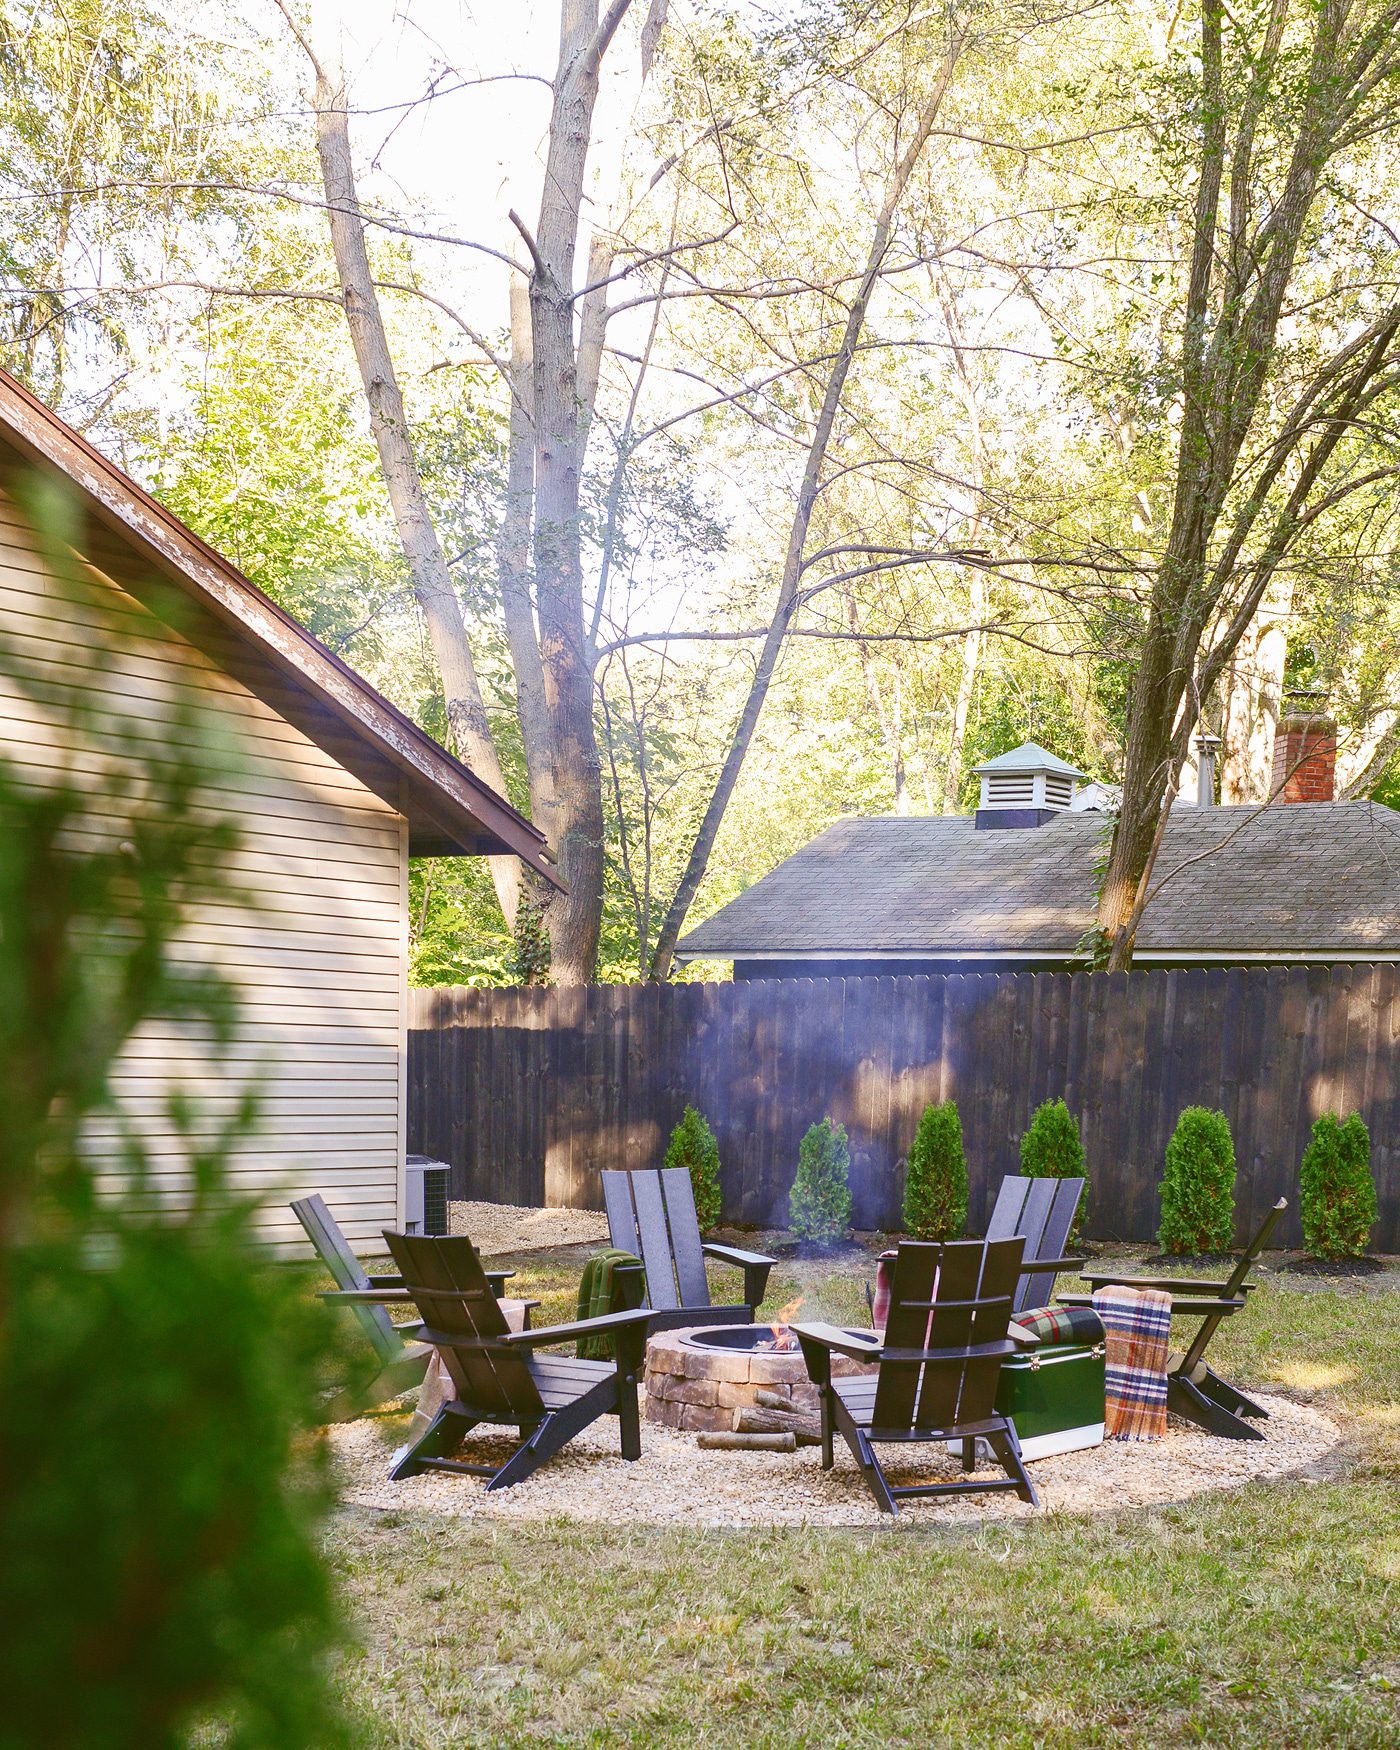
View From House | After

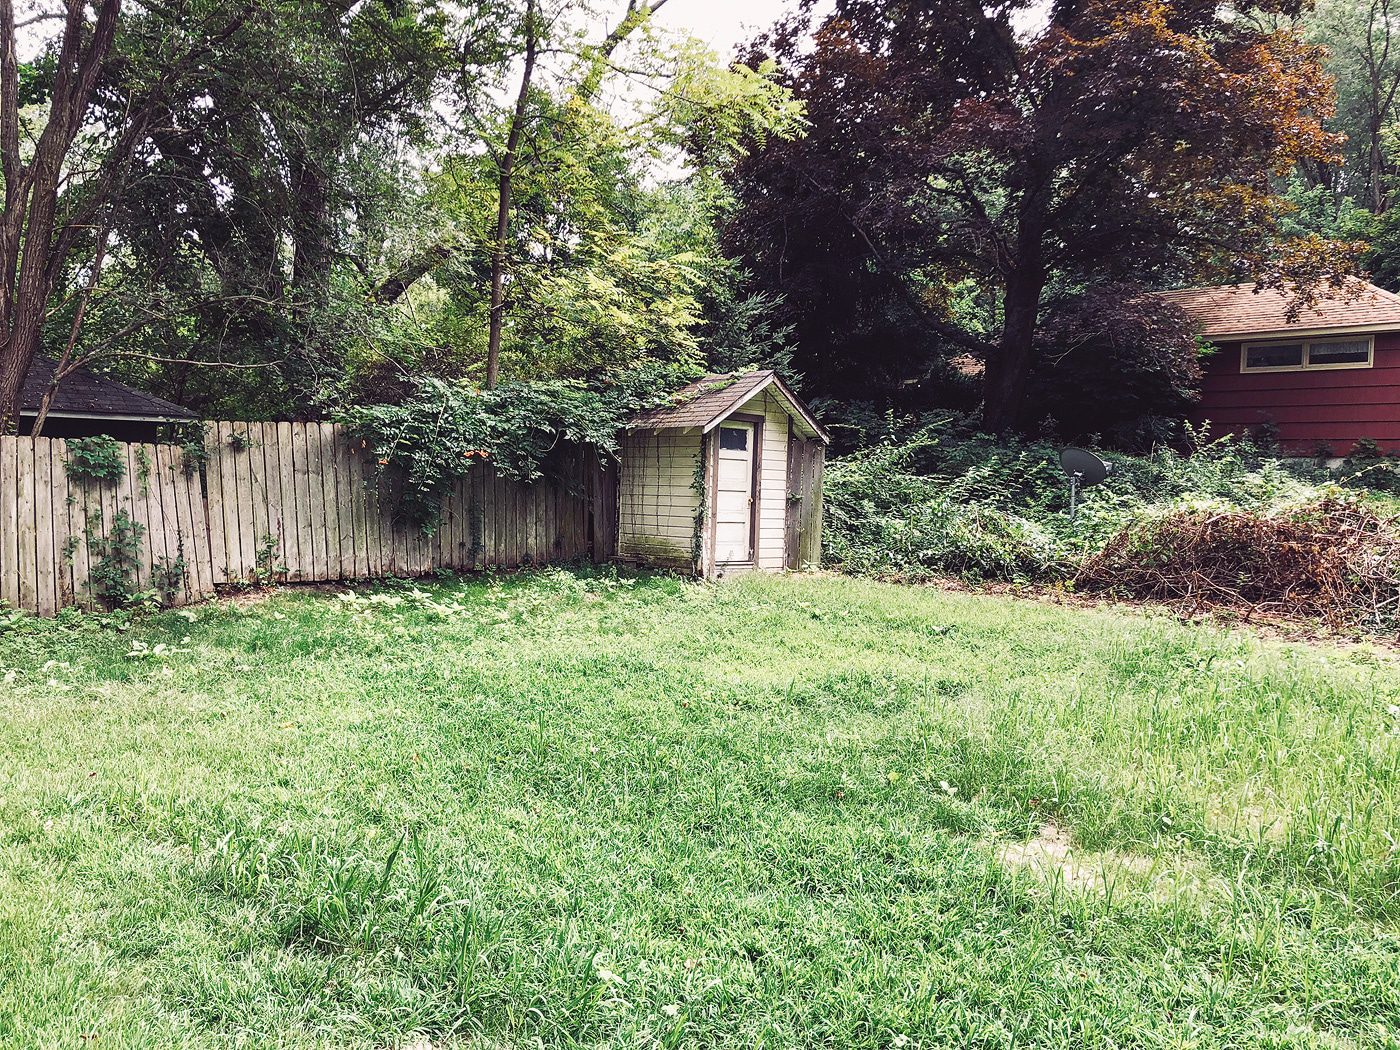
In the first photo below, you can see how our yard looked with those massive yew bushes (trees?), and do you remember that raised garden bed of ferns (there, in the back)? At that time, the yard looked much smaller than it actually is.
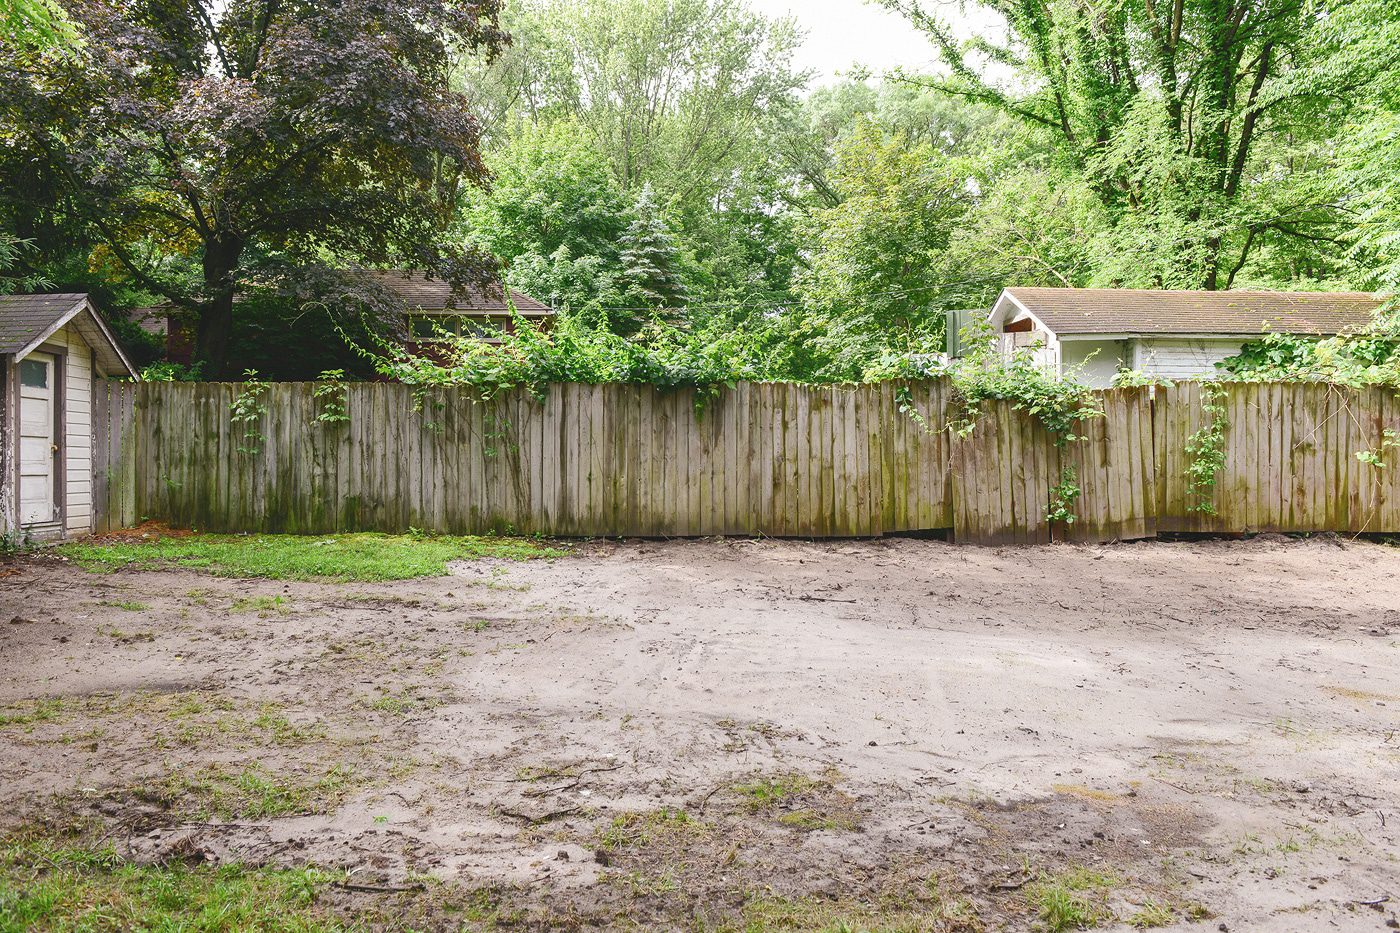
View From Shed | (Way) Before
View From Shed | Progress
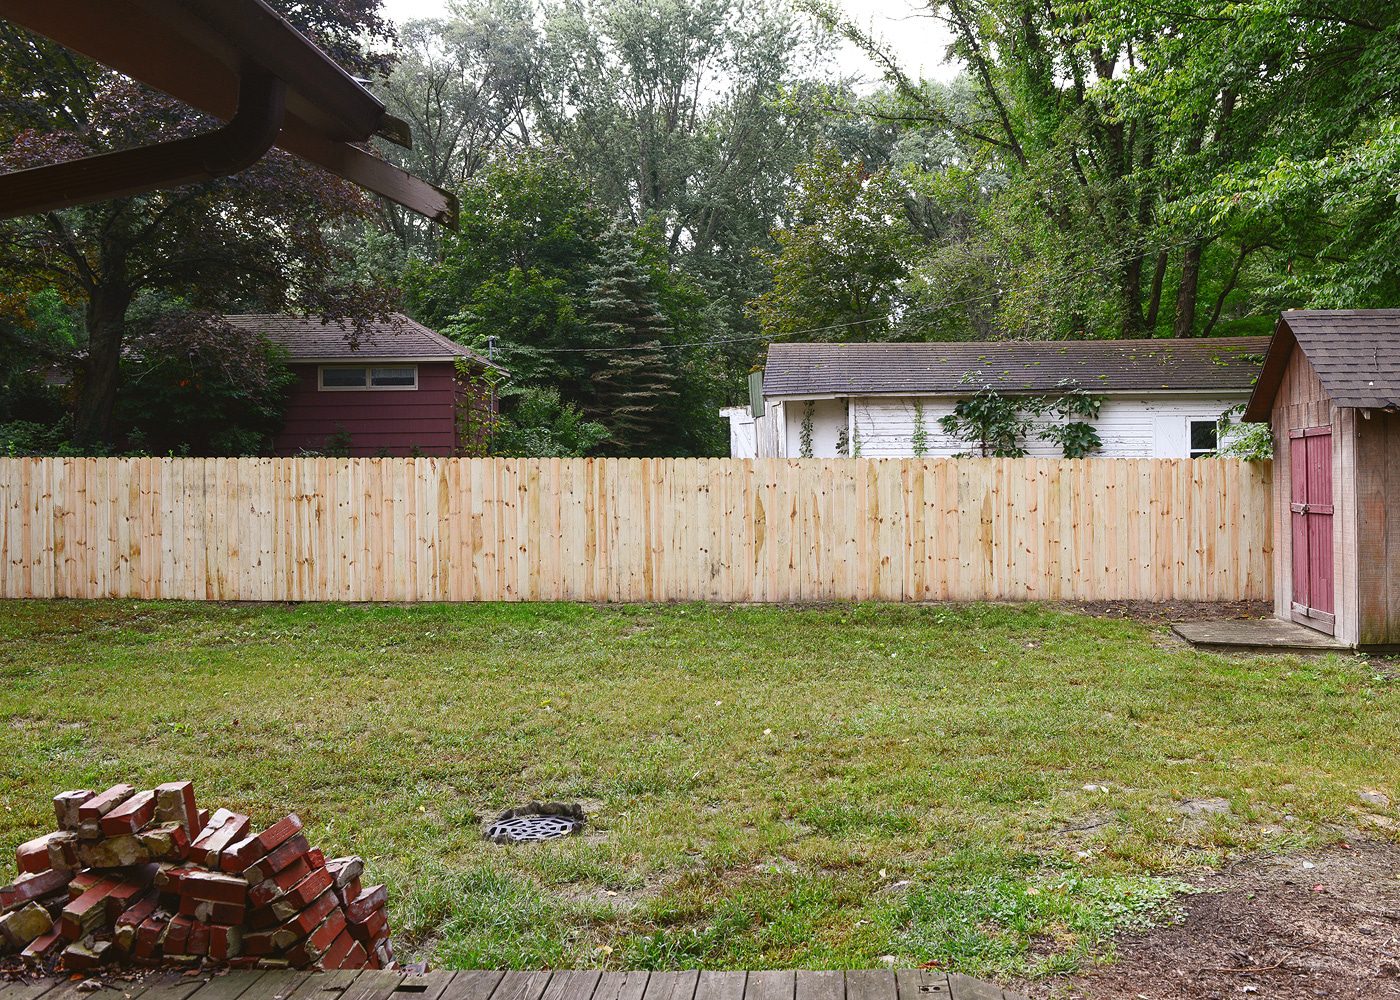
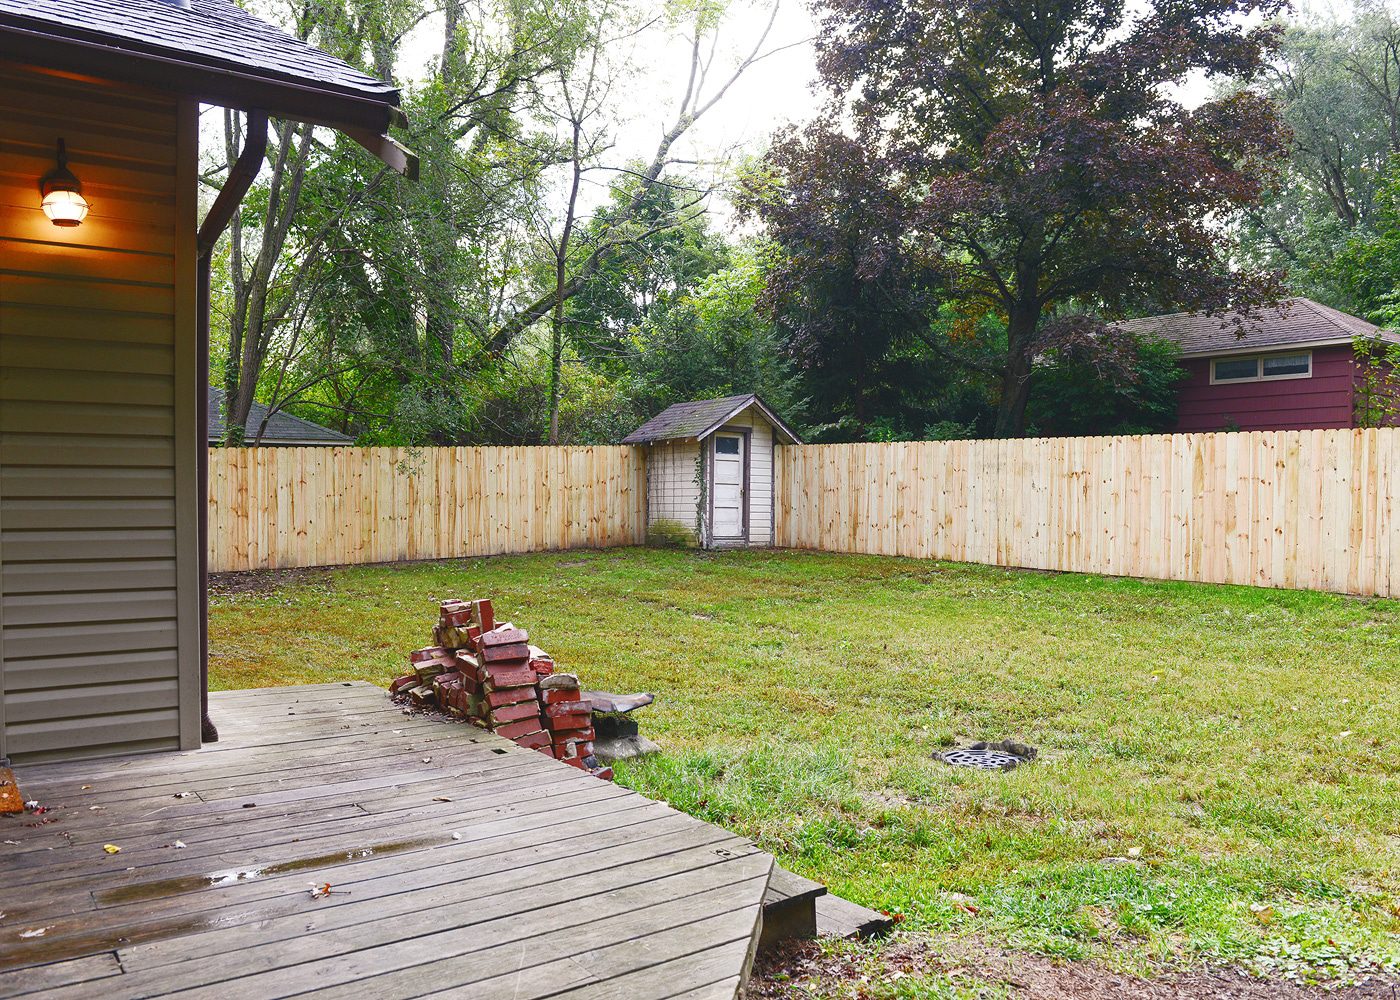
View From Shed | After
Over the course of the 3 days, we shared our progress on Instagram Stories, and we saved those to our highlights, if you’d like to see! So many times we were asked, you did all of this in 3 days?, and while we can say that we did, it wouldn’t have been close to possible without the help of our Troy-Bilt tools! We used a combination of these battery and gas powered tools (no cords!):
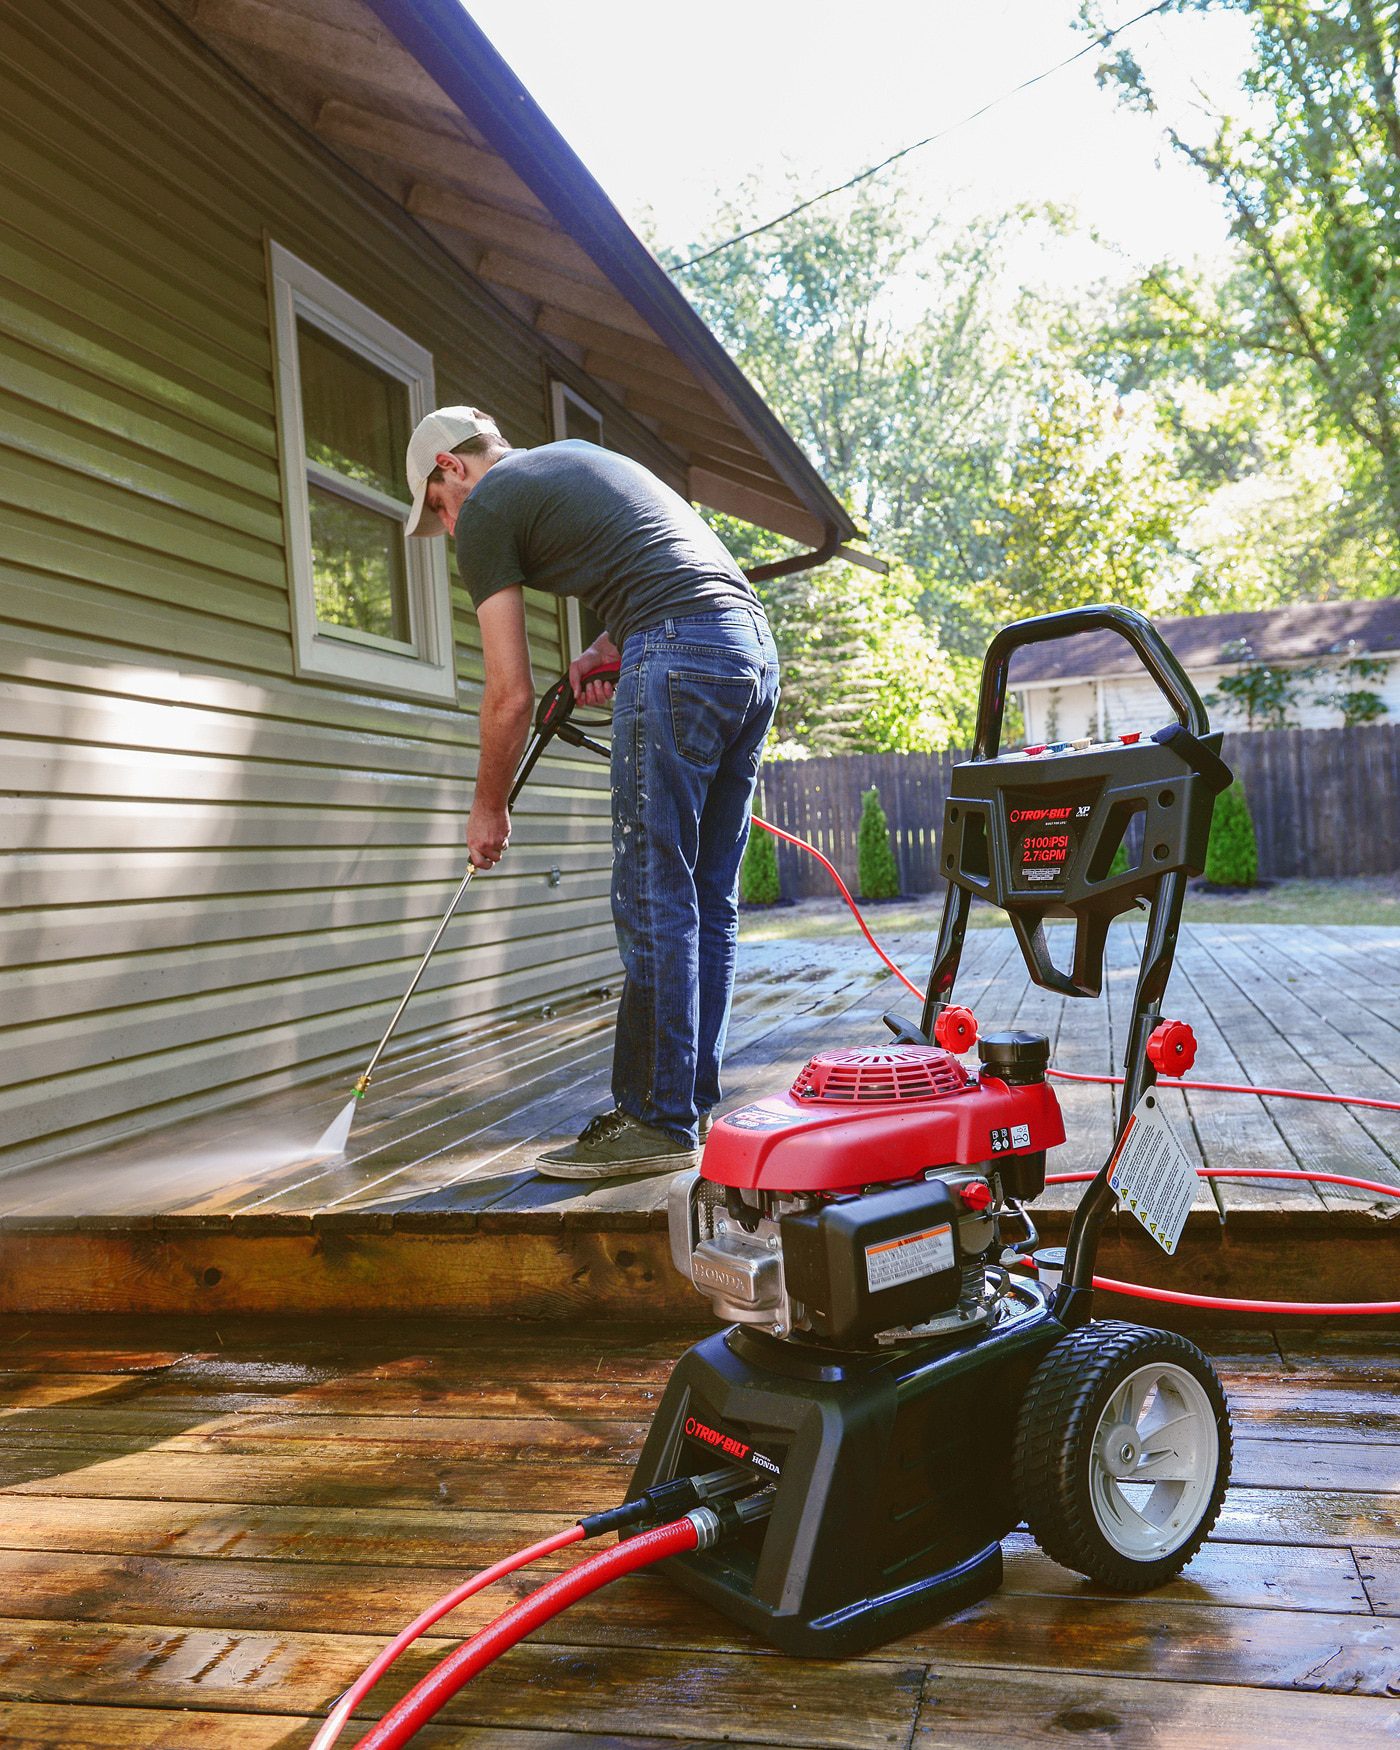
Self-Propelled Mower • String Trimmer • Handheld Blower • Hedge Trimmer • Garden Tiller • Pressure Washer
The four of us (under strict Lucy supervision) worked long hours – at least two 10 hour days and one 6 hour day – but the payoff came back ten-fold. Here’s what our 3 day Flip the Yard makeover looked like!
Day | 1
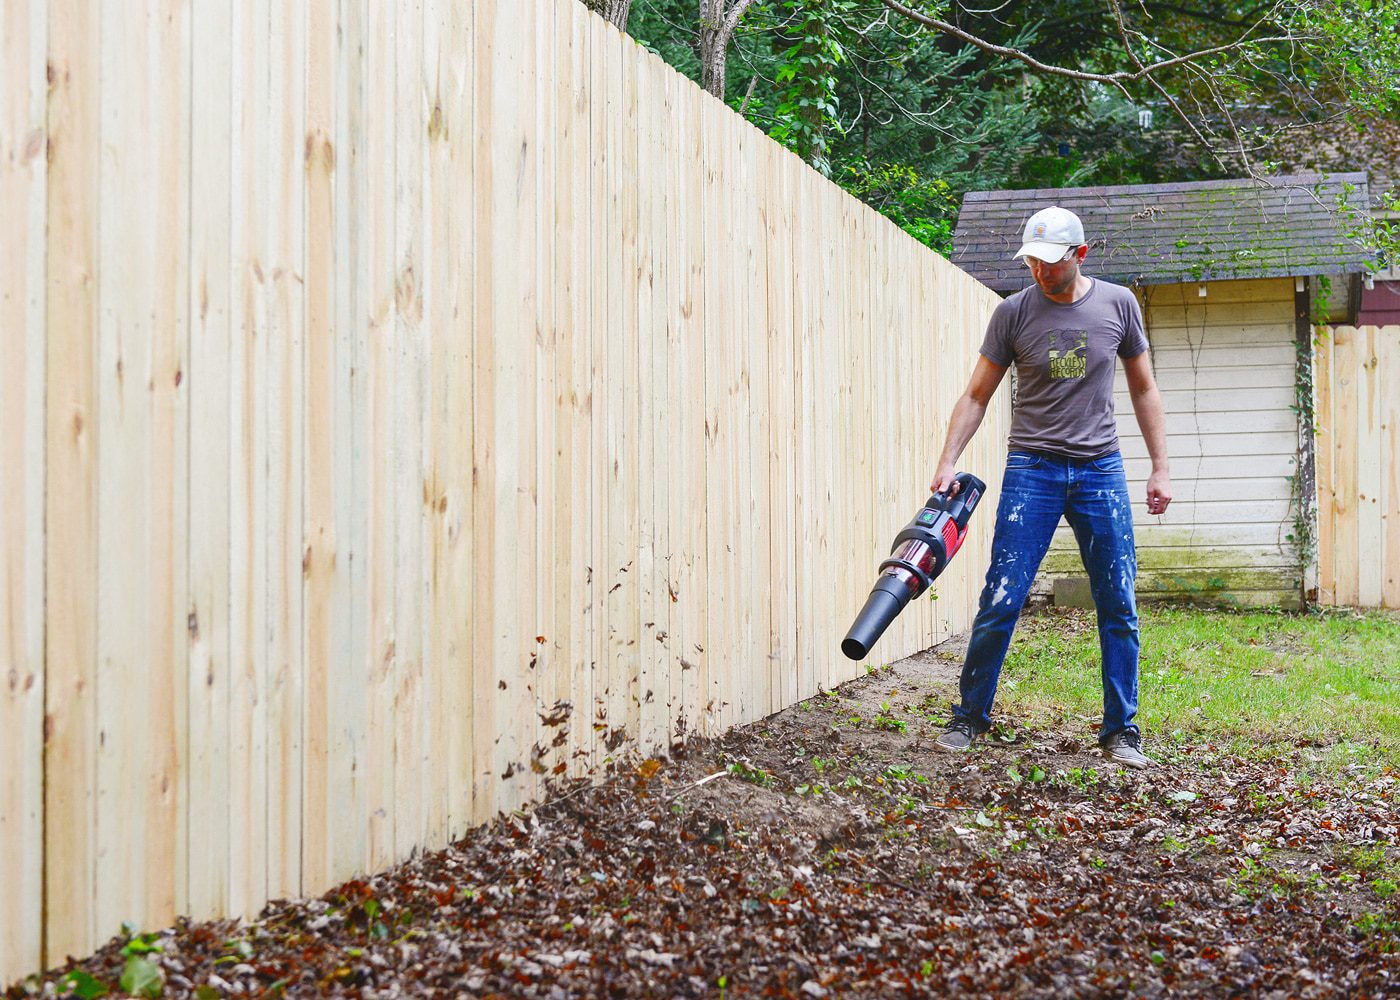
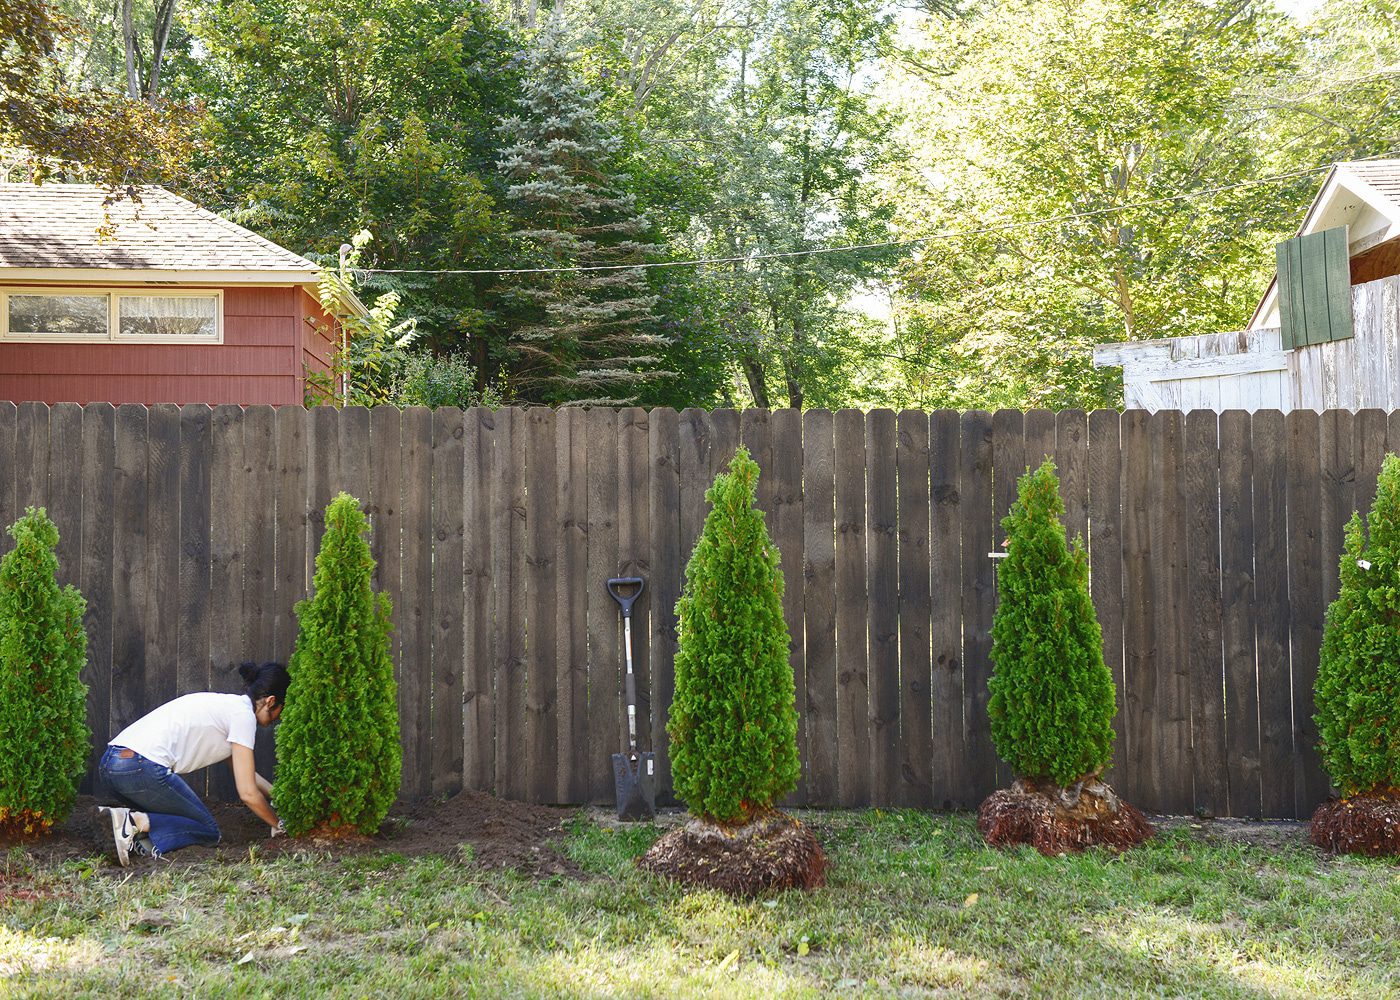
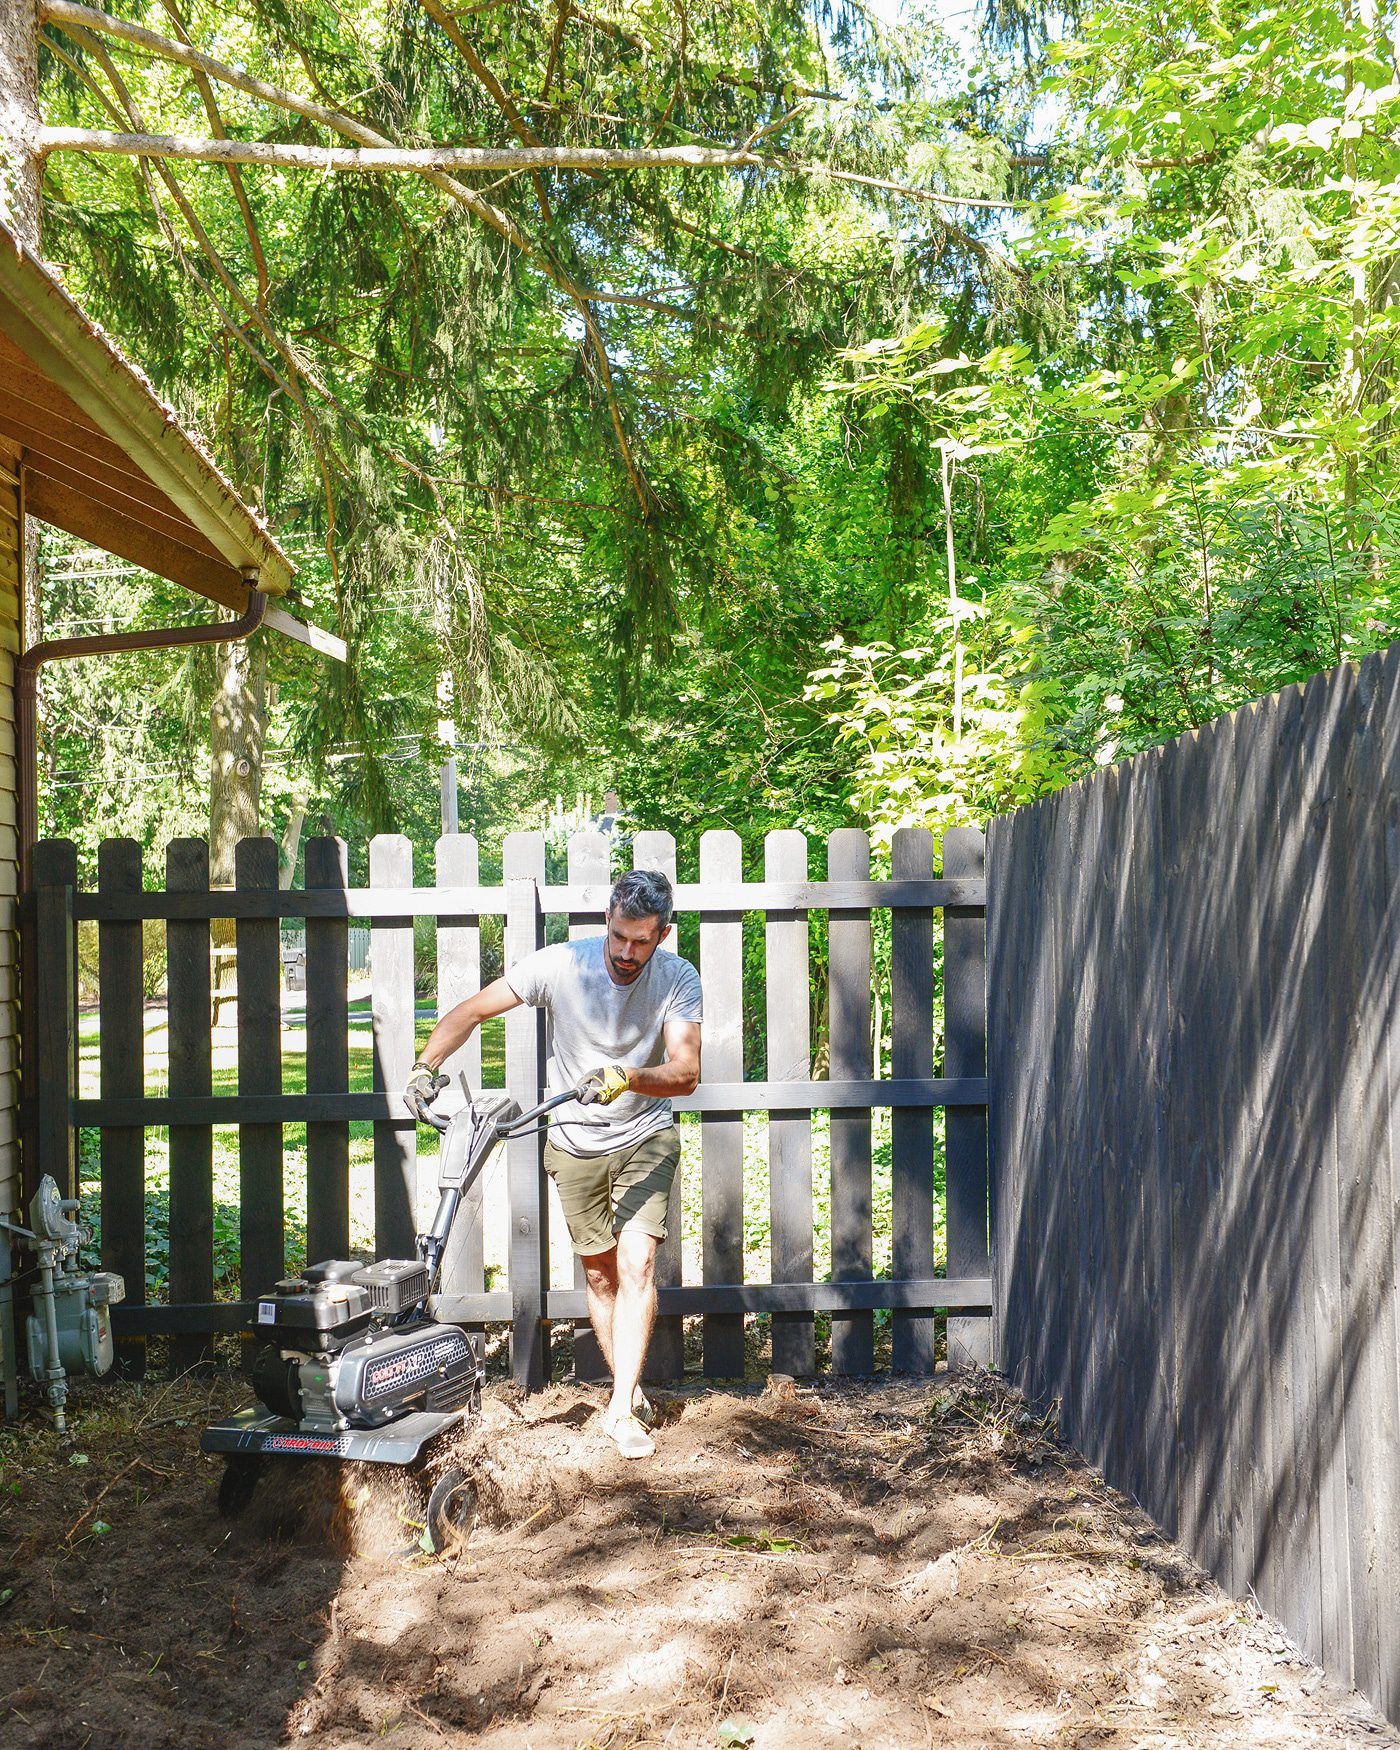
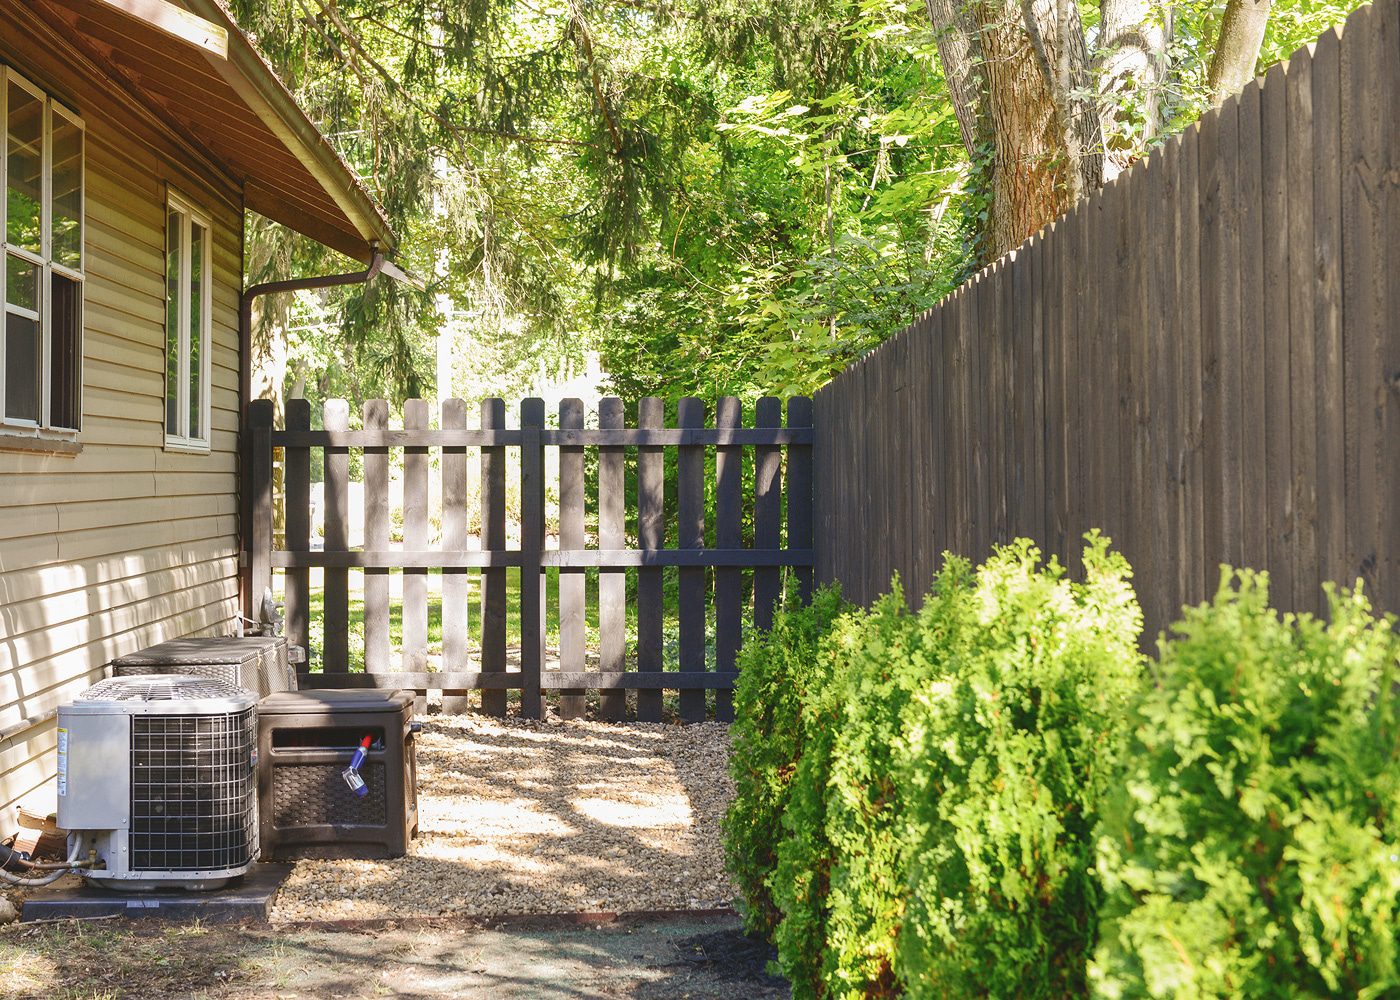
The new line of fence we installed meets up to an existing fence that was in decent shape, but that older fence was overgrown with scrawny bushes, weeds and long grass. We started by using our hedge trimmer to cut down the largest growth, and once they were a manageable size, we shoveled them out at the roots – bye, brambly bushes! Scott followed up along the fence line with our string trimmer, so that we could actually see the fence again!
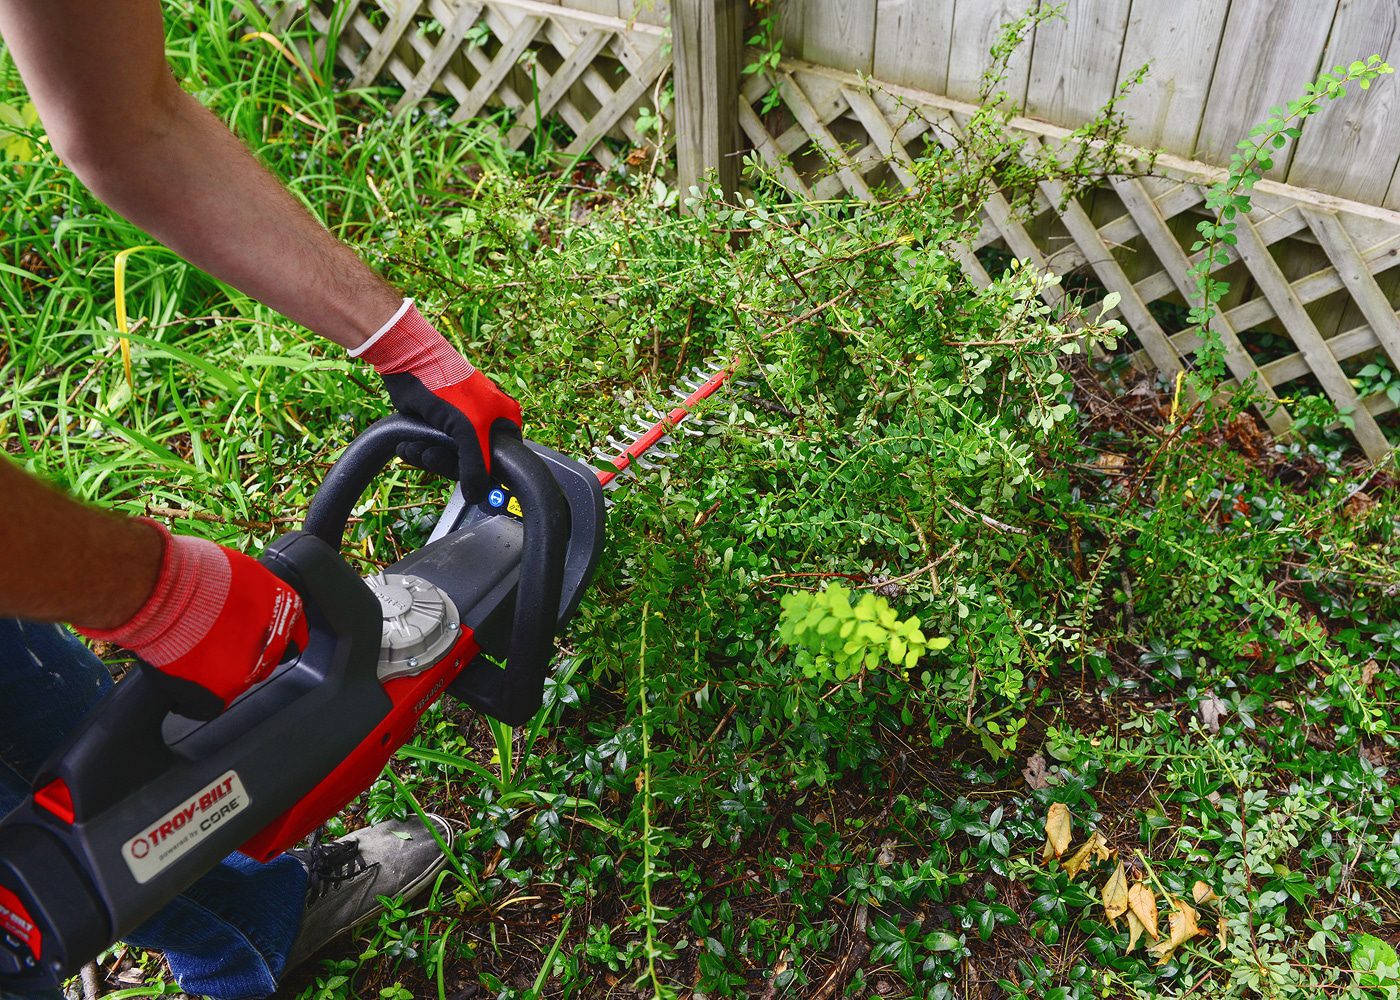
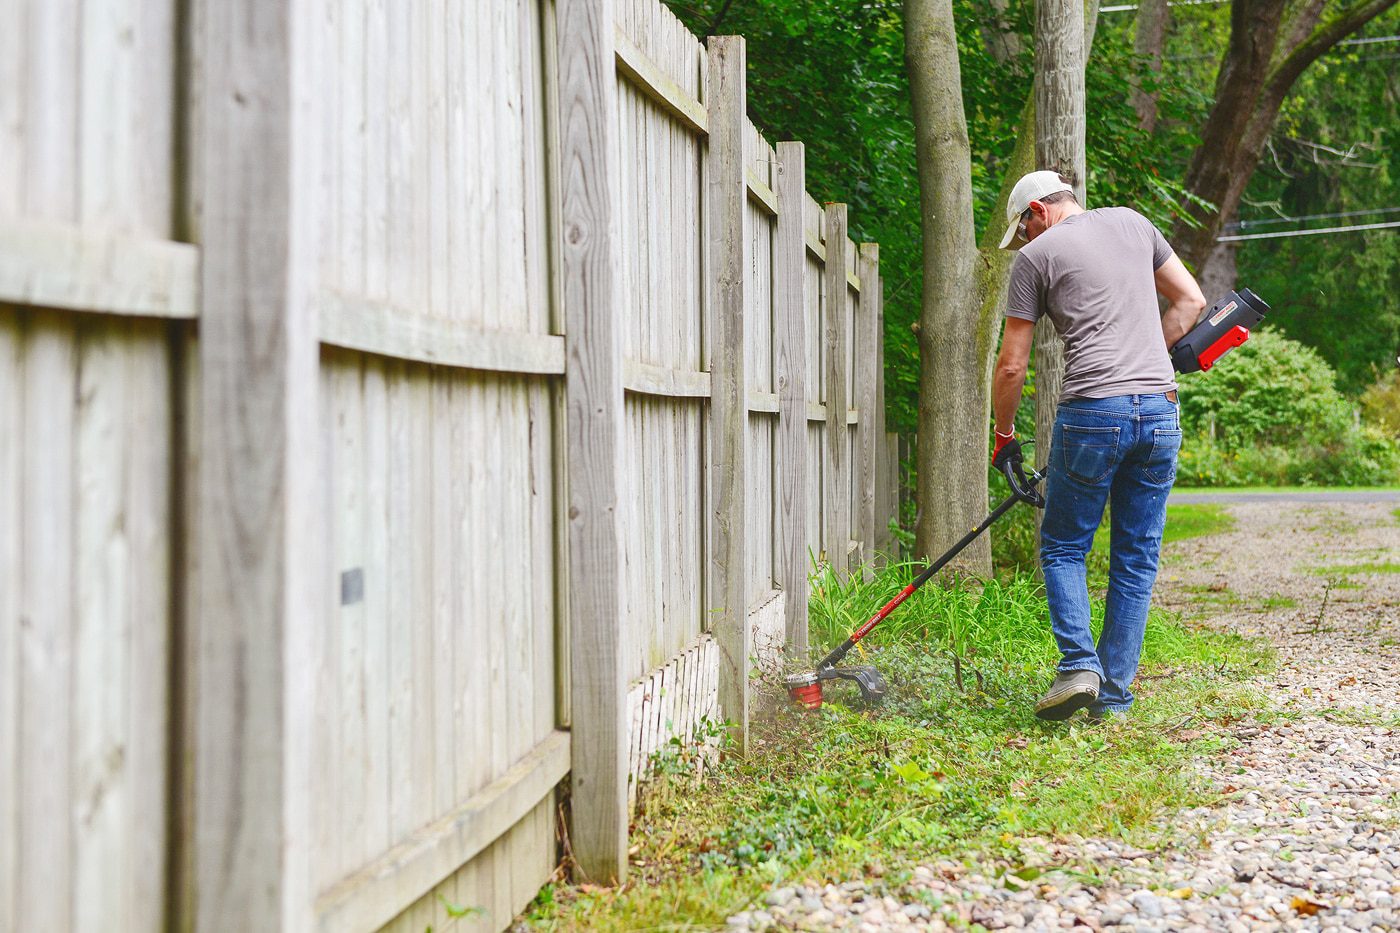
The final step before we could stain the fence (which we’ll be sharing in a later post!) was clearing away the remaining debris around the entire perimeter. It was a painless job – dare I say fun? – with the help of the handheld blower! The blower, string and hedge trimmers are all battery operated from the Troy-Bilt CORE line of products, and, simply put, they are fantastic. They’re as powerful as any gas powered product but quieter, no emissions, and for the size of our yard, there was no need to replace or recharge the batteries! We’ve already gotten into the habit of charging the batteries after each use, and it takes about 45 minutes to come to a full charge.

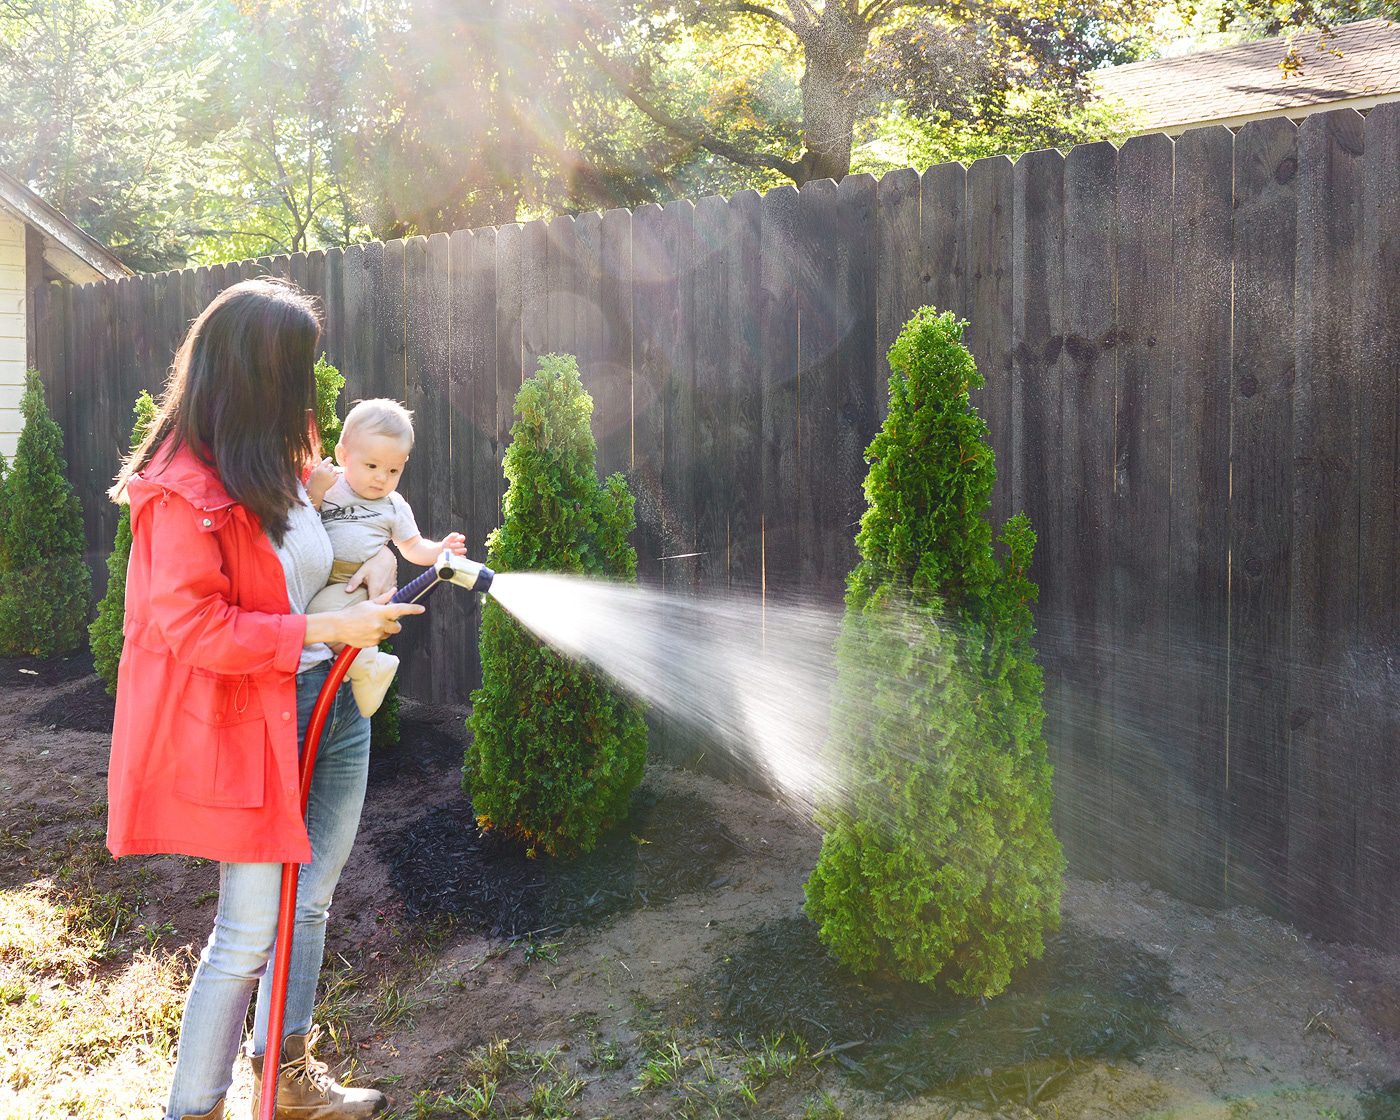
Once the fence was cleaned and stained black, we spent the rest of the day measuring and laying everything out! We landed on pretty Degroot’s Spire Arborvitae, which we were advised to plant 3′ to 5′ apart. Over time, they’ll grow to about 4′-ish wide, and they have the potential to grow up to 20′ tall! They’re on the slimmer side with a neat and tidy shape, which is exactly what we were looking for.

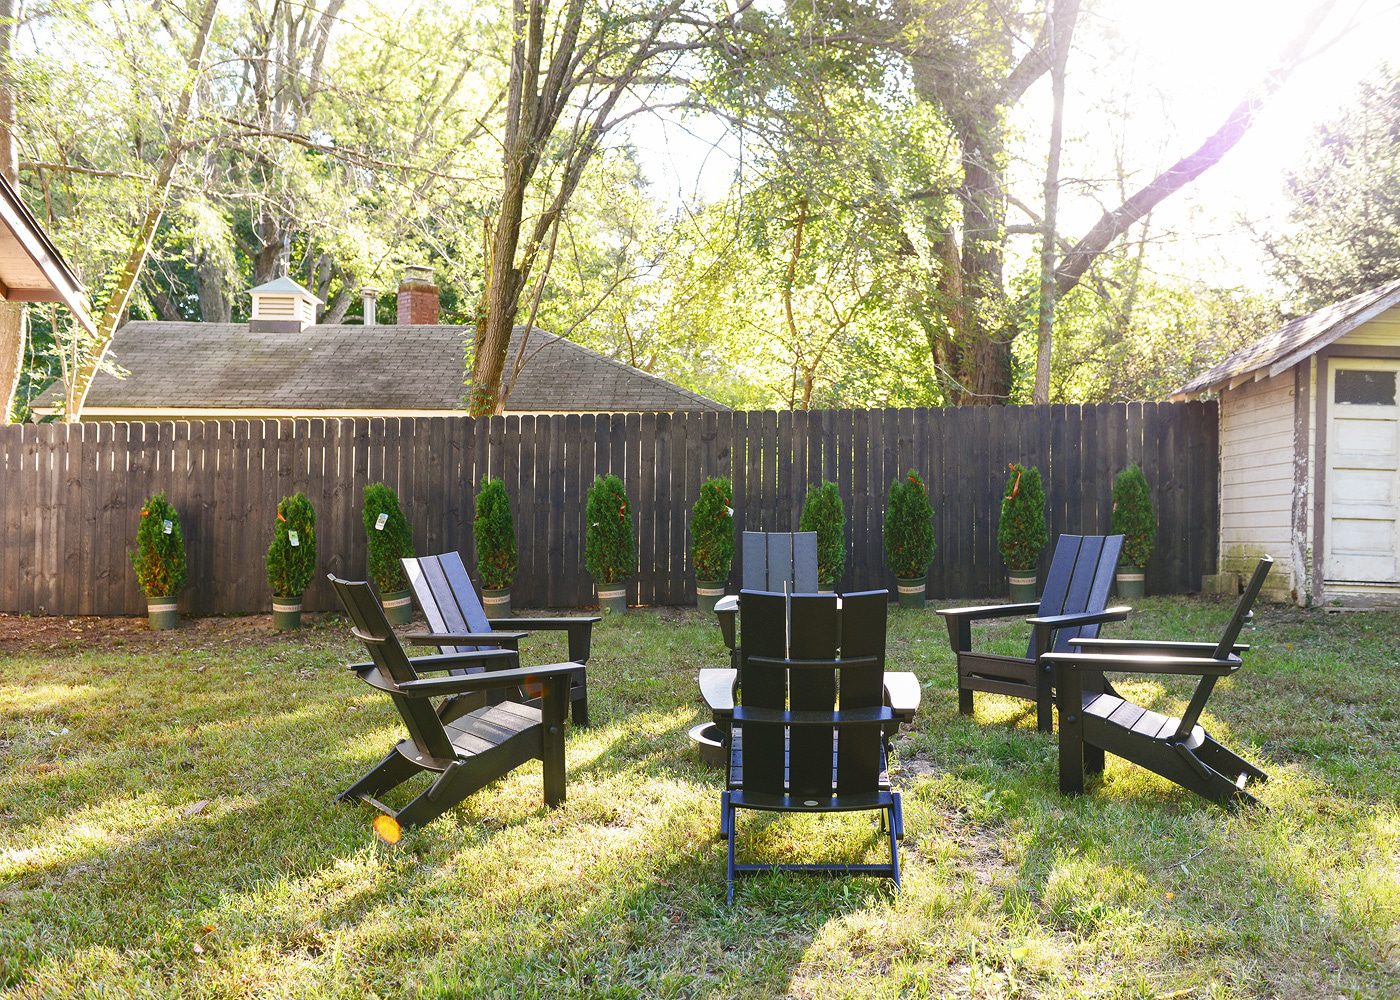
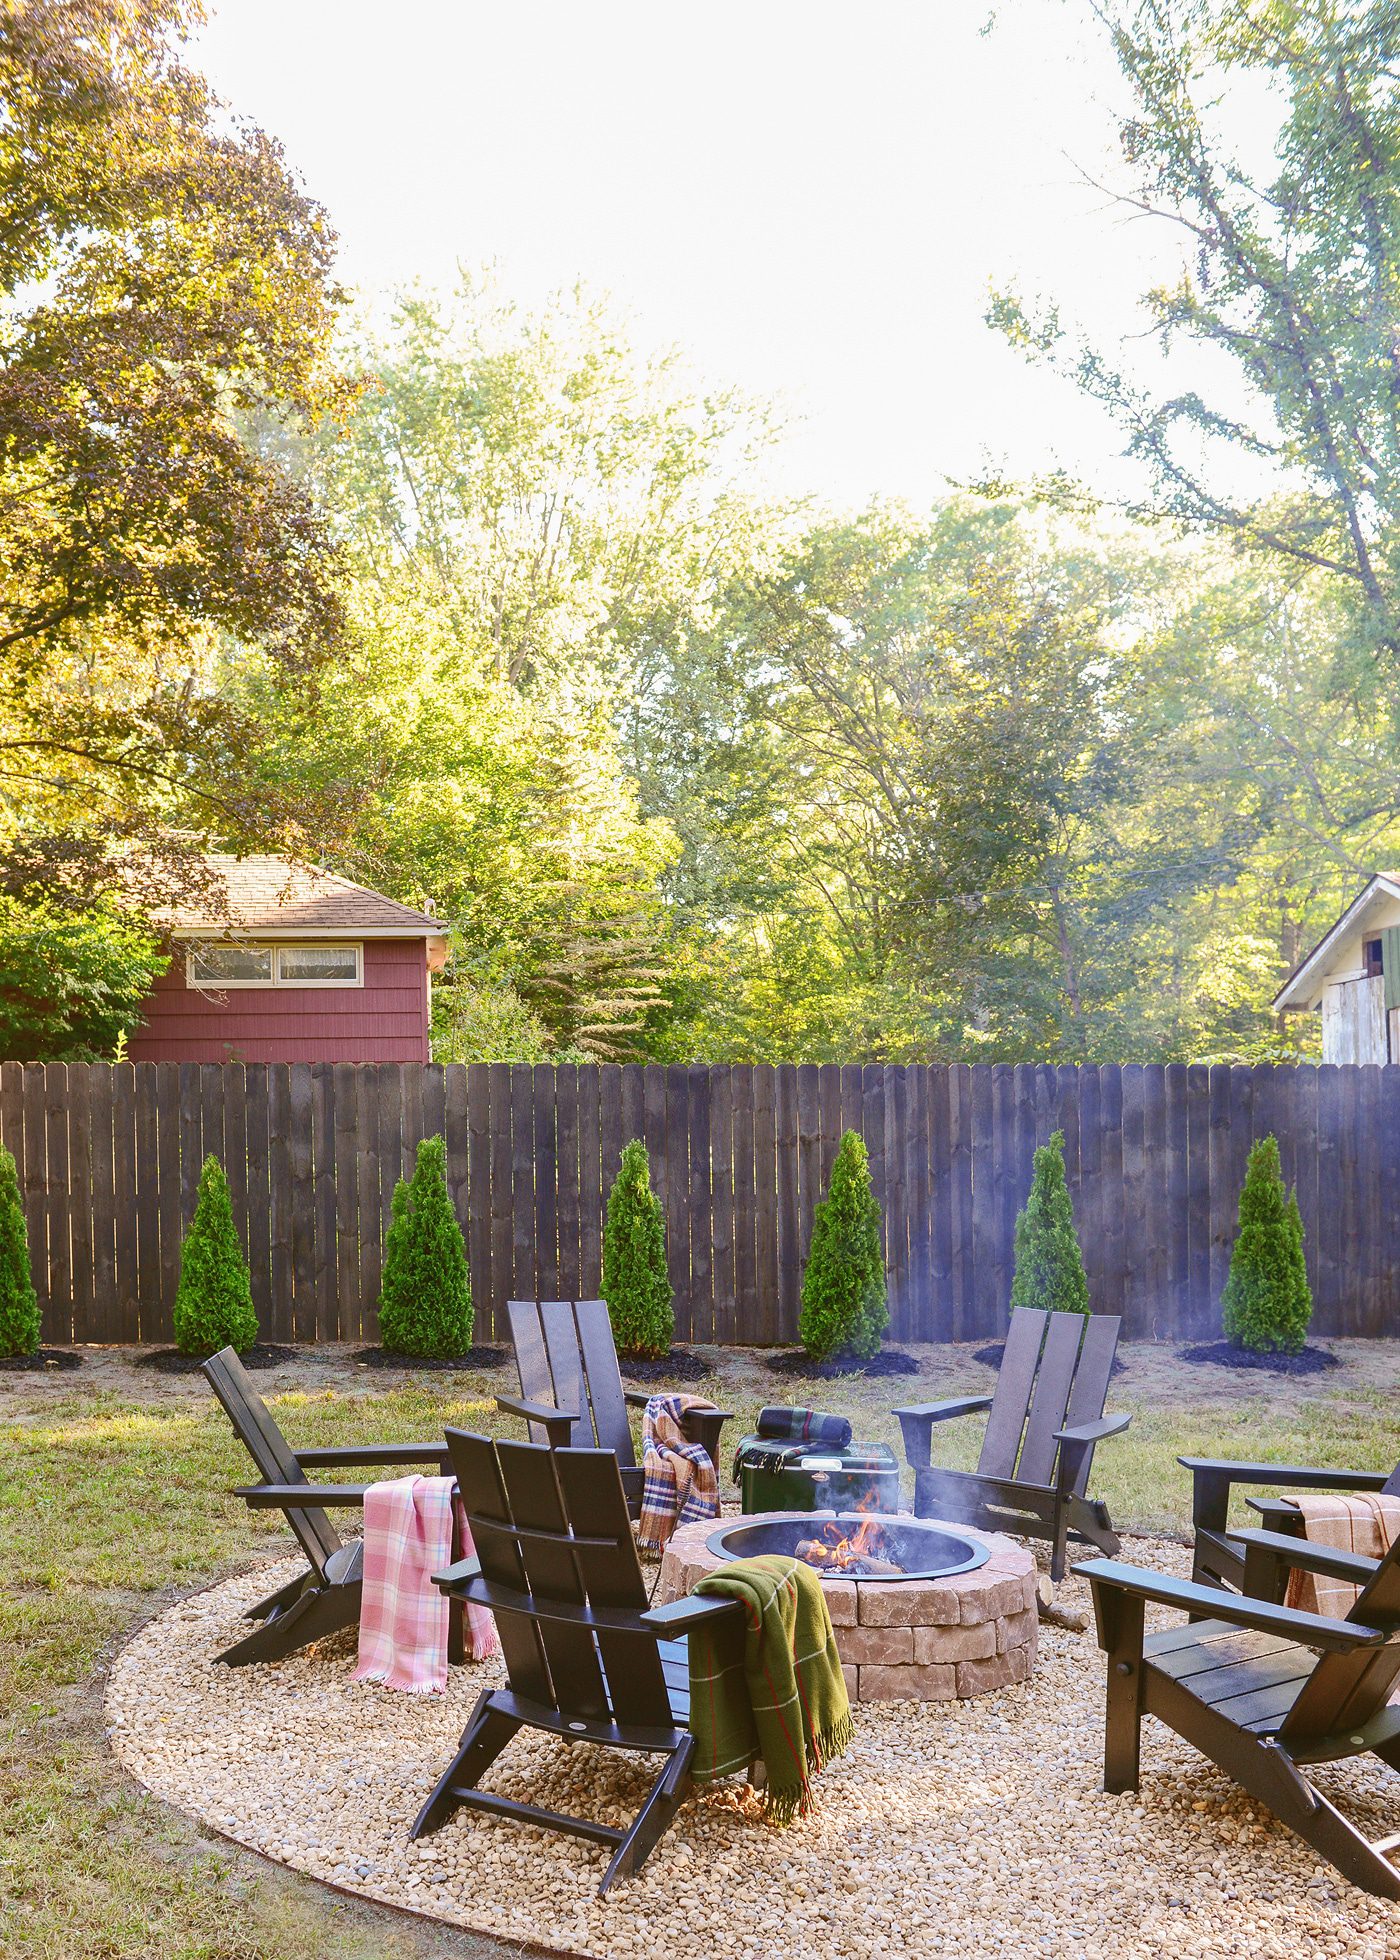
The addition of a fire pit was high on our wish list, and to say that we’re excited that we could finally make this happen is an understatement! (Remember this sad thing?) We wanted the pit to be centered off of our living room French doors, so that in theory, you could walk right out of the living room and pick your chair – beverage in hand, of course. The pit splits the difference between those doors and the row of trees. Laying out the chairs and fire pit ring helped us to visualize how large we would need to make the pit, and although we were only staging, it started to become very real! It’s so invigorating when you can start to see the glimmer of possibility in the midst of a large DIY project, don’t you think?
Day | 2
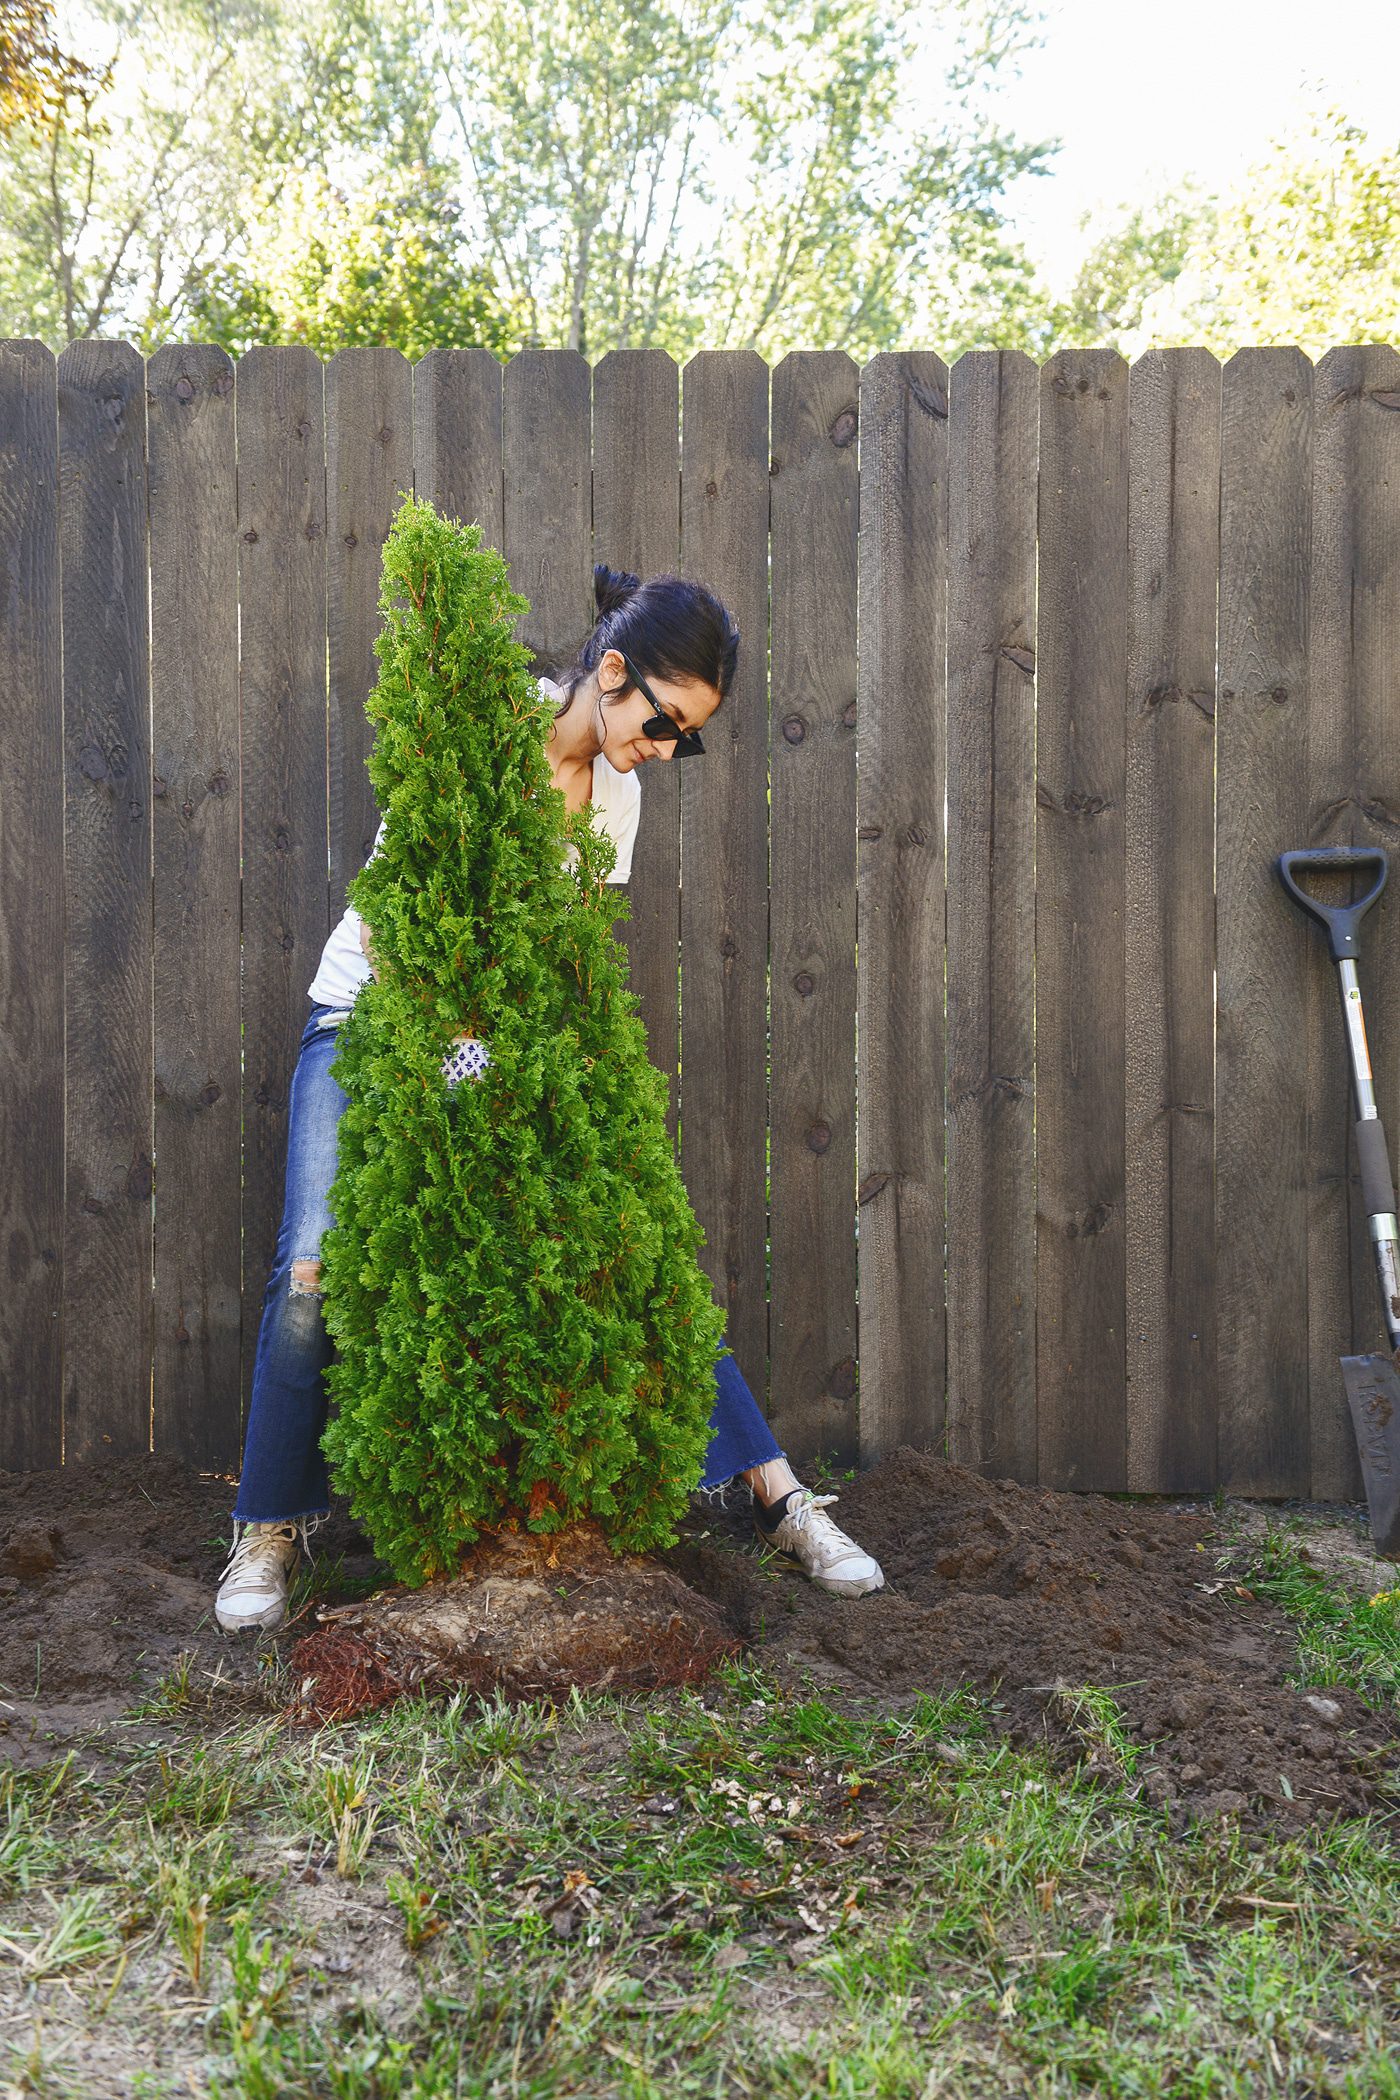
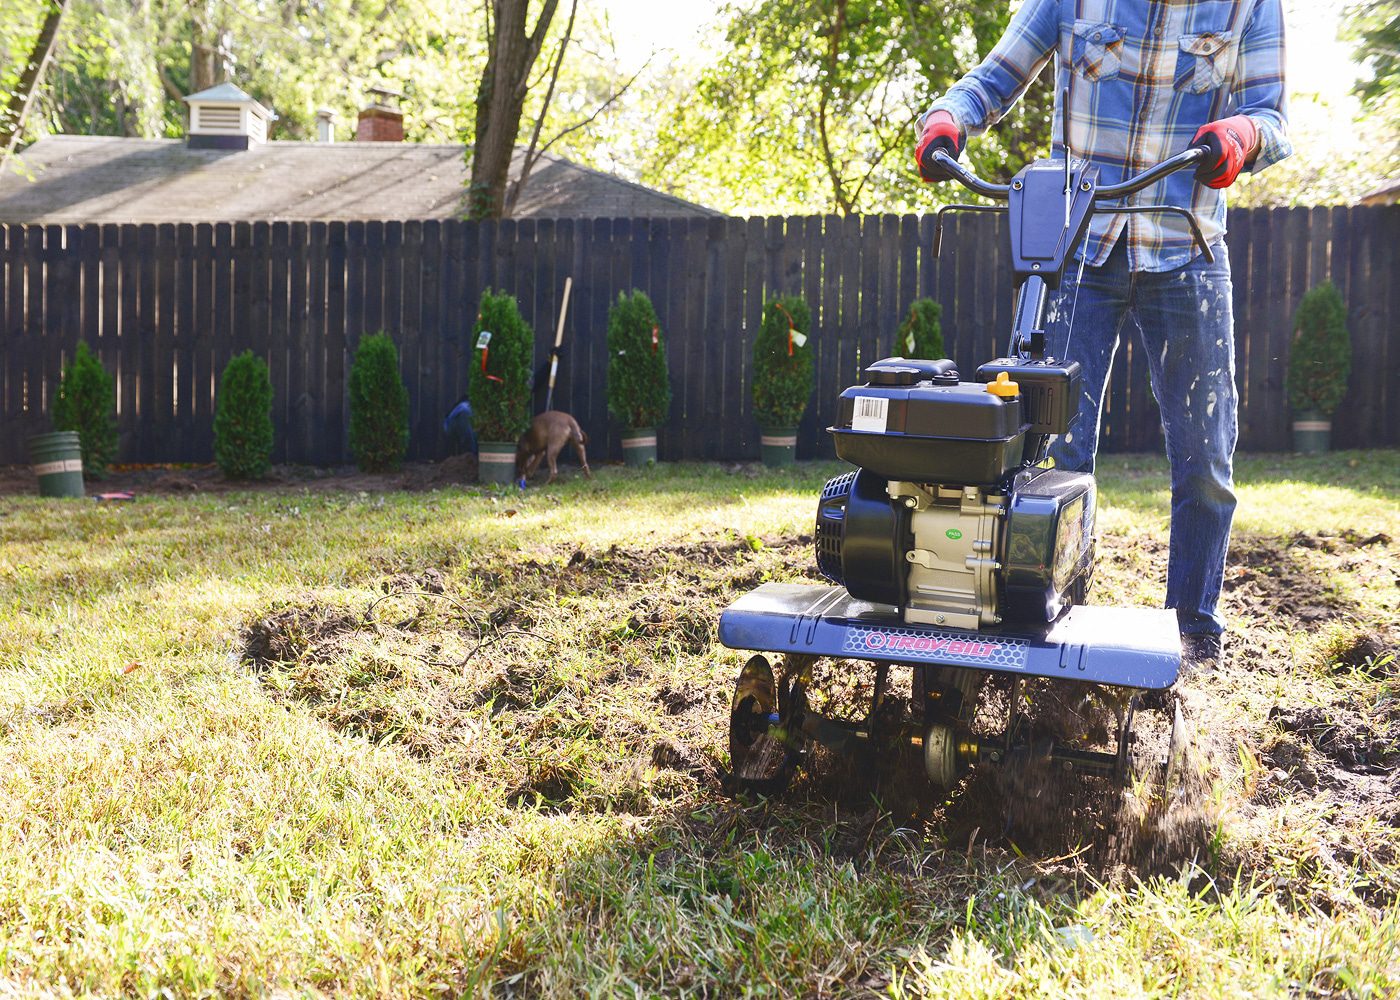
Day 2 kicked off bright and early, with Daniel and Meghan on tree-planting-duty, while Scott and I got started on the fire pit. The trees were measured out exactly, and all the holes were dug to make way for our new greenery. We had 21 trees to plant (21!), and no one was sure whether it would be a few-hour job versus an all-day job. Luckily, the former was true, and they had every last tree in place and planted by lunchtime!
Meanwhile, Scott and I plotted out a 15′ ring for the fire pit. We laid the groundwork quickly by using this tiller, which had our ring dug up in less than 10 minutes. The tiller is adjustable up to 7″, although we chose a lower depth of around 3″ – just enough to lay weed screen and a thick-ish layer of pea gravel.
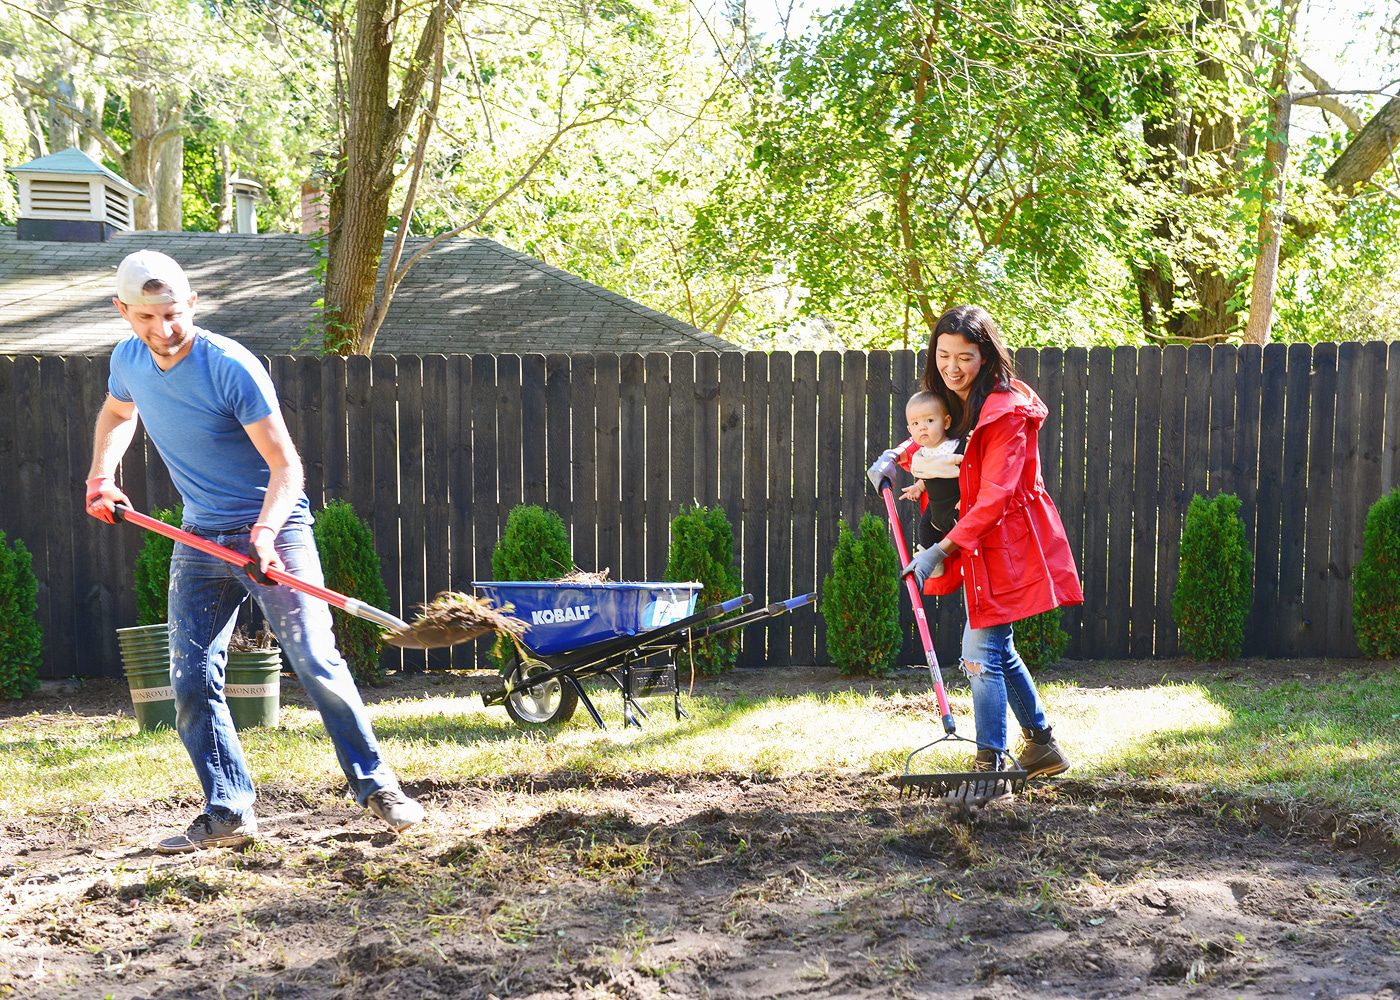
We raked up the extra dirt and shoveled it into a wheelbarrow. Initially, we were nervous about what to do with All the Dirt (eek), but we ultimately ended up dumping it onto low areas of our lawn in both the front and back yards. Scott wheeled the dirt over, I raked it even, and we think our yard is happier for it.
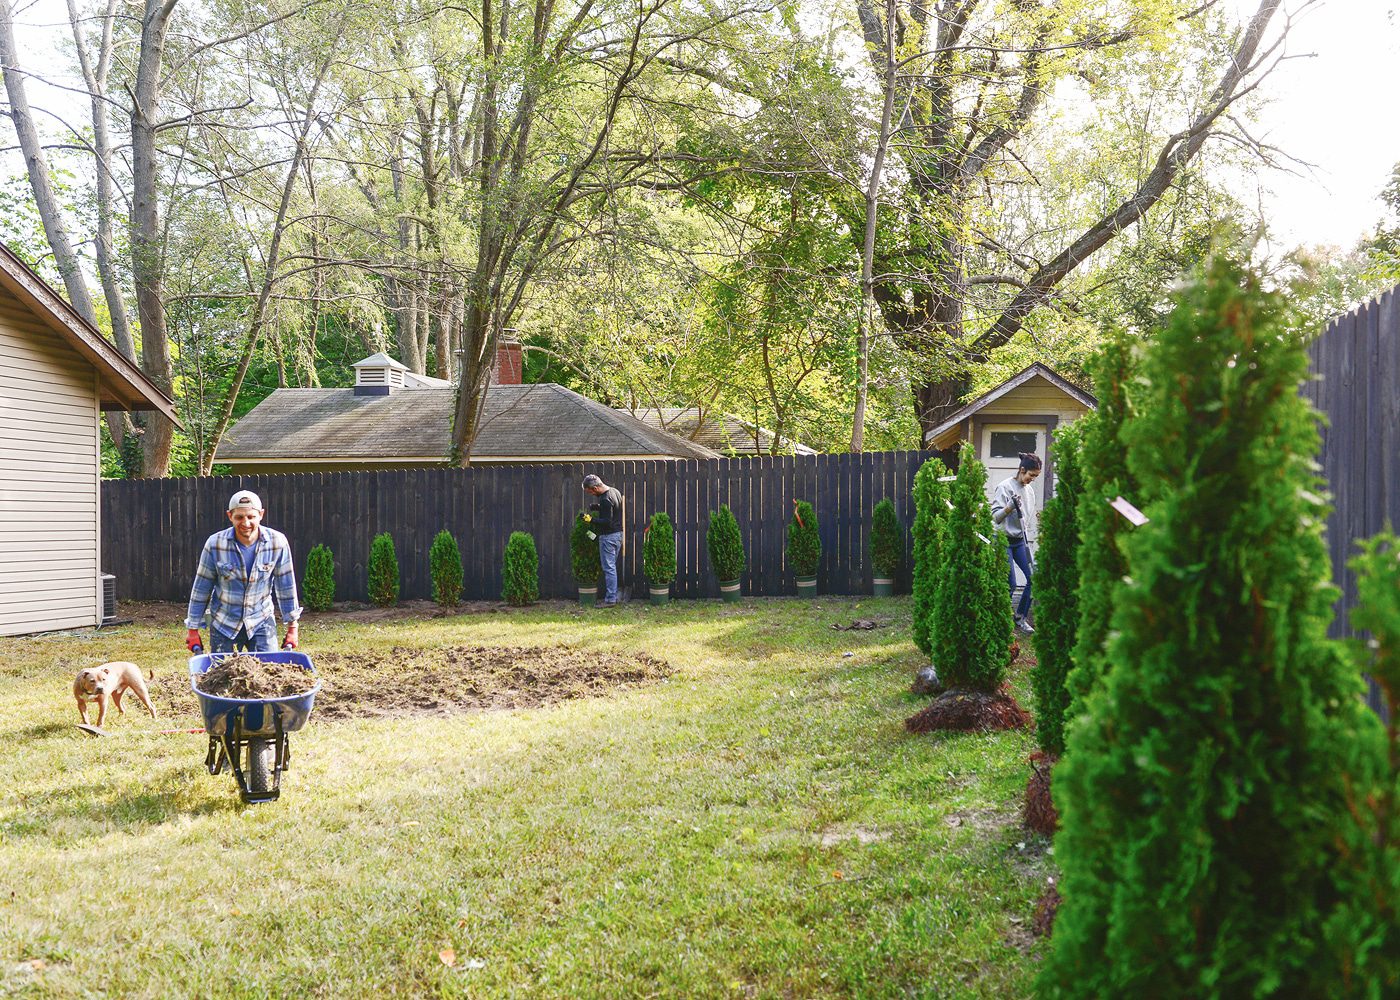
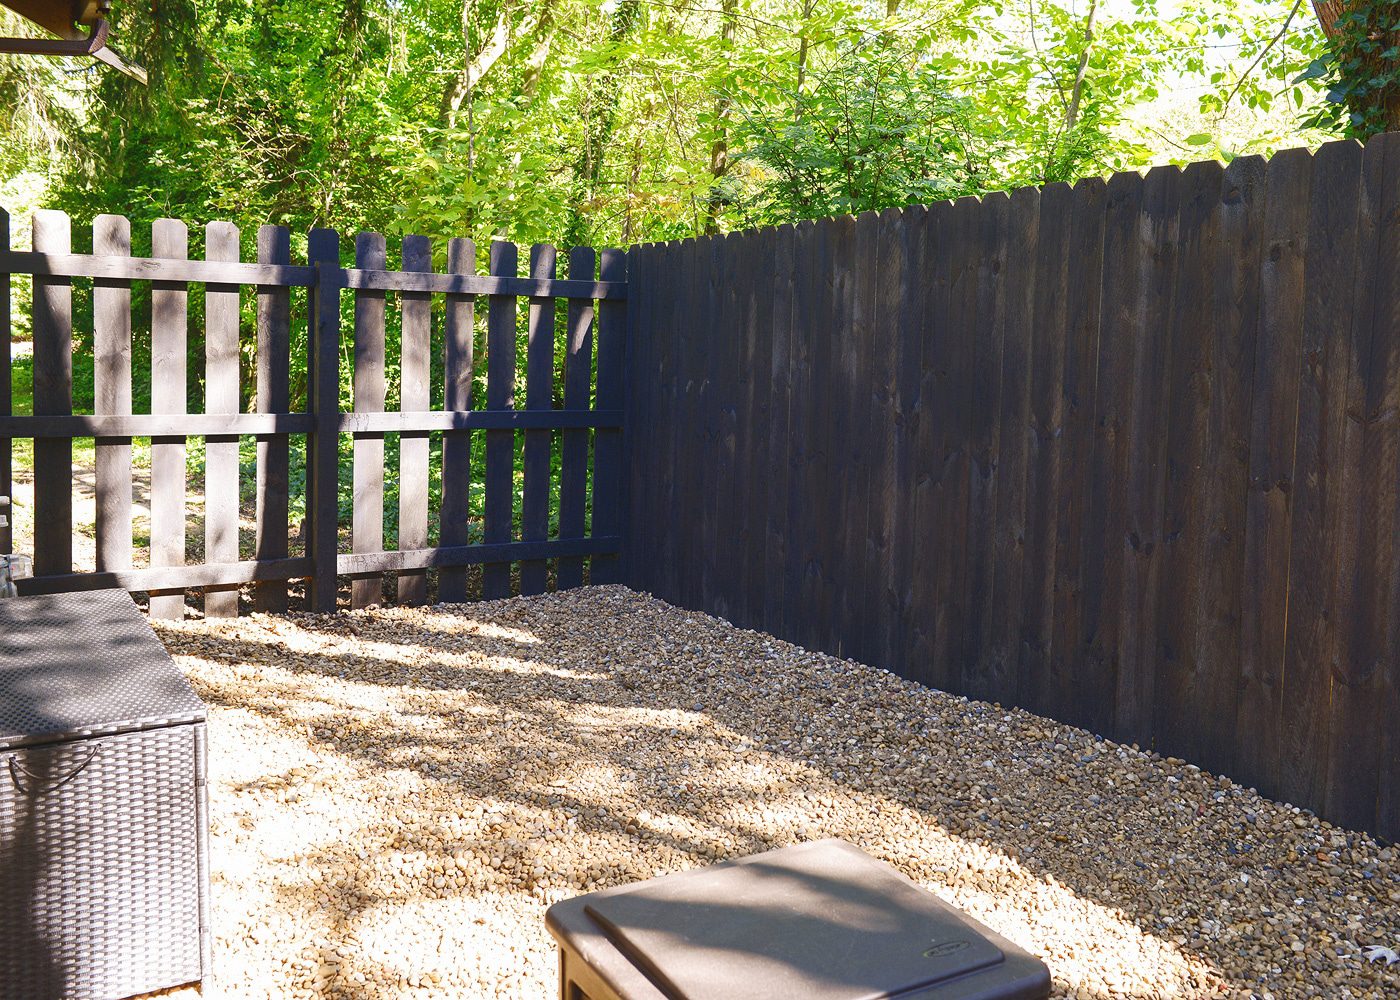
While Scott and I began laying the gravel for the fire pit, Daniel got started tilling the side yard for our puppy pee pit! I can’t tell you how many times you asked us if you were hearing us right in our stories (are you saying ‘pea’ or ‘pee’?!), but yes, you heard us right. We’ve successfully trained Jack and CC to use gravel to do their business. We pick up any solids, and we rinse away the rest with a garden hose. It’s a great solution for helping us to keep our grass alive (and it prevents any accidental omg what did I just step on? moments), and if our dogs can learn to do this, I promise that your dogs can, too – ha!

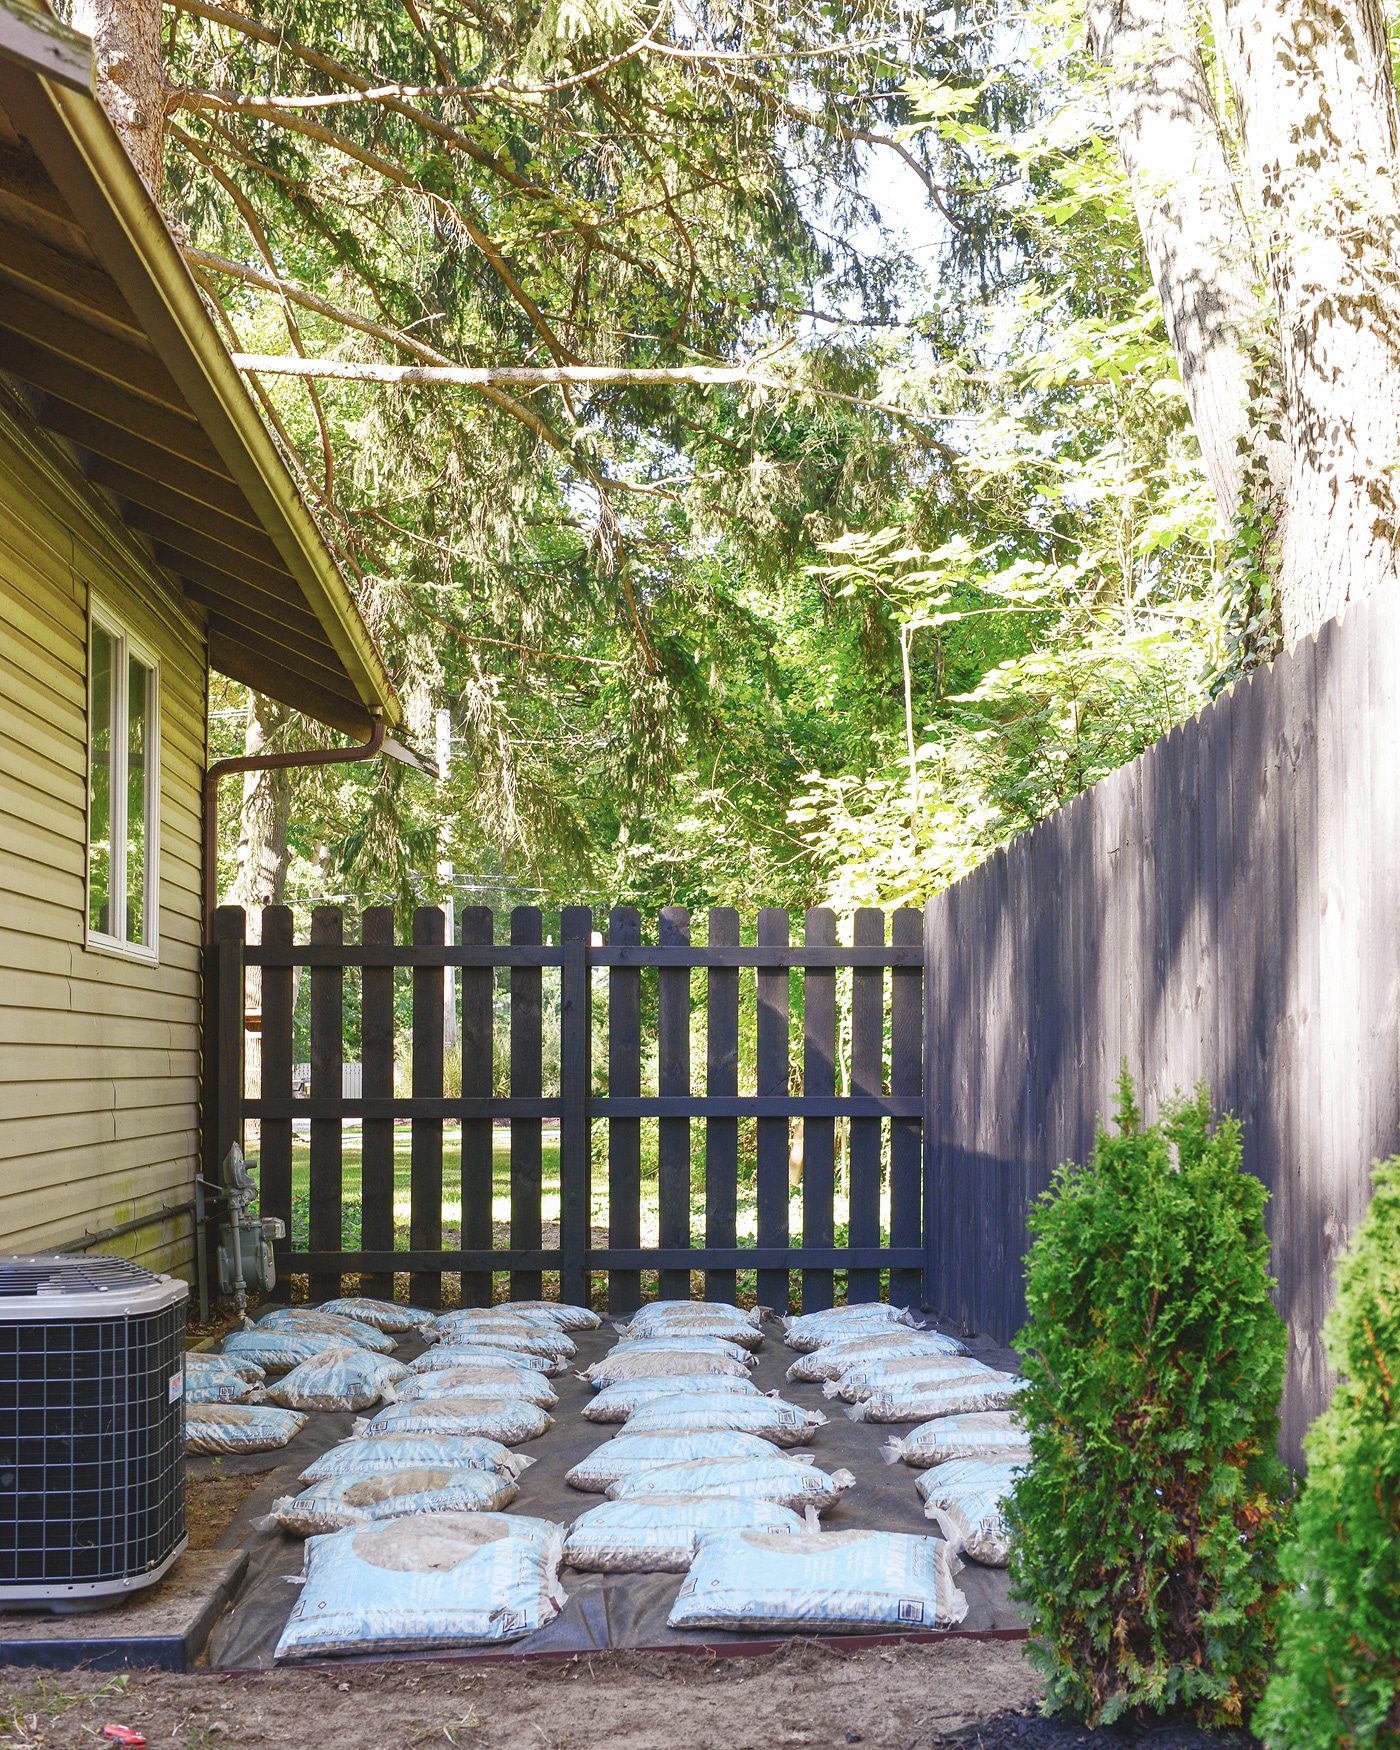
We used a little less than 120 bags of gravel for both areas at about a 3″ depth. For reference, the side yard is approximately 12′ x 20′ and the pit has a 15′ diameter. We got into a system where the boys would lay down the bags, and I’d slice them all open and spill out the contents. Once everything was filled in, we checked for thin areas and added more gravel as needed!
Day | 3
We focused on all of the finishing touches for day 3! Tree House’s first lawn mower is self-propelled (meaning that you don’t have to physically push it), making the task of lawn maintenance super easy. Scott started by trimming the grass, and afterwards, we spread seed in all of the bare areas. There’s a decent amount of bald spots due to the mish-mash of work that has been completed over the summer, but we’re hopeful that one day, we’ll have a lush green lawn! Bonus: Comment on Troy-Bilt’s Instagram post for your chance to win our same self-propelled mower!


Finally, it was time to show the yard some love with a good rinse. Every last thing was hosed off – the fence, the muddy gravel, the trees, the grass and the fire pit. It all looked so shiny and new in the morning light; best feeling.
Later that day, Scott spent a handful of hours pressure washing the deck! It’s absolutely insane to watch the decades of grime rinse away so quickly. Before this task was completed, the deck was somewhat unsafe during rainy days, as the algae became super slippery.
Is this super gross or super awesome? (Awesome, right?)

More before and afters!
View From Driveway | (Way) Before
View From Driveway | Progress
View From Driveway | After
View of Side Yard | Before
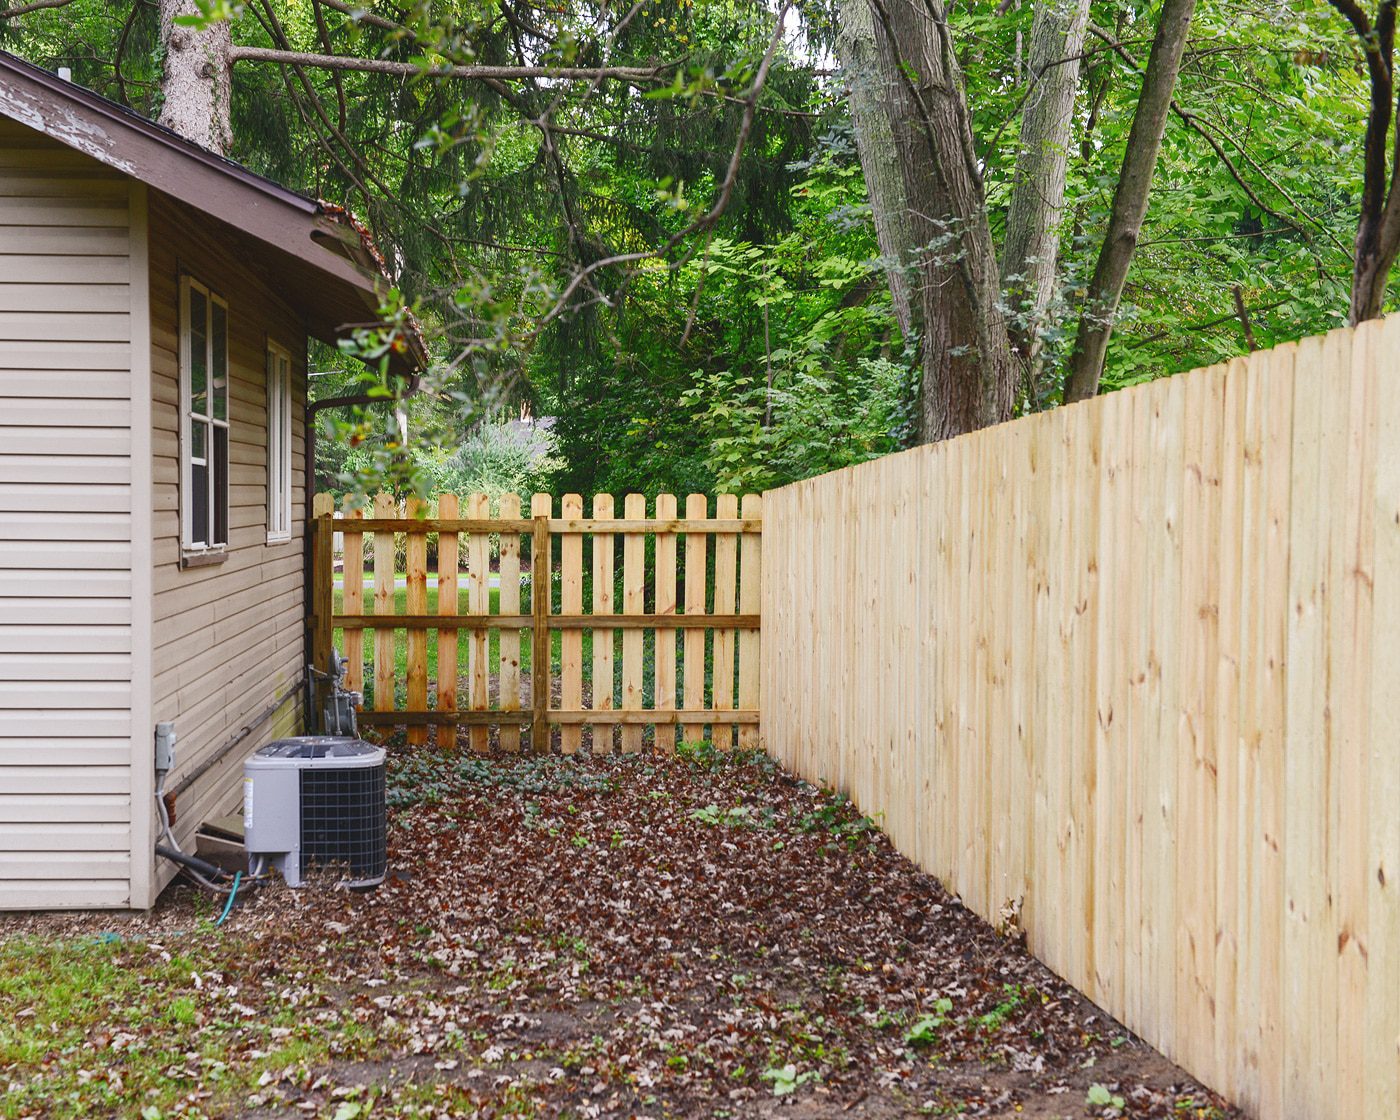
View of Side Yard | After
It’s hard to believe that this is the same yard from just last week. We’ve already bundled ourselves under wool blankets and roasted half a bag of marshmallows. It’s everything we ever wished for our Tree House.

We’re still considering this the first (or second? or third?) wave of exterior renovating, and yes, that is an outhouse you see in every other photo – haha! Ultimately, that may get replaced with a small shed, and our shed may get upgraded to a small garage. The front yard needs some slight reconfiguring, as does the deck – we think. The trim on our home needs fresh paint, and the siding has seen better days. We have big plans, but they’re still broad. They’re still ideas unformed. But we’ll get there.
Friends, we hope you’ll join us for an Instagram live @yellowbrickhome around 7pm EST tonight! We’ll be answering any questions you may have, so we encourage you to ‘ask away’ on our most recent Instagram post or leave a comment below. Bonus: Comment on Troy-Bilt’s Instagram post for your chance to win our same Troy-Bilt self-propelled mower!


You did an amazing job!! I love how it turned out!
Absolutely gorgeous! Love the stained back fence and the puppy pee pit is amazing. I need to keep that in mind for my next house!
this brings back so many memories from our first house in Denver. How are the arborvitae holding up? They are hard to grow here in Colorado climate (no humidty). But they are great trees for filler!
laura
It’s only been 3 days ? but they seem happier to be in the ground! We’ve gotten a few tips to fertilize this fall, so that’s next on our list.
I love that those chairs fold for storage! Perfect time of year to finish a firepit project. :D
Yes, it was a huge perk!
Holy smokes, what a transformation!!! How satisfying! I am super curious about the budget for this. When I read 120 bags of gravel and 20 trees, my eyes began to bug out, haha. Can you share anything about what to budget for a project like this one?
It adds up, no doubt. It’s tough to know where to cut off the budget of each thing, since we’ve been doing it in stages (the initial landscape removal, the fence, etc). The trees were one of the biggest splurges, but we got them all at half off since it’s the end of the season – around $40/ea. The fire pit – including the pit kit, all gravel, edging and weed screen – was about $450. We’ll share more about the fire pit in another post, and we can cover some of this tonight in the IG live as well! :)
Thanks, Kim! That is a total steal for those trees!
It looks fantastic! That’s a lot of work but will pay dividends, I’m sure. Unrelated question(s): (1) where are your black shoes from? and (2) where is that awesome green cooler from?
Thanks!
Thank you! Cooler is this one and these are my shoes (SO comfortable)!
I can’t BELIEVE the difference in the deck! Will you be adding a pathway or anything from the french doors to the fire pit area?
Good question! Ideally, yes… eventually! We can speak more to that tonight during the IG Live!
Are you going to do a sources breakdown? If not, can you speak to the edging you used? It looks like steel – was this hard or easy to work with? Any tips? How did you choose that over a plastic, rubber, or rock option?
We’ll be doing an entirely separate post on how we made the fire pit. I’ll be sure to add that information!
Also meant to include link to edging: https://www.lowes.com/pd/COL-MET-8-ft-Brown-Powder-Coat-Landscape-Edging-Section/3015399
Thank you!!!
Puppy pee pit – brilliant idea! I can’t believe the complete transformation of your yard. You guys are so inspiring!
Wow! This looks amazing! I’ve got heart-eyes all over it. We rehabbed our house a couple years ago and have been fighting just to keep our yard from reverting to a jungle. It’s a slow process, but does allow us to dream about what we want for our exterior space and make sure we get it right the first time. But man, I’d love to be curled up in front of a fire pit tonight =]
This transformation is absolutely incredible!! Your hard work paid off immensely! What an amazing place to relax now…sooo beautiful and serene!!?
This looks so great! All of your hard work is definitely paying off! We invested in a few battery operated yard tools this year, and they’ve been great. I think I’ve used the leaf blower for everything except blowing leaves (although, that time is fast approaching). It’s been great for blowing sawdust off of the porch after working on a project, blowing the grass clippings off of the rocks in our new flower beds, drying various projects LOL… I’m a little obsessed with it. Thanks so much for sharing your projects. I’m looking forward to the post about the fire pit. Have a great day :)
Do those chairs fold up when not in use? Or do you leave them out when you’re not there?
Our plan is to fold them up over the winter and use a furniture cover!
Don‘t you worry that it will look too monotone with all the same trees? Are you planning to add more variety to the planting?
Hi, Jane! We were actually going for a more uniform look here, although we may add more variety down the road!
It looks awesome. I’m so impressed!
I am sure the nursery told you this but remember to keep the moisture up for this type of evergreen. They are shallow rooted and will suffer without adequate moisture over the winter.
They are so popular -due to their great looks- but if not treated right they get scraggly and sickly looking.
Your yard is looking lovely!
Beth
Ooh, appreciate this tip! We’ve been watering every day since planting, and there’s a big rainstorm tonight. We’ll be babying them until it’s too cold to water!
Great job, and great before and after pics. The transformation must feel really good!
Do you pups ever confuse the fire pit gravel for their pee pit? Do a couple of NOs direct them to the right area or are they smart enough to know where is ok?
We have to corral them to the pit the first few times, and they catch on super fast after that!
Few things are so awesome as powerwashing the deck!!! :-D
Not gross at all.
It really is SO satisfying!
Big score to have friends like yours. Planting 21 trees is back-breaking work, and they’re just smiling and getting on with the job! Wowza. :D
Your neighborhood seems to be full of mature trees, and large backyards. How long did it take to pick the right neighborhood?
We knew which area we wanted to be in from the beginning. :) The types of homes are all over the map, so it was a matter of finding that needle in a haystack!
Looks beautiful! What did you use as a border for the bonfire pit and for the pee pit?
We used metal edging from Lowe’s!
[…] to be filled with furniture, you can make it more beautiful by adding more trees or plants. Even a yard with just chairs and a fire pit table would look great if it is surrounded by beautiful […]
[…] with a little bit of planning it can end up being a fairly simple project. This setup featured on yellowbrickhome is a really good source of inspiration in that sense. This a circular seating area centered around […]
[…] to be filled with furniture, you can make it more beautiful by adding more trees or plants. Even a yard with just chairs and a fire pit table would look great if it is surrounded by beautiful […]
I LOVE how this turned out! We’re currently in the demo phase of our yard with the <a href=”https://www.redboxplus.com/denver-nw/lafayette-co/”>dumpster rental</a> and everything out front. I’ve been dreaming of a fire pit area and I love how yours turned out! Thank you for the inspiration!