

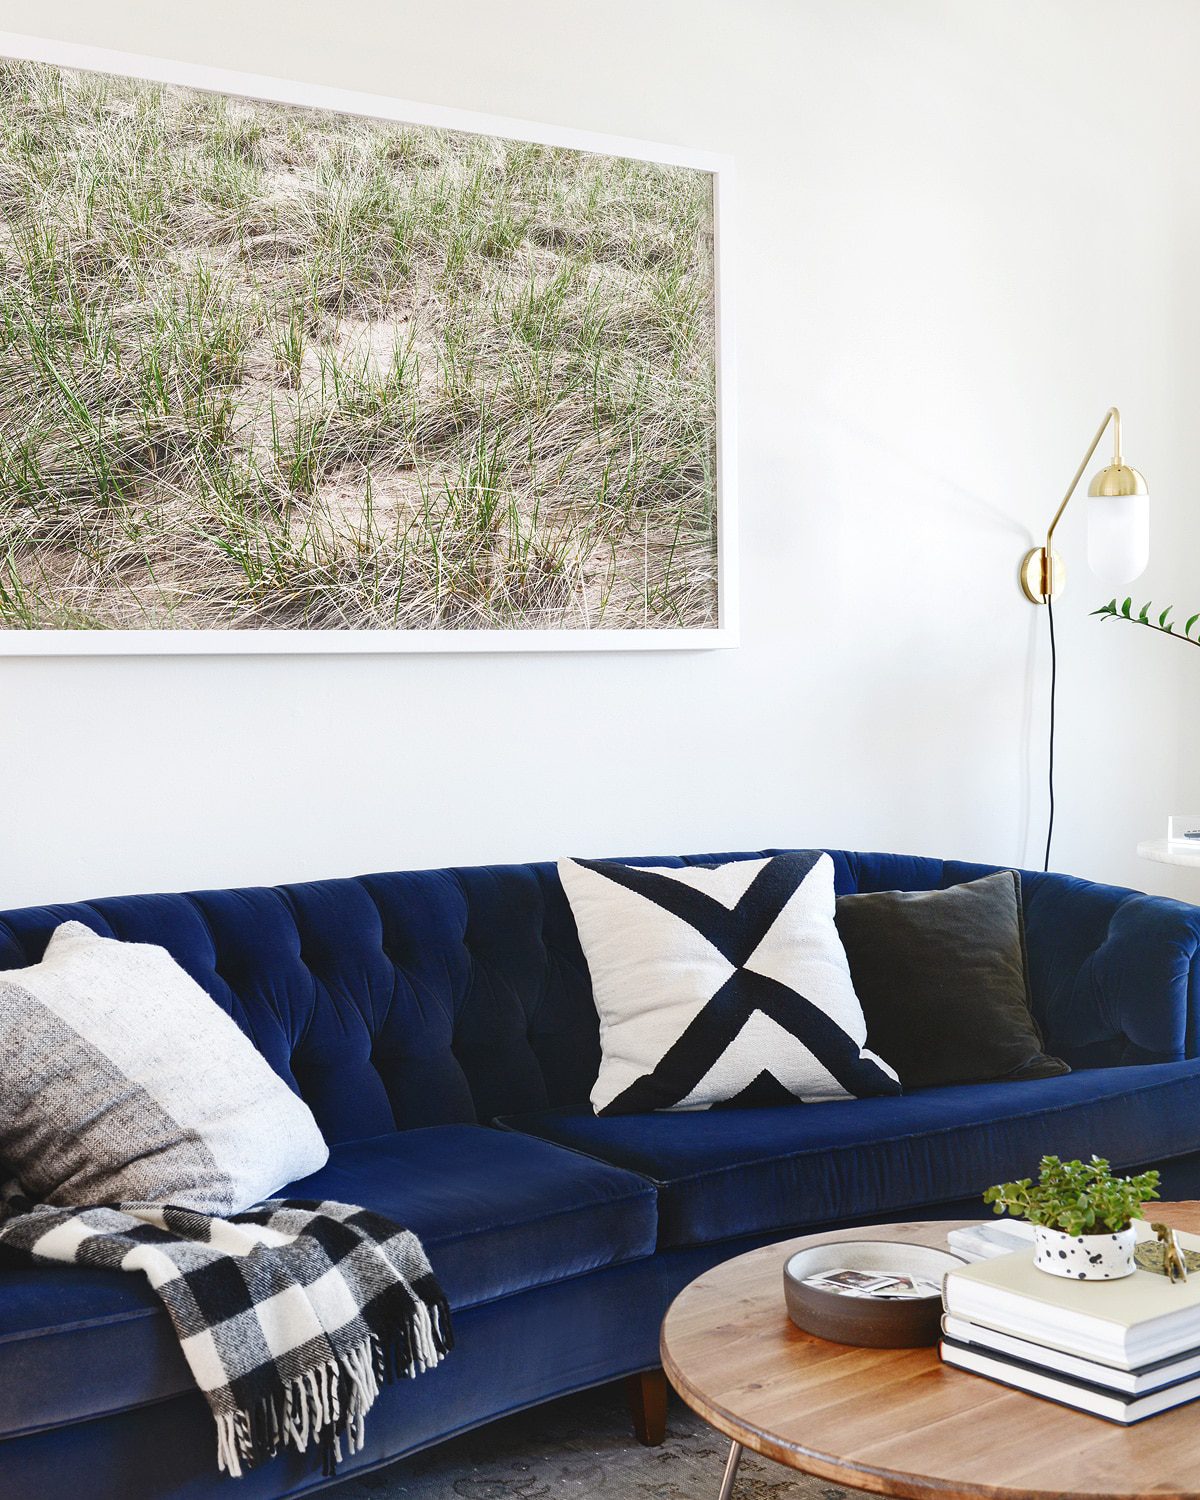
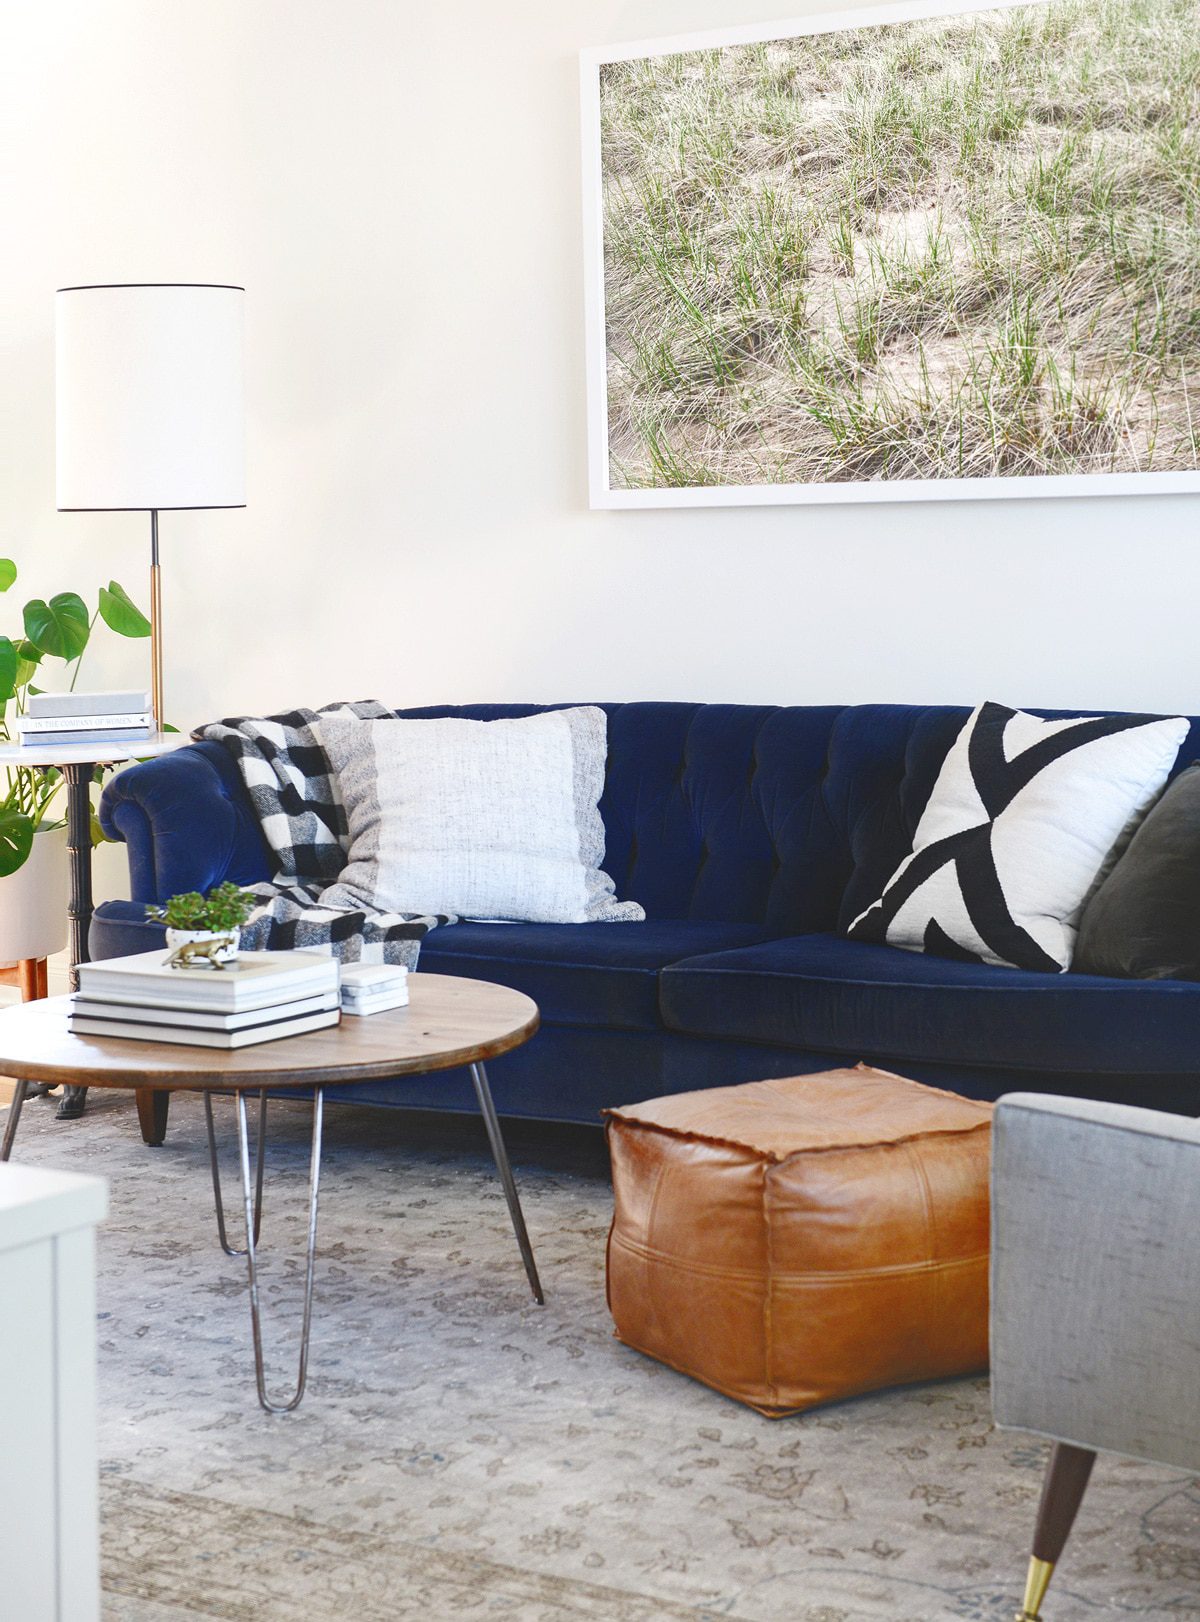
sofa | gray pillow (similar) | Xbase pillow | velvet pillow | throw | sconce | table | mini planter
At the start of summer, we sold our DIY dino prints for a song, making back just enough to cover our supplies. (Can you believe we made those three years ago? Our living room has come a long way since then!) A few months before that, we were purging items from The (former!) Scary Room, and when a buyer came to pick up a little table we’d been squirreling away, he stopped in his tracks when he saw the dinosaurs. Are those for sale, too?, he asked. Admittedly, we had already begun tossing around the idea of something new – one big thing, we were thinking – so we told him we’d let him know when we were ready to let them go.
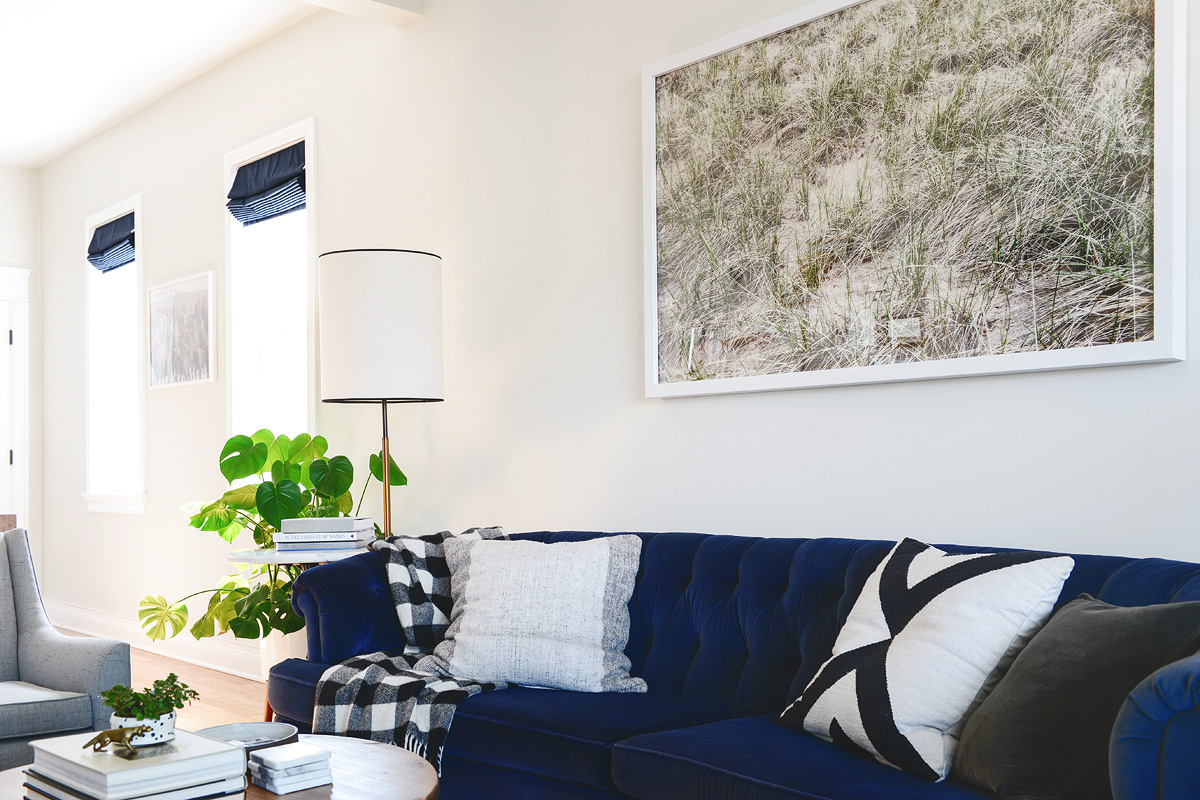
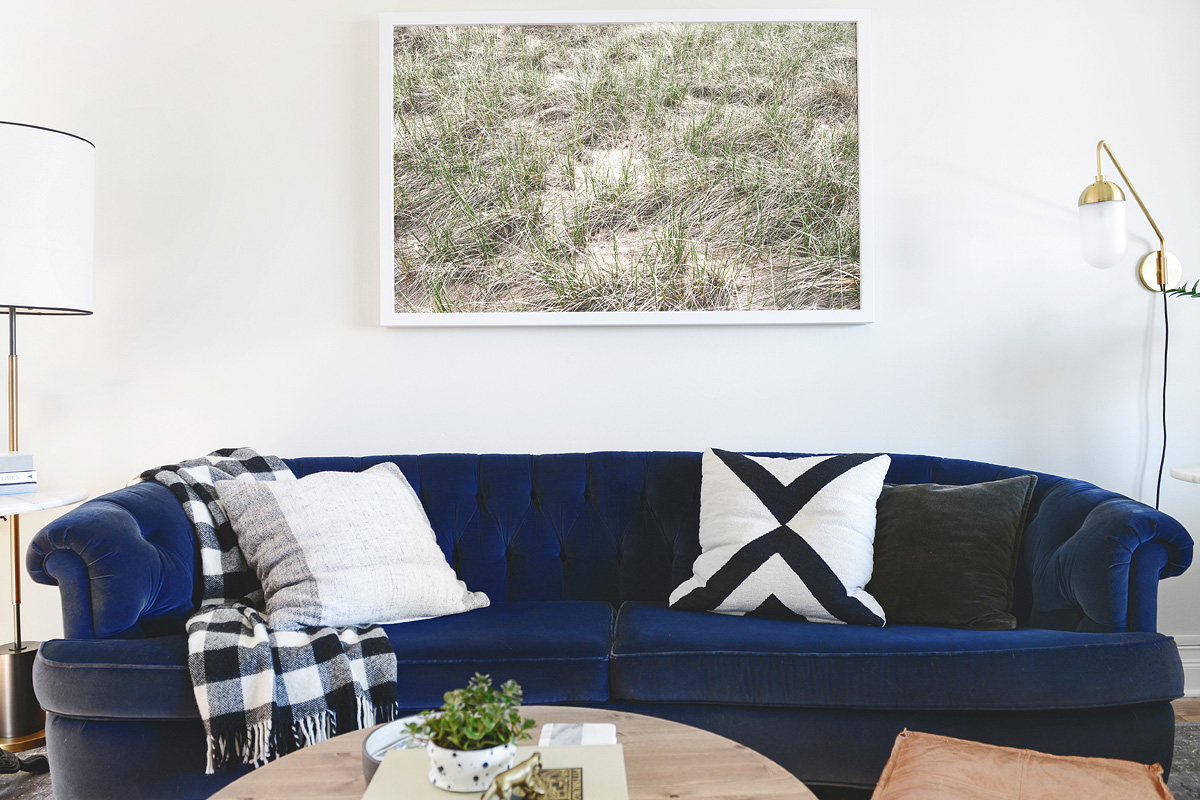
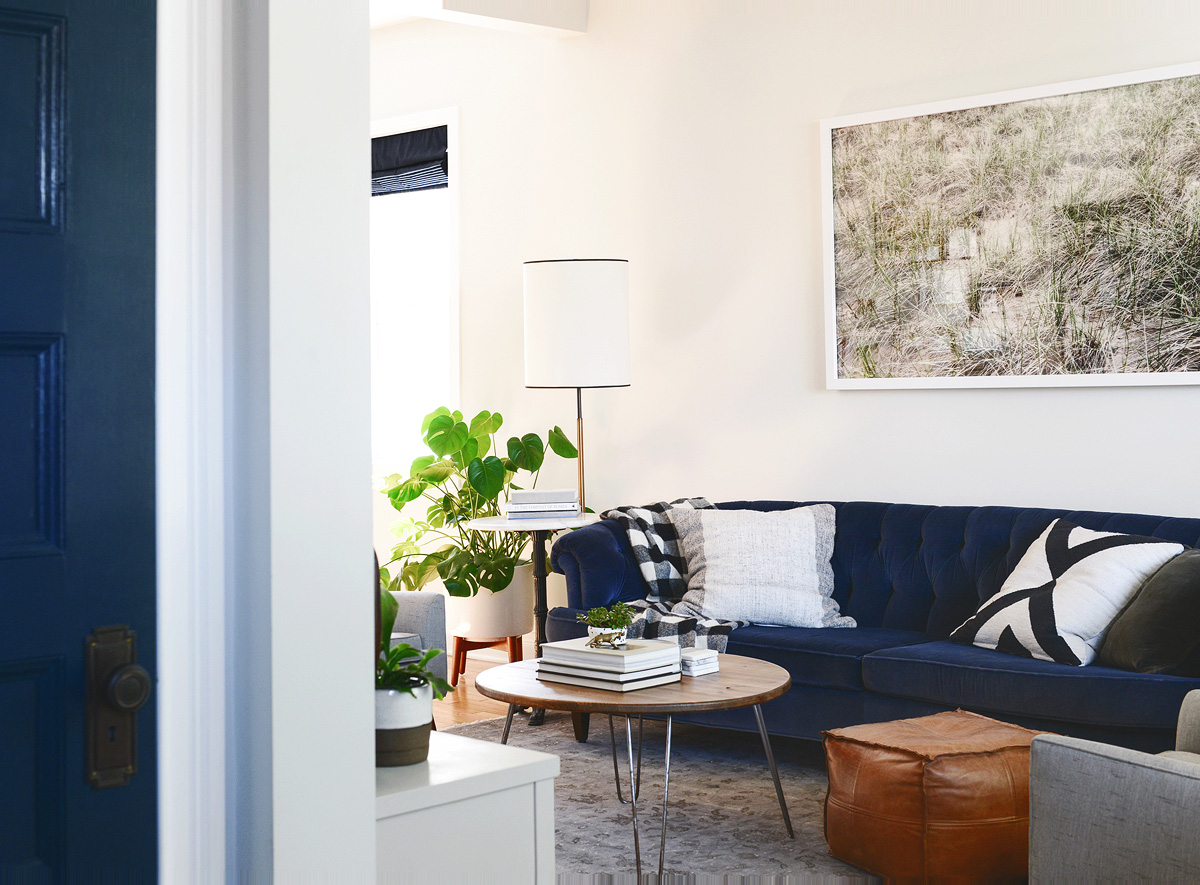
That time came amidst the renovation of the garden apartment (he was very excited, which made us very happy!), and for a good while, we lived with a big, bare space above the couch. The living room felt… sparse? We were spending all our days and nights in the garden, but we’d toss out ideas for artwork while we worked. At one point, we even had a mini photoshoot downtown in the hopes of capturing lazy Chicago scenery, but then it hit me – let’s use a photo from our Sawyer getaway! We sifted through the photos we had taken months before, and we kept gravitating towards images of sandy dune grass. I have long loved the deer bed print above Joanna’s television, and it was 100% my inspiration. We made a few small prints of the top contenders (going so far as to get your vote in our Stories), and we eventually landed on a winner.
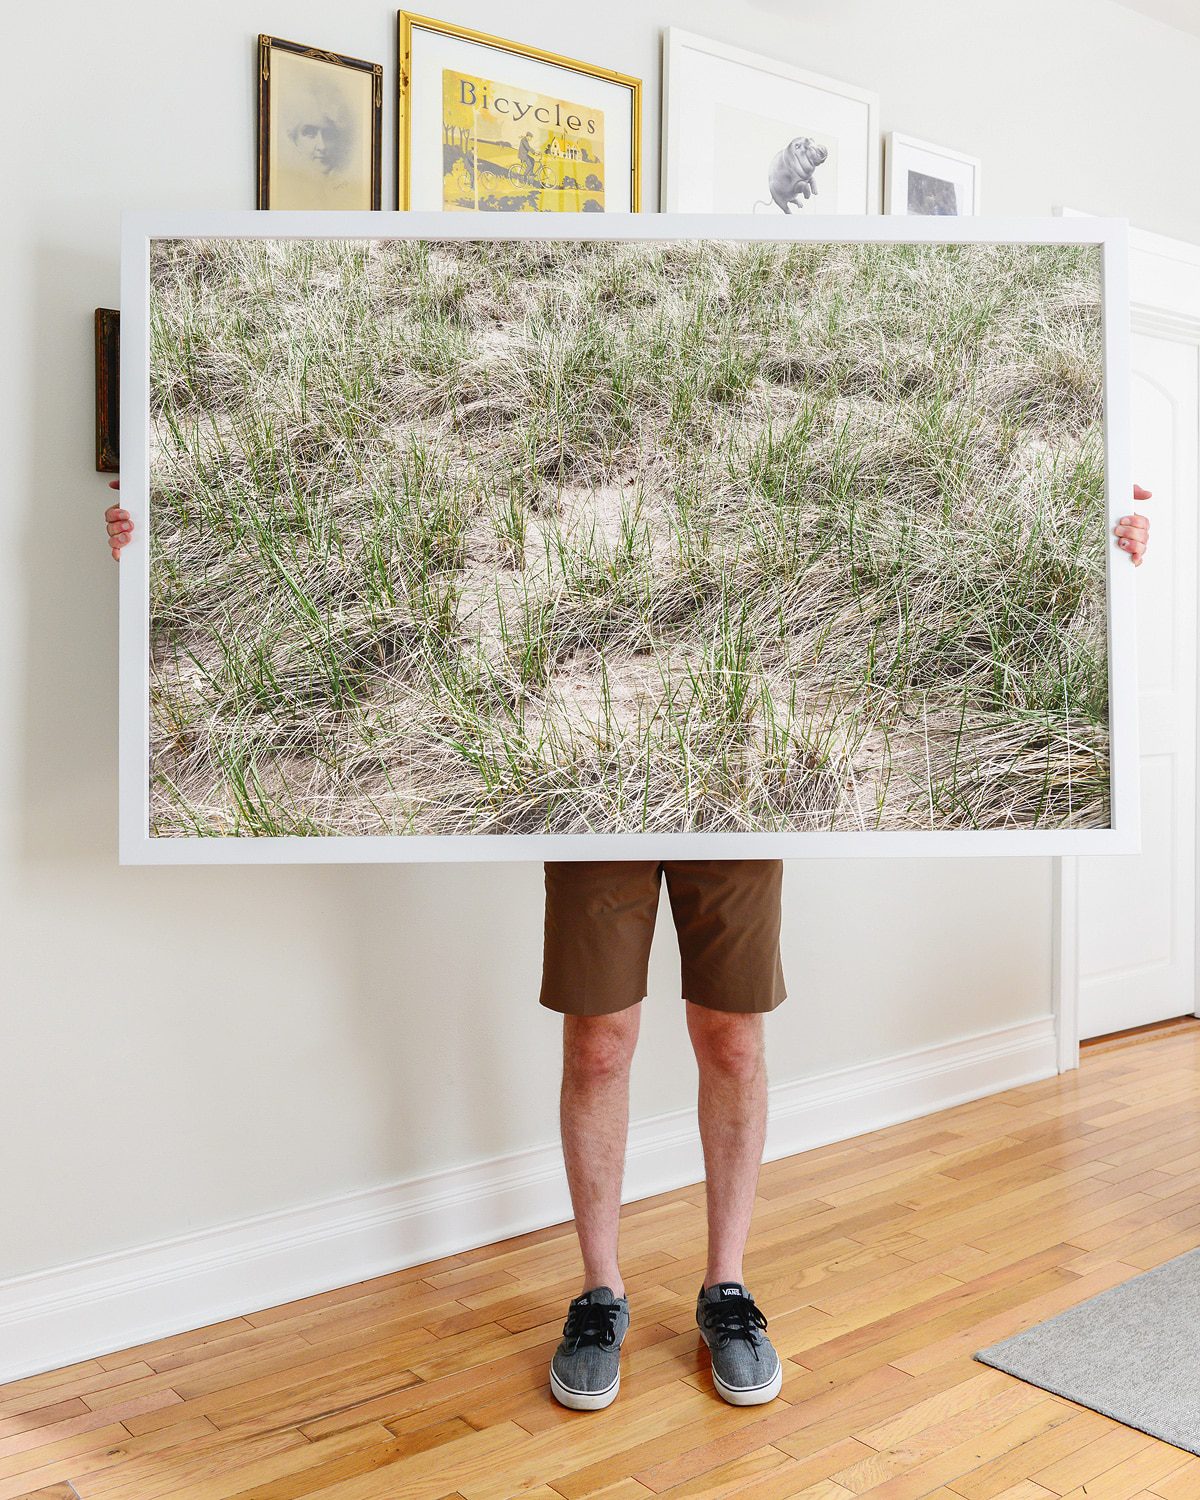
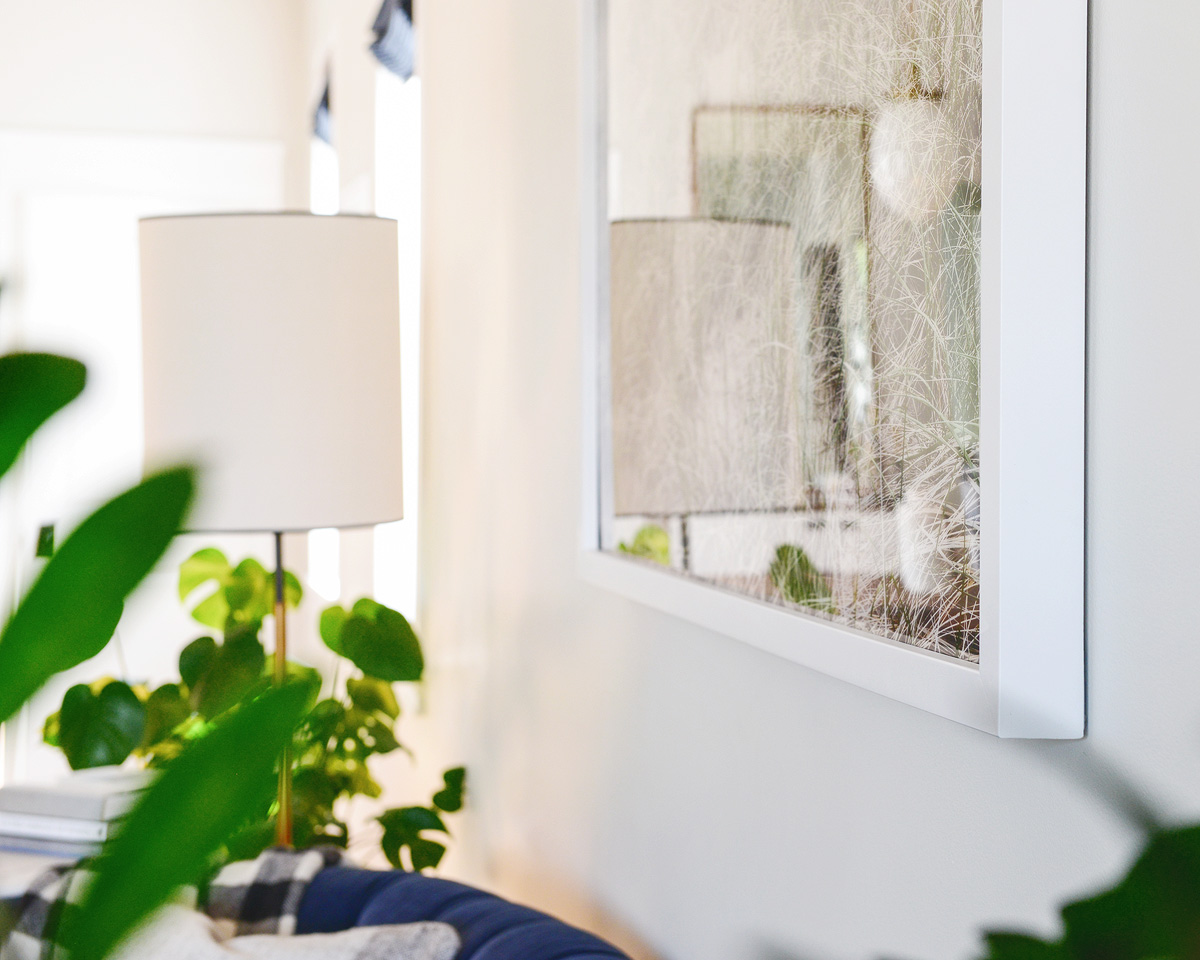
I edited the final image using this awesome moody action set, and I had it printed to 36″ x 57″ (admittedly a strange size) on the same thick velvet paper I use in our Print Shop. Next, it was time to make a frame! You might be wondering, what makes this frame any different than our dino frames? Two really, really big things: 1) We eliminated the need for a router, and 2) for it’s size, it’s really lightweight!
In This Post
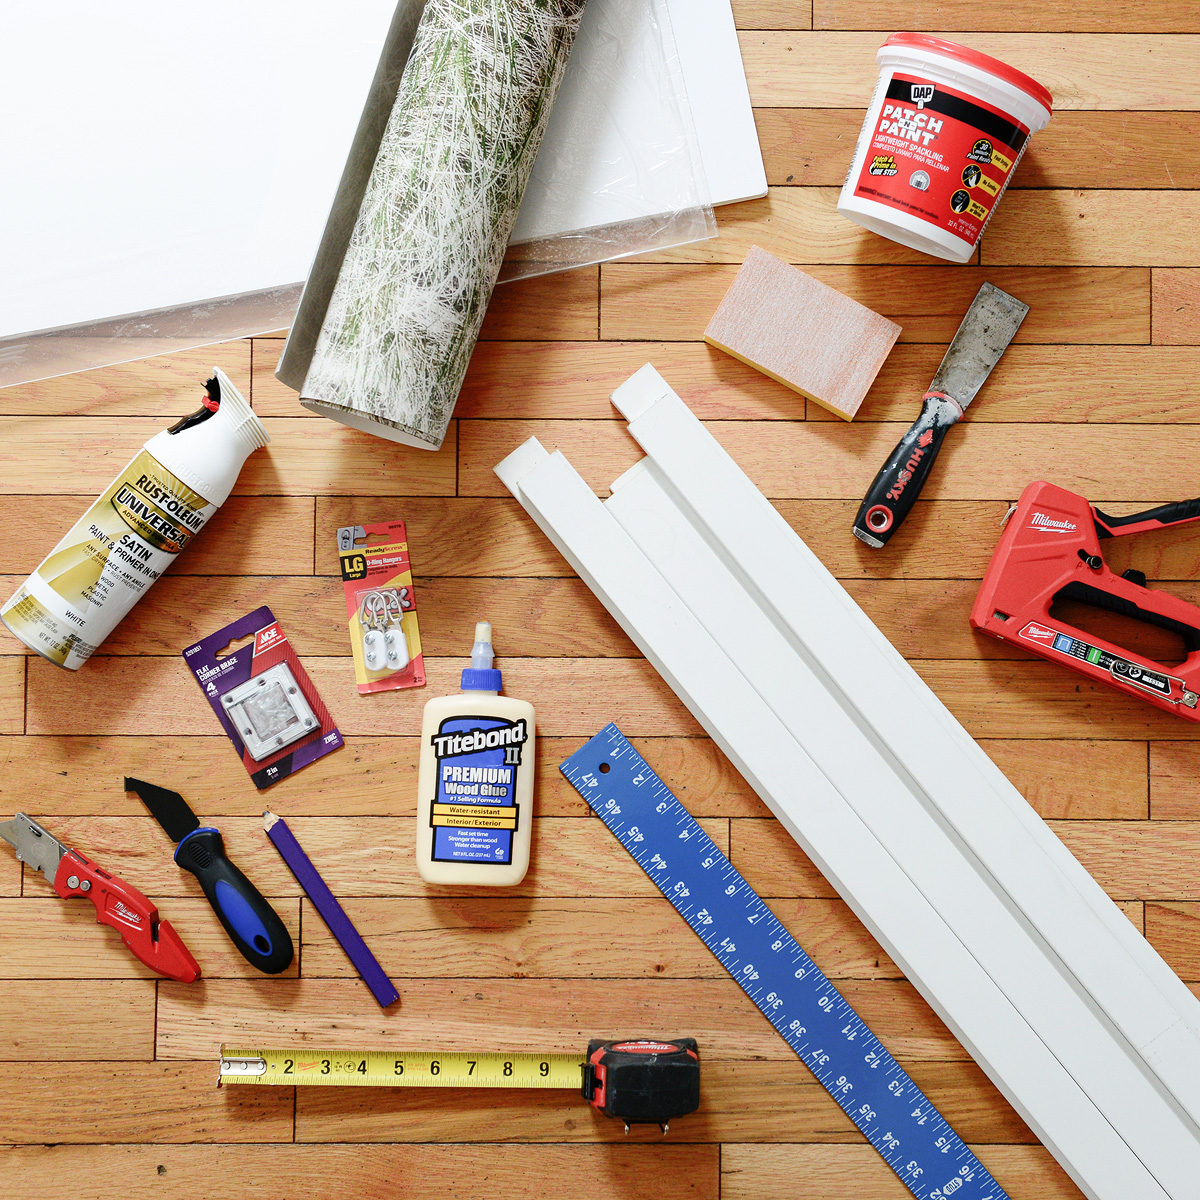
Supplies used for a 3′ x 5′ frame:
6 – 6′ 1″ x 2″ primed MDF
4′ x 6′ 1/2″ foam board
3′ x 6′ acrylic sheet (available at most hardware stores)
8 – 2″ corner braces
Wood glue
Spray paint
Pack of 2 D-rings
photo hanging wire
Art print of your choice
Tools used:
Spackle / putty knife
Sandpaper / orbital sander
Drill / screwdriver
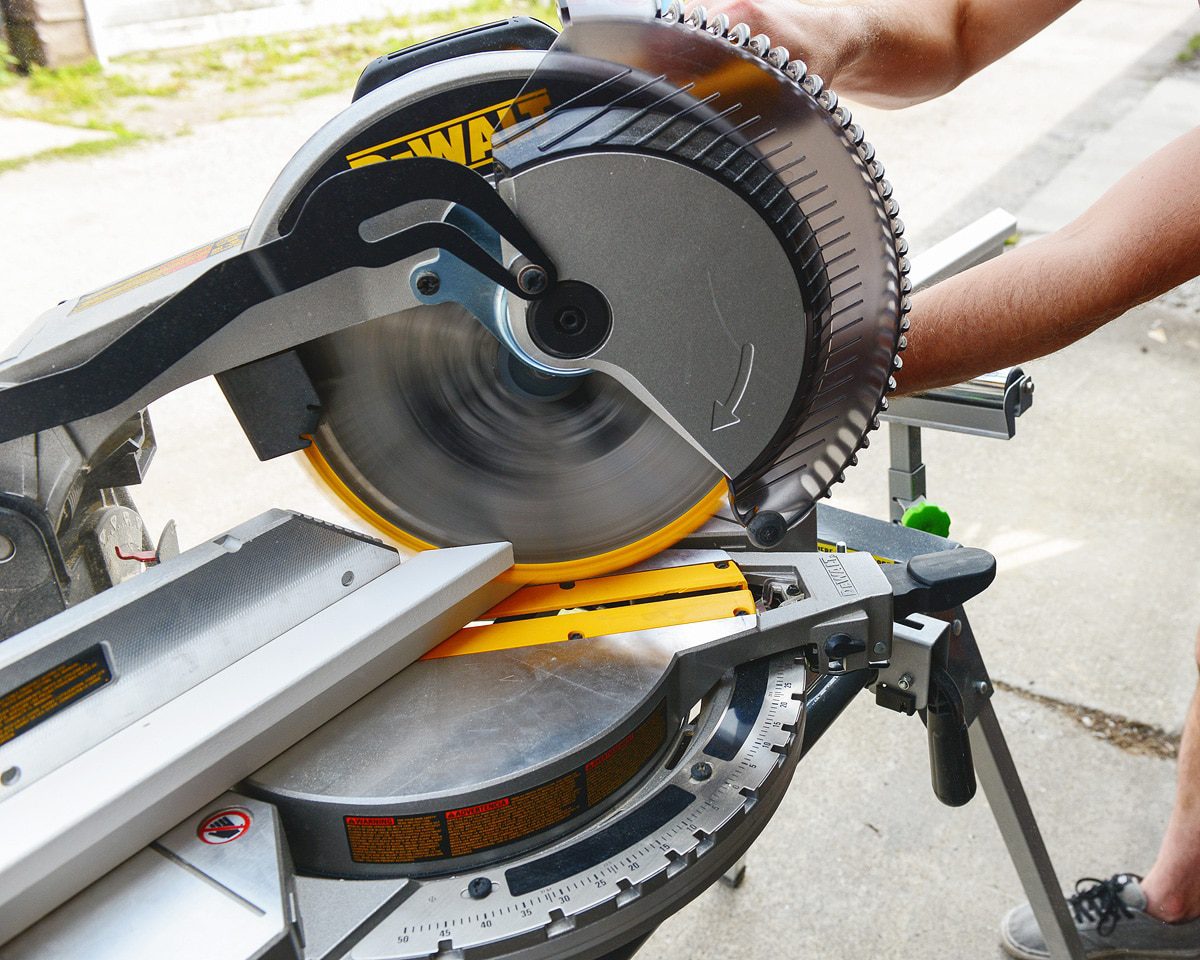
Miter saw
Nailer / nails
Plastic cutting tool (like this)
Utility knife
Right angle square
Straight edge
Staple gun
Clamps (we love these)
Tape measure
Anchors for hanging
What we did:
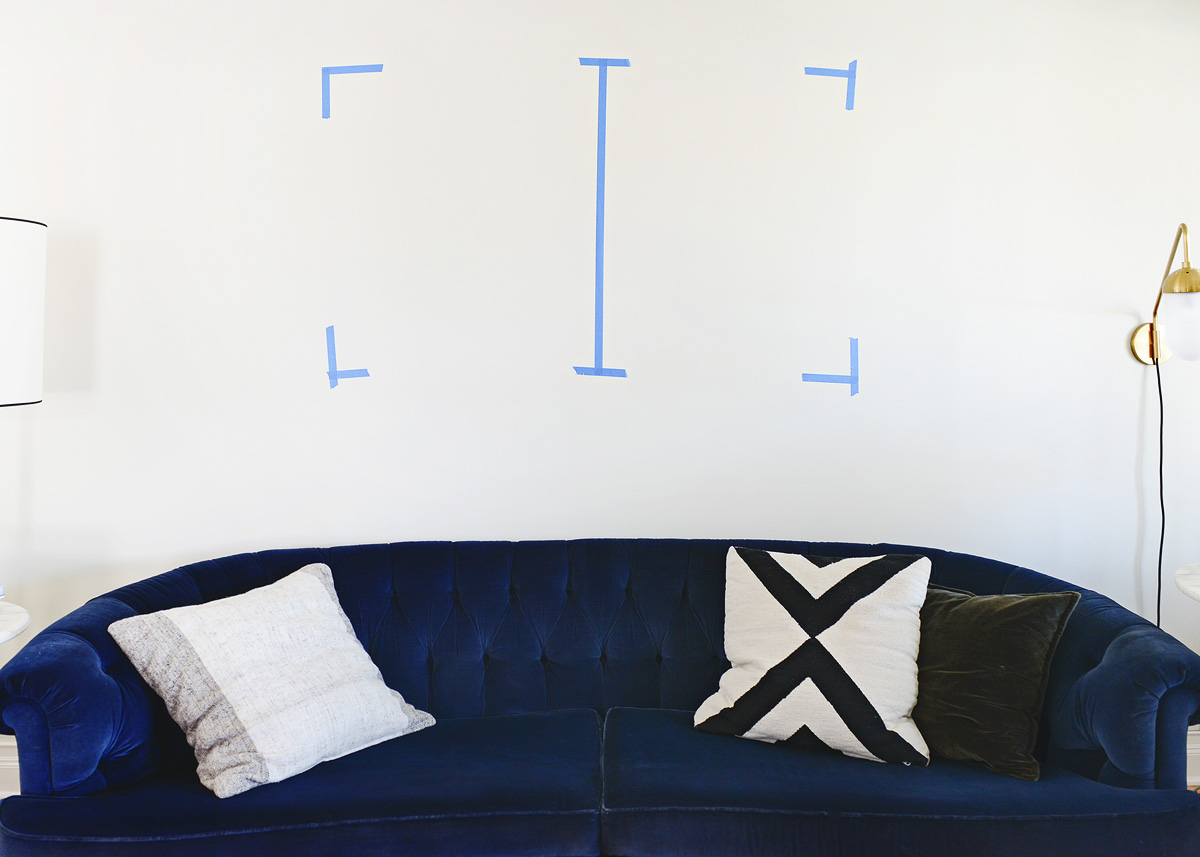
Before we spent any money on printing, we needed to come up with a size. The printing service I use has a significant jump in price for anything larger than 36,” so we were sure to stick to that for our height. We came up with a width of not-quite-60″ by taping the measurements onto the wall, and once we agreed we liked the size, I placed my print order. Note: There are several printing services online that can print poster sized images, but if you’re looking for something as large as we were, you may want to consider engineer prints or calling into your local print shop (think: shops that print banners).
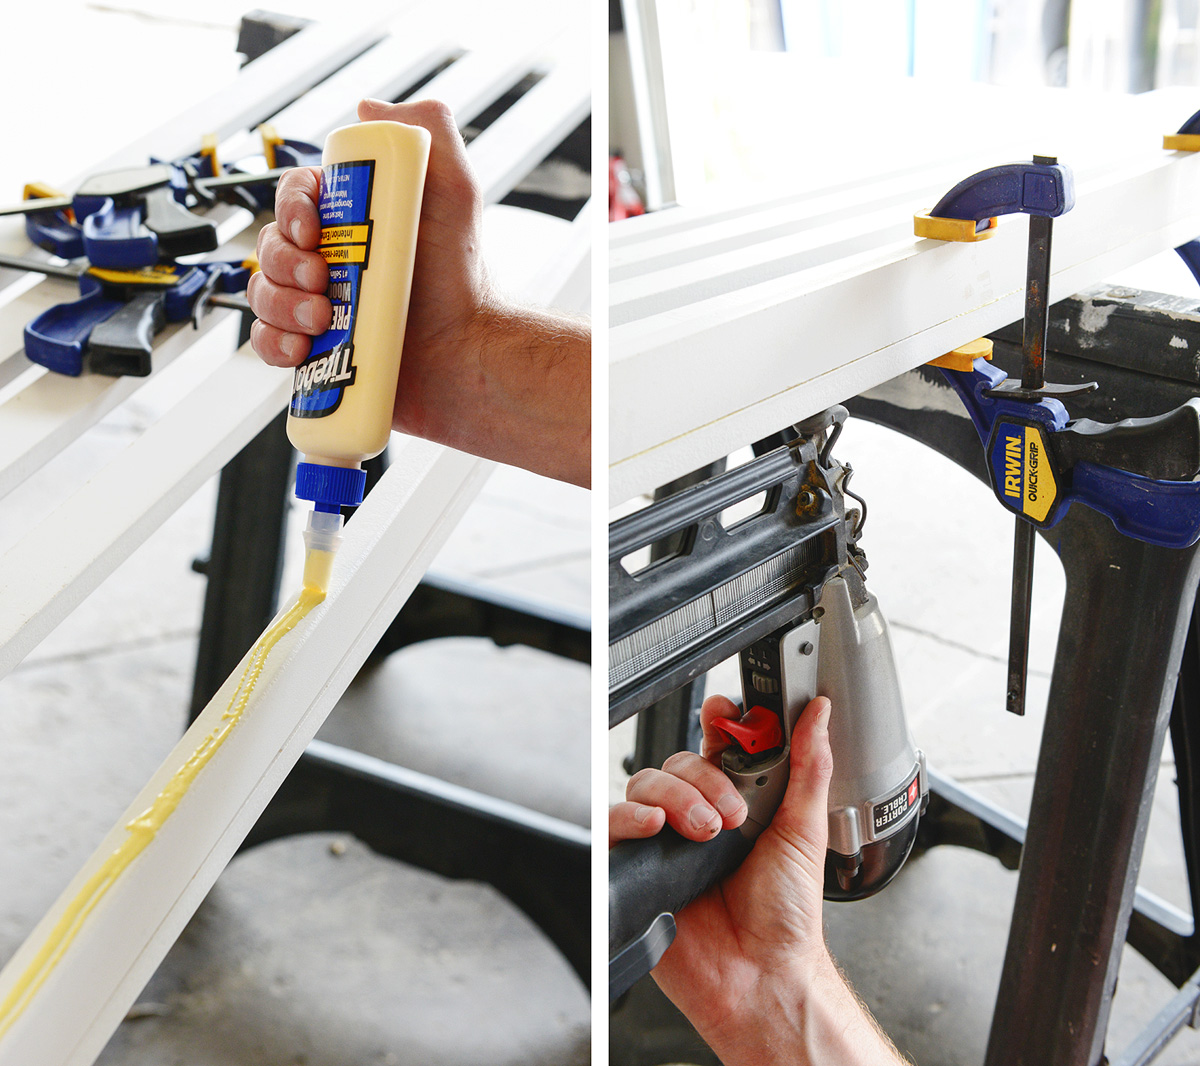
In the past, we built our giant frame with 2″ x 2″ common board and used a router to create a lip for the glass, print and backing to sit into. In this case, we decided to stack two pieces of 1″ x 2″ primed MDF! Not only would this help achieve a deeper frame profile (which we love), but we could eliminate the need for a router altogether. After running a line of wood glue down the 1″ side of MDF, we lined it up and clamped it to the 2″ side of a second piece of MDF. Scott used 1″ finish nails and our nailer to attach the two boards, striking a nail every 8-10.” Because any wood you use will never be perfectly straight, I ‘walked’ the clamps down as he nailed, forcing the boards to be as square as possible.
This left us with three 6′ L-shaped runs of MDF, like this:
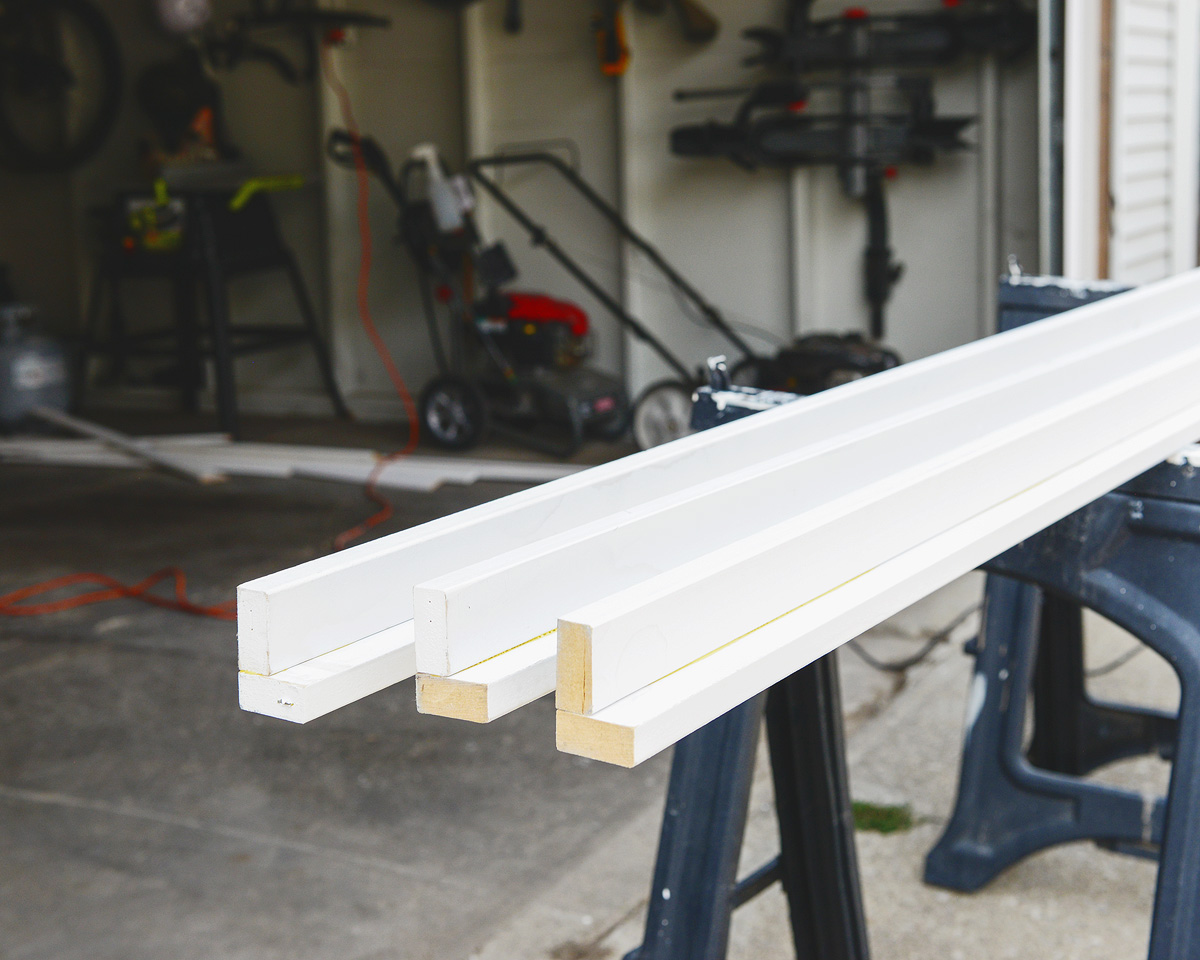
Next, it was time to get math-y. To get our frame measurements, I took our photo width and height and added 1/8″ (for wiggle room) and 5/8″ x 2 (to account for the MDF). For example, my math looked like this: 36″ + 1/8″ + 5/8″ + 5/8″ = 37 3/8.” The overall frame size for our 36″ x 57″ print was 37 3/8″ x 58 3/8,” and we used those measurements to create our mitered corners. Two of the L-shaped boards would be our top and bottom, and the third L-shaped board was used for the sides. Note: Even though we were using 1″ x 2″ MDF boards, the true measurements are closer to 5/8″ x 1 5/8.” You’ll want to use the exact measurement of the wood you’re using to create your measurements.
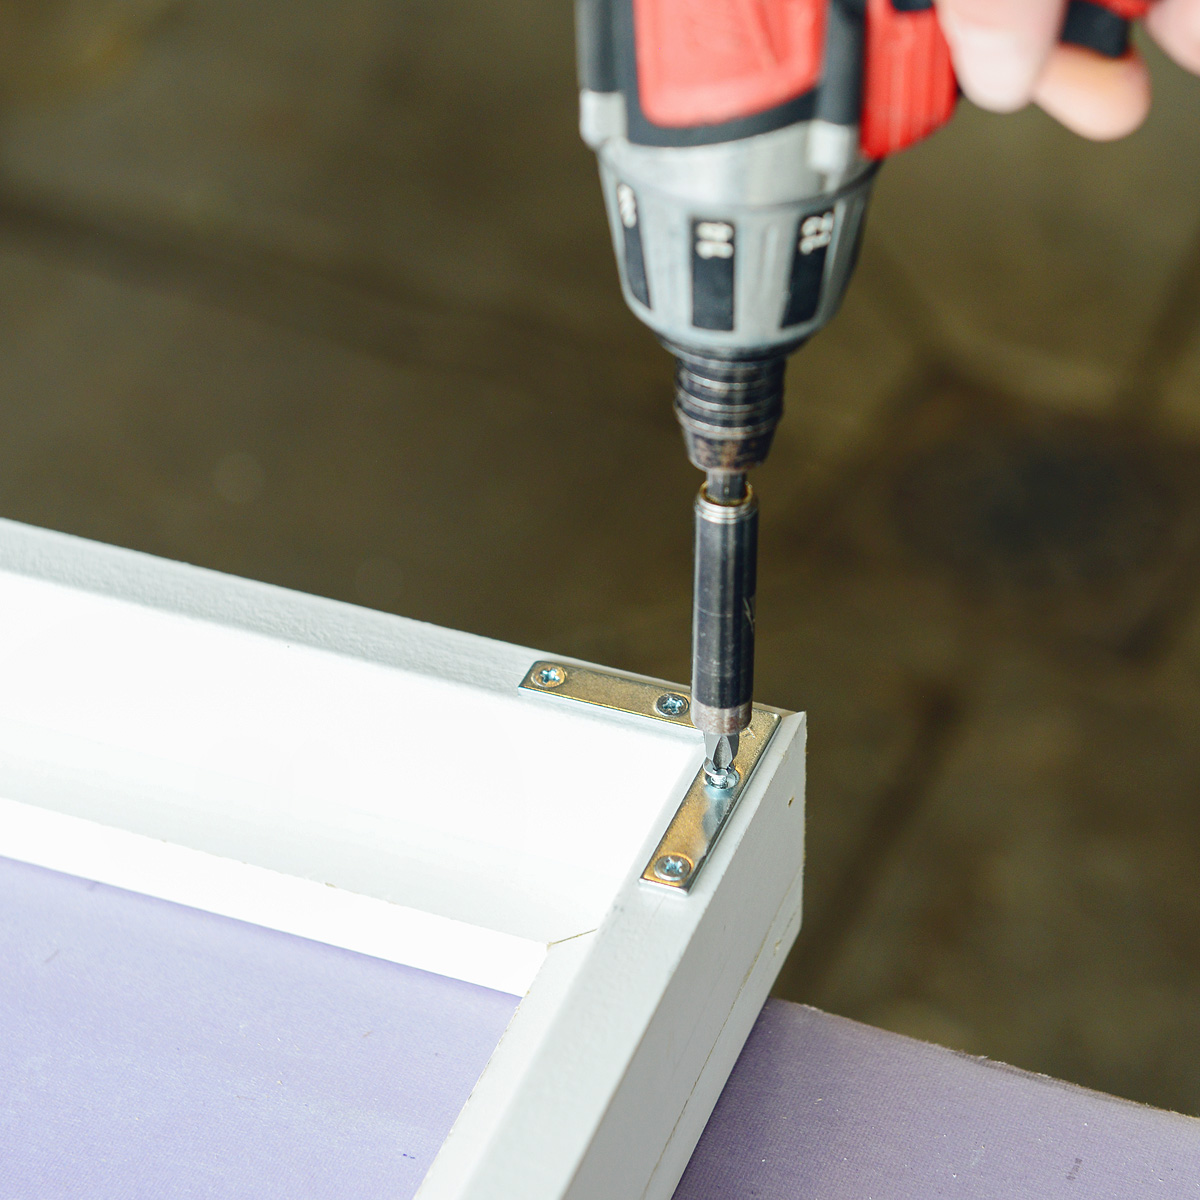
The hardest part of this easy frame? Finding a flat surface that’s large enough to work on! Luckily, we had a scrap piece of drywall that would work, and we set it all up on our saw horses. With our flat surface ready to go, we added a dab of wood glue to join the corners. Corner by corner, we used a square to align the frame, and Scott popped 3-4 nails into each one, with 1 nail on one side and 2 nails in the other, making sure to stagger them as he went.
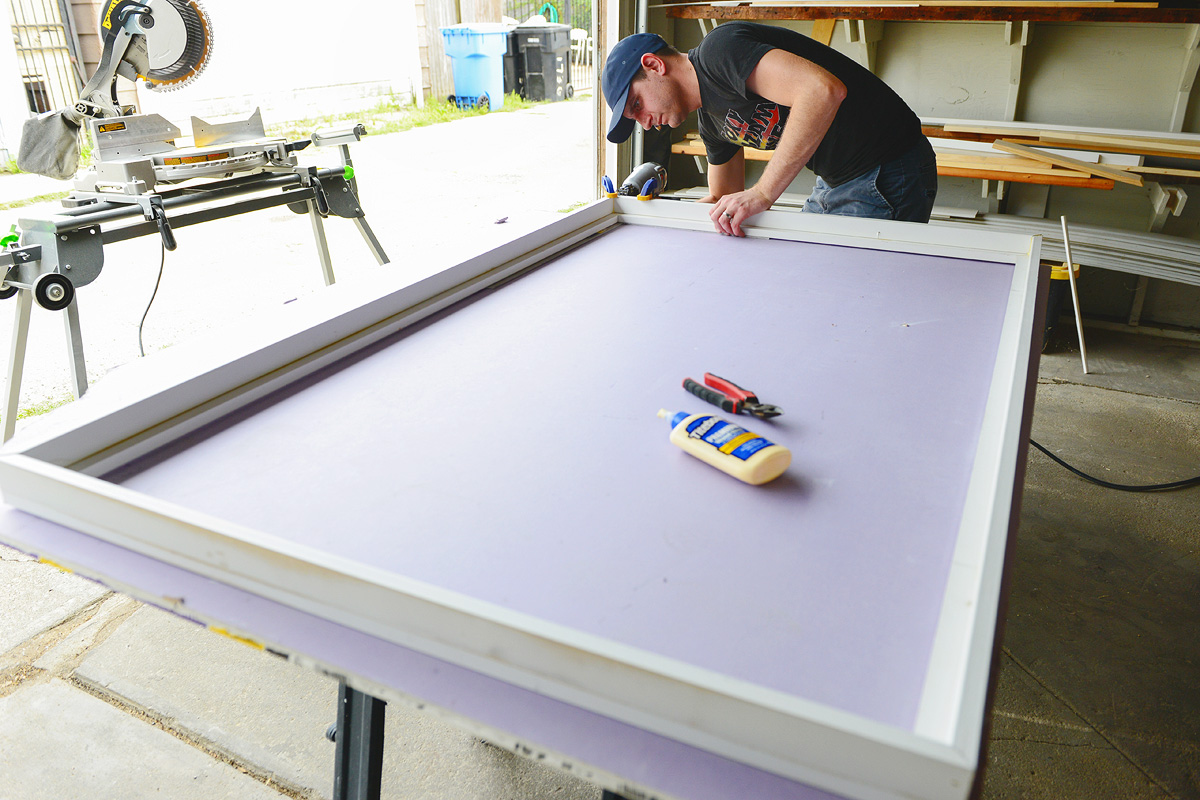
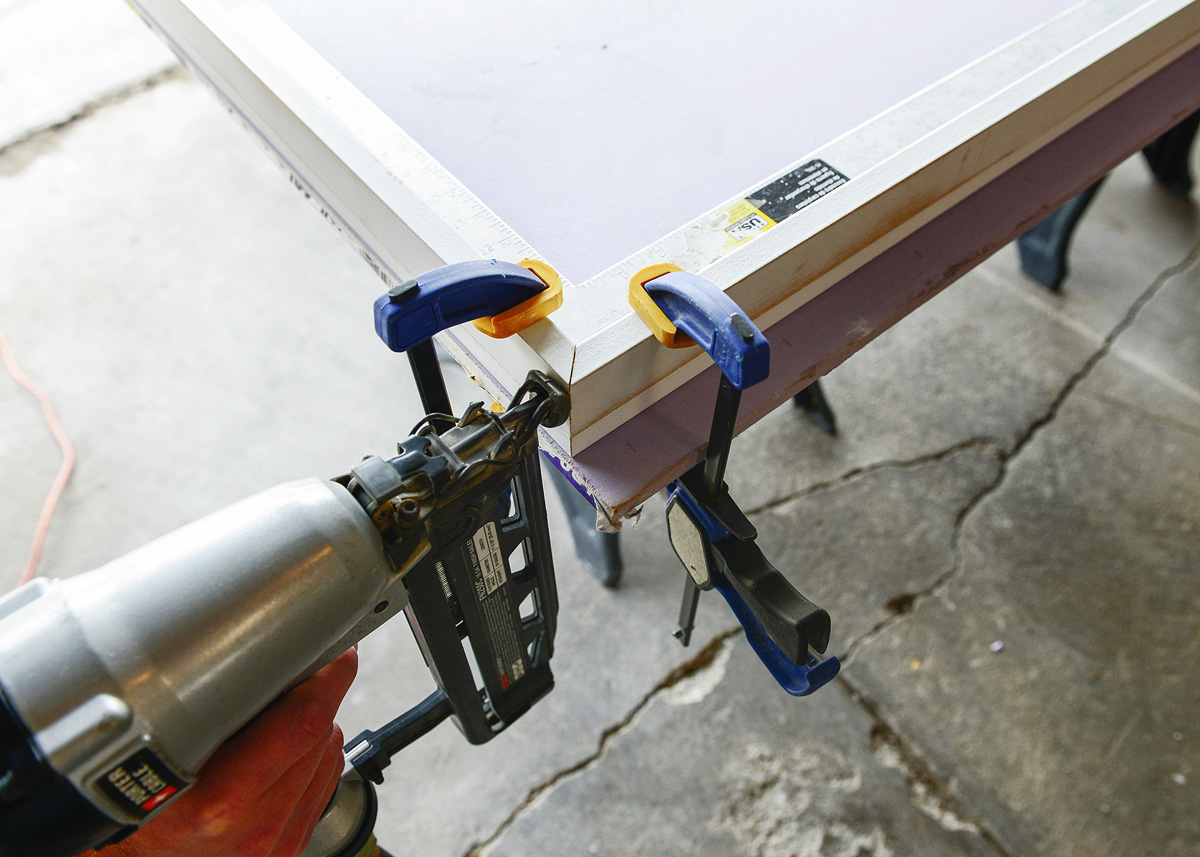
The frame was already feeling really strong, but as an extra measure, we also added 2″ corner brackets:
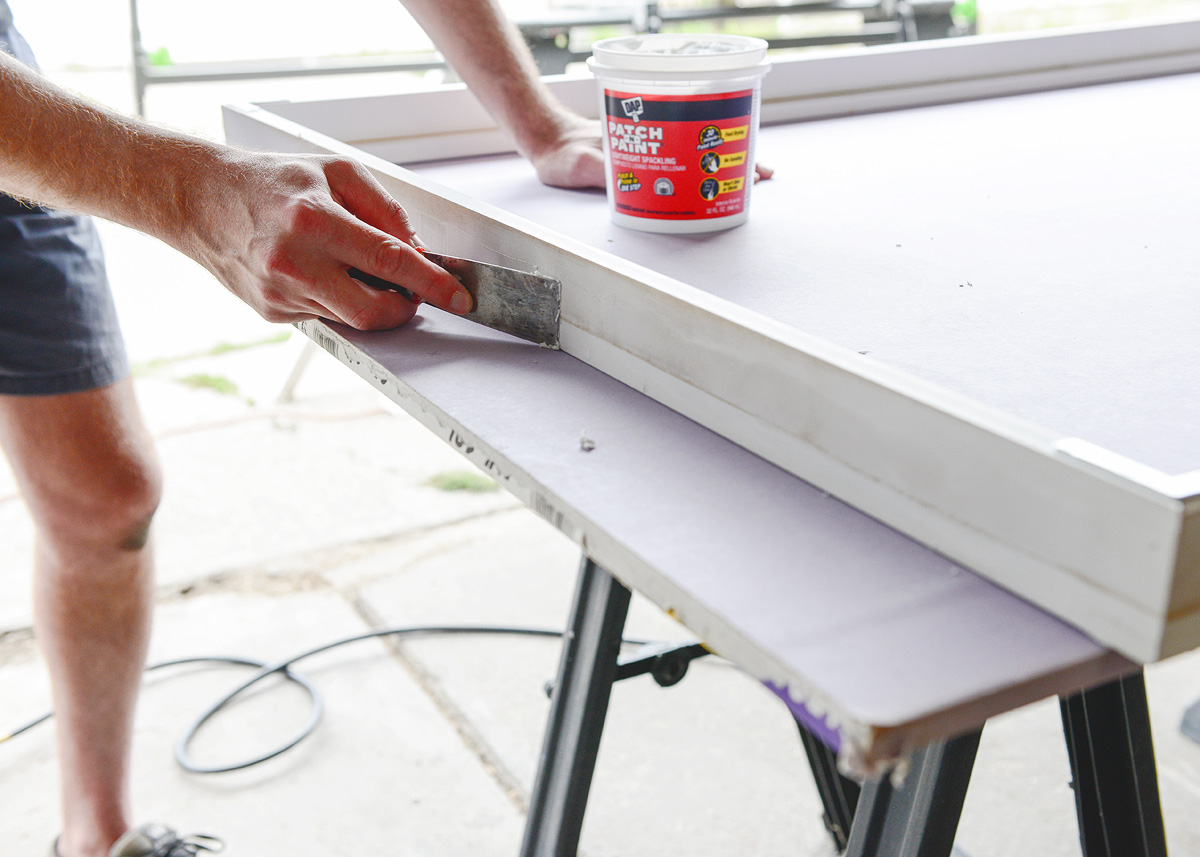
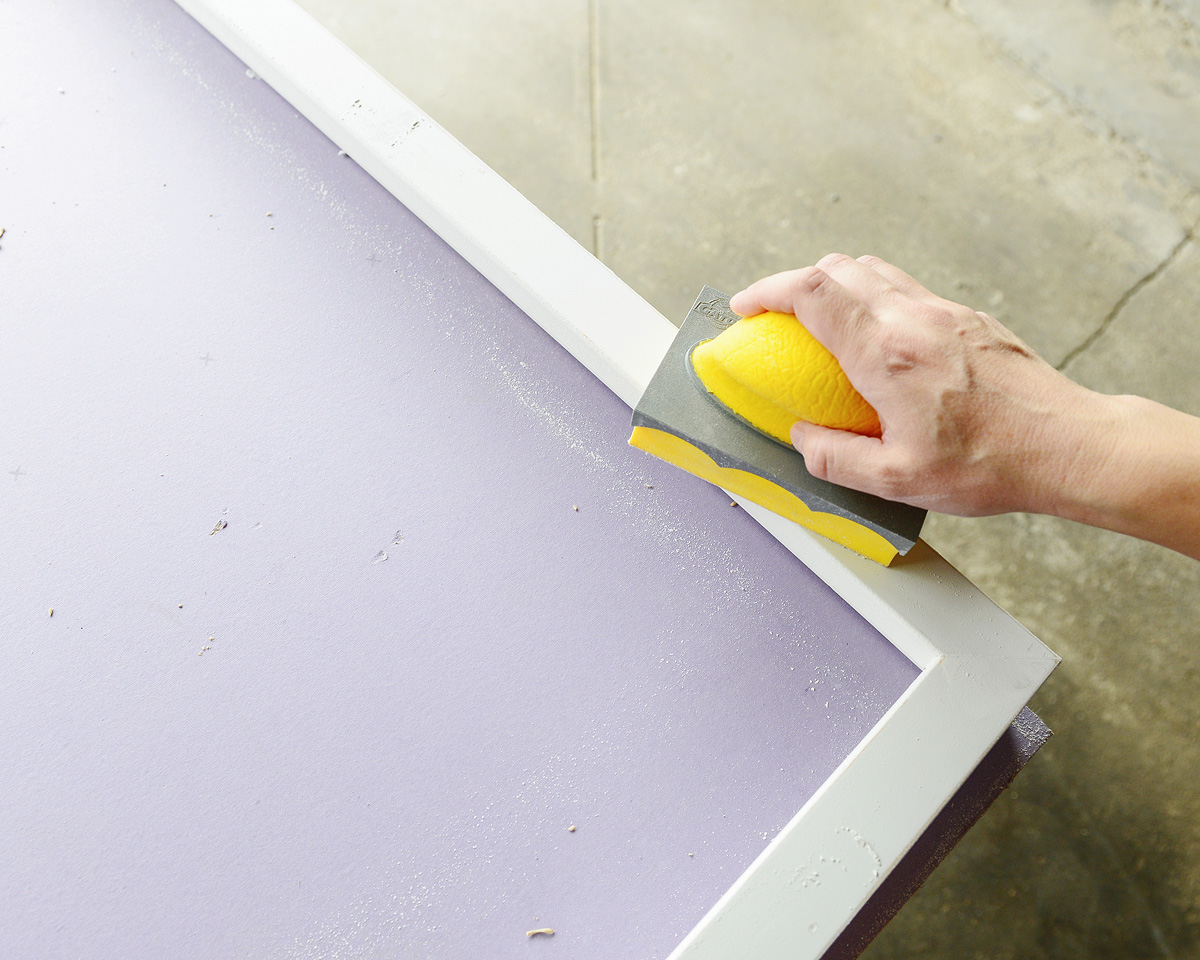
To create a seamless finish, we smoothed on spackle to cover the joint and all nail holes. Once dry, I started by using a sanding block, but in the end, we found a quick pass with the orbital sander and a fine grit paper really whipped the frame into shape!
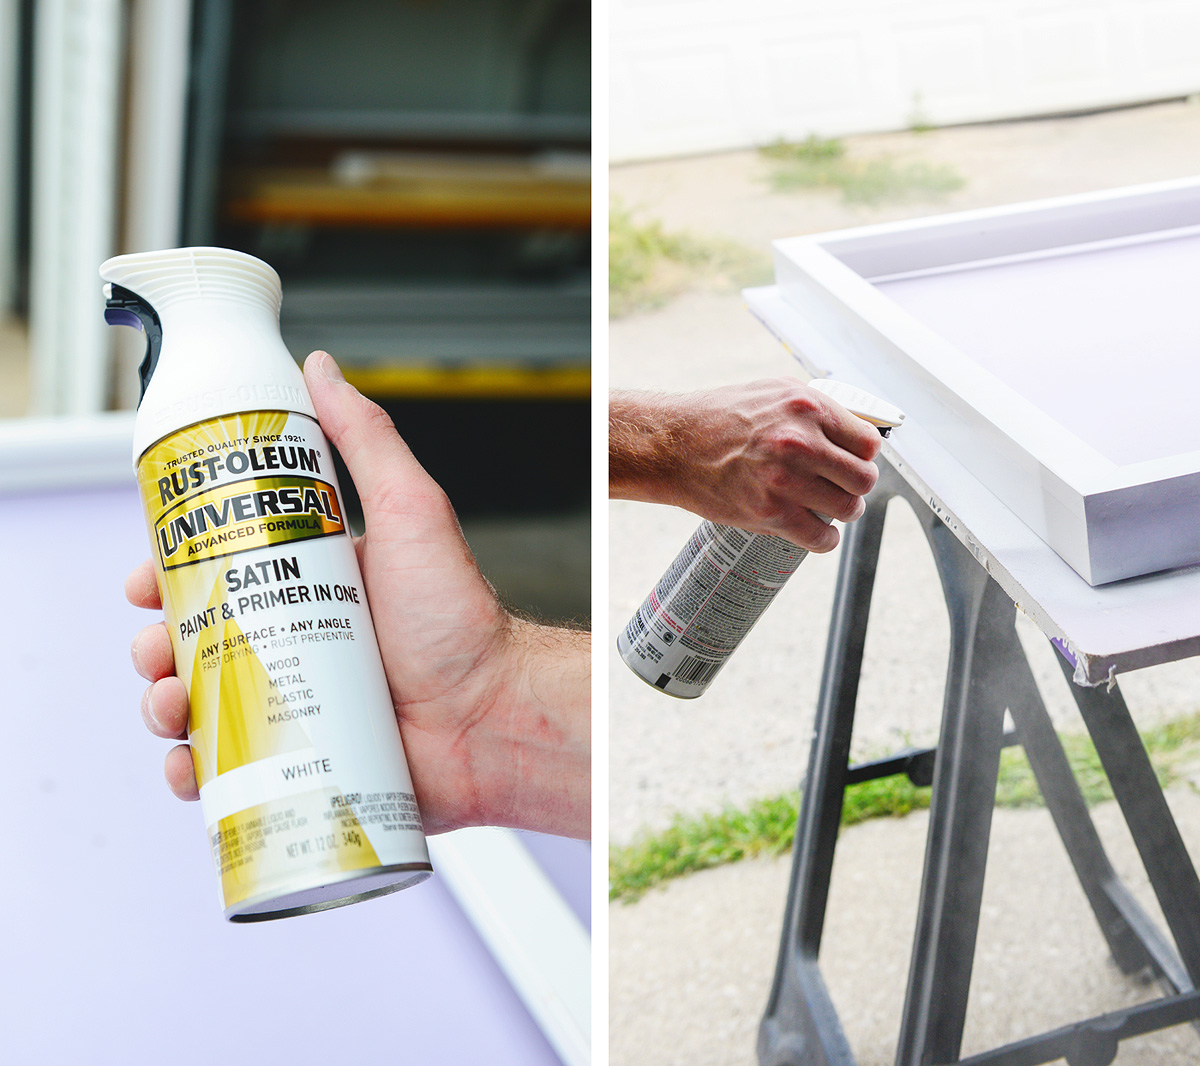
We ended up using an entire can of satin spray paint to give the primed boards a clean white finish, waiting a few minutes between coats. The entire frame received three coats, with a fourth coat only where necessary. The satin sheen was flawless!
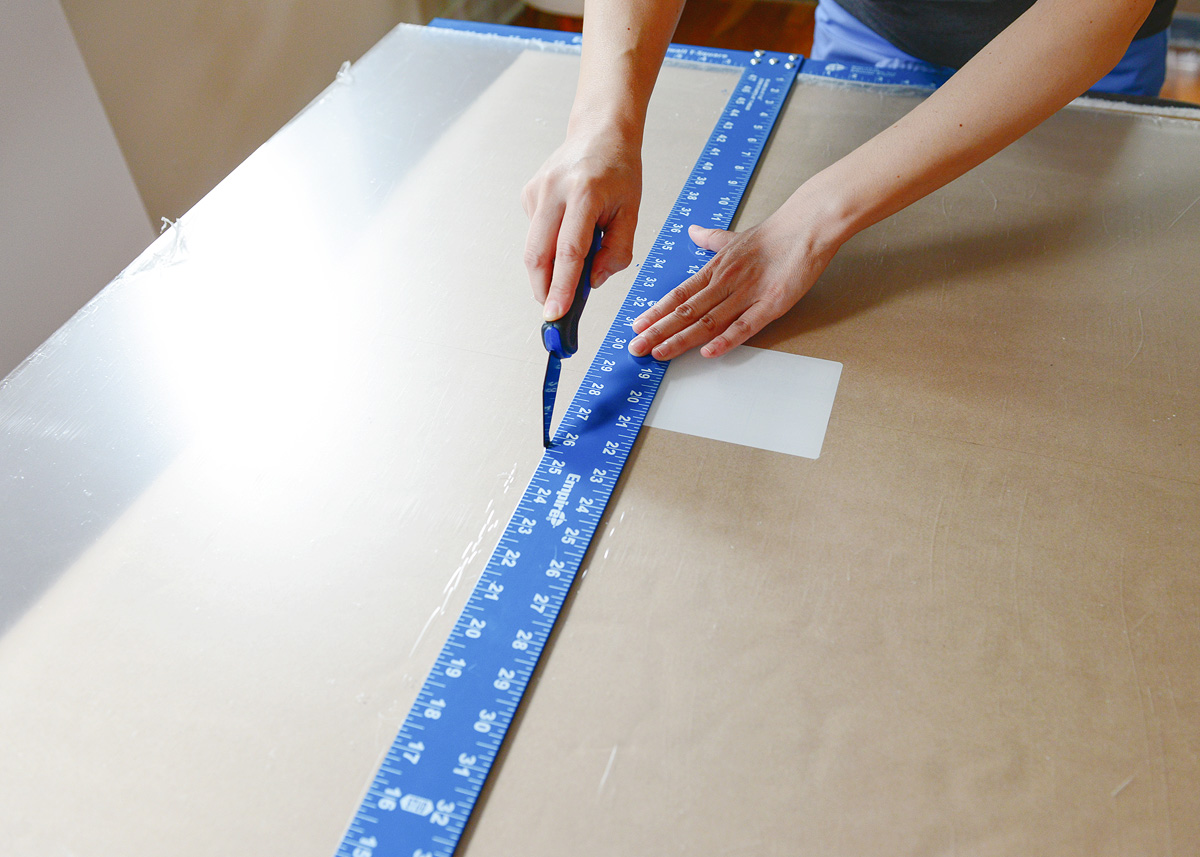
We allowed the frame to dry overnight, and the following day, we worked indoors where it would be less dusty for the next steps. We took turns using a plastic cutting tool to cut our acrylic sheet to the frame’s inside dimensions, and although we’ve never used one before, we found that holding it at an angle and running the knife along a straight edge was the quickest way to slice through the sheet. We clamped the straight edge into place after the photo below was taken, which was extremely helpful in keeping us aligned and safe! Once we were halfway through the acrylic, we were able to bend and snap off the excess.
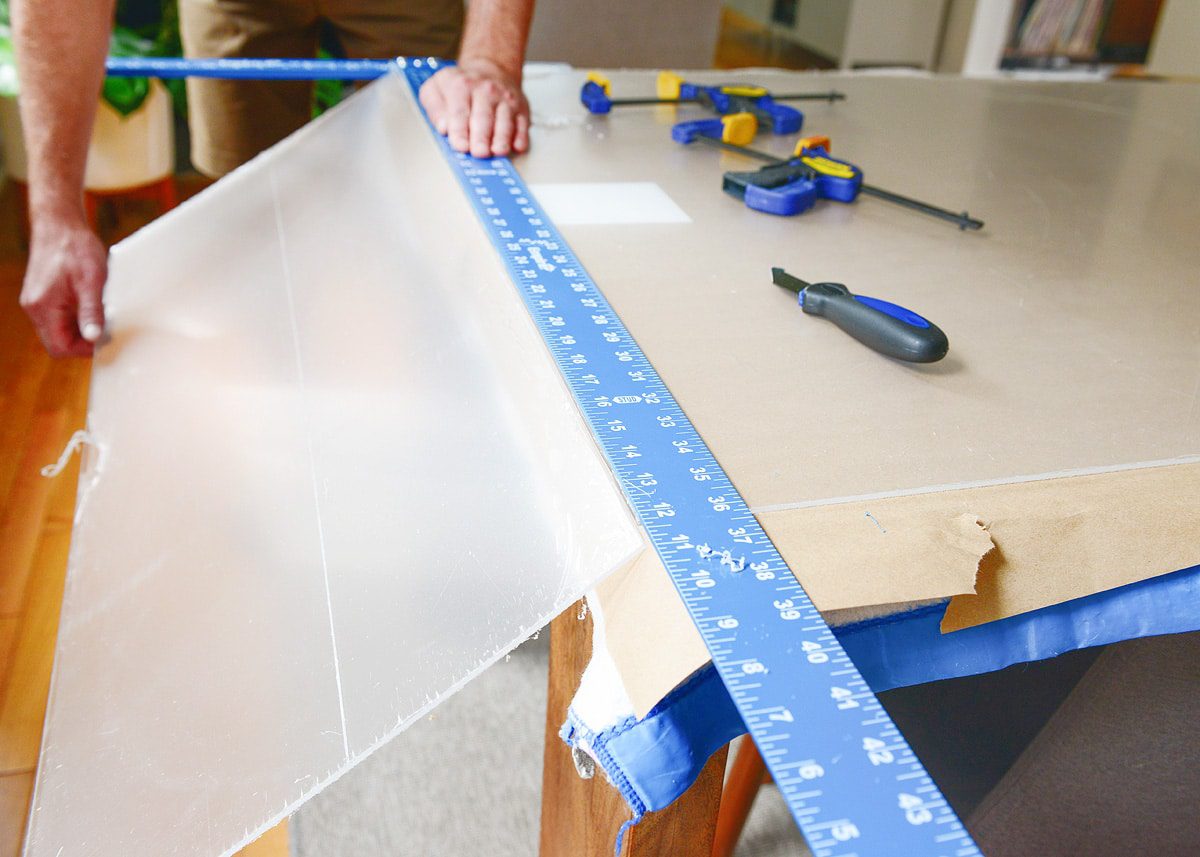
Using a fresh blade and a utility knife, we cut the foam board next, ensuring that it would be a snug fit. Note: Double check your inside measurement for this and cut it to that exact size. Finally, it was time to bring everything together!
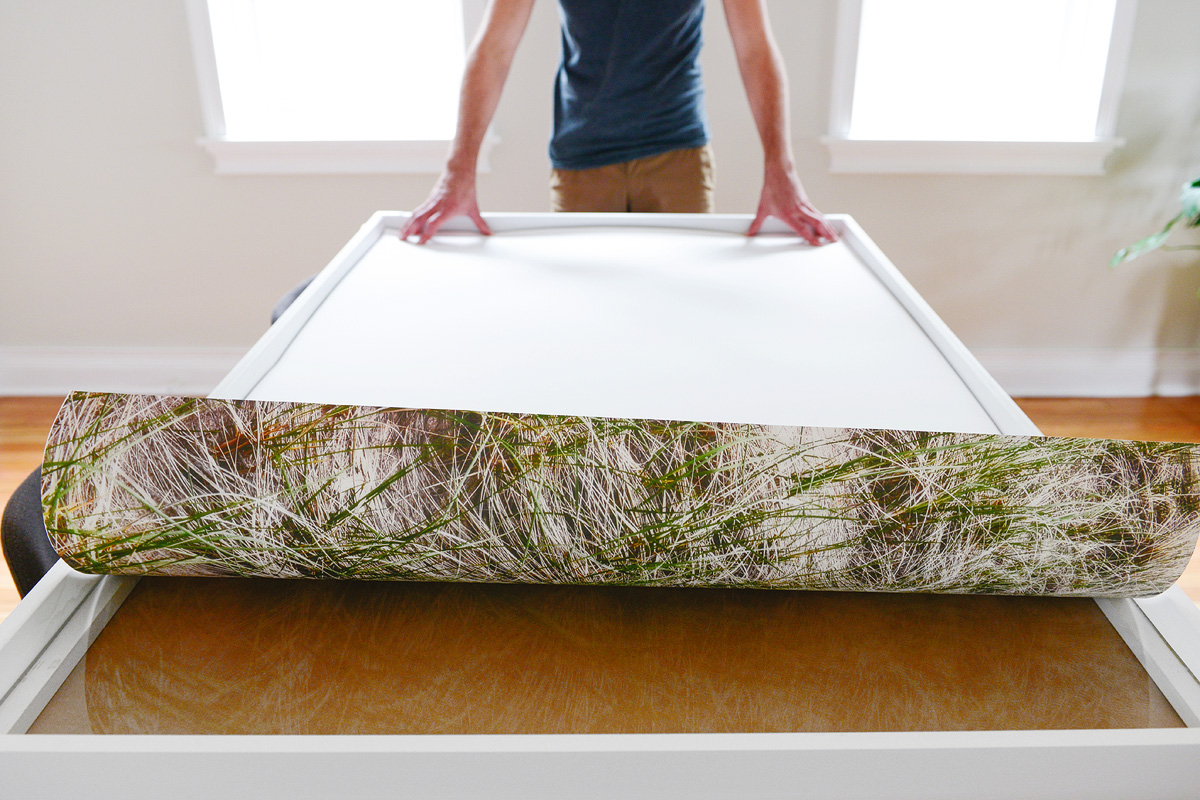
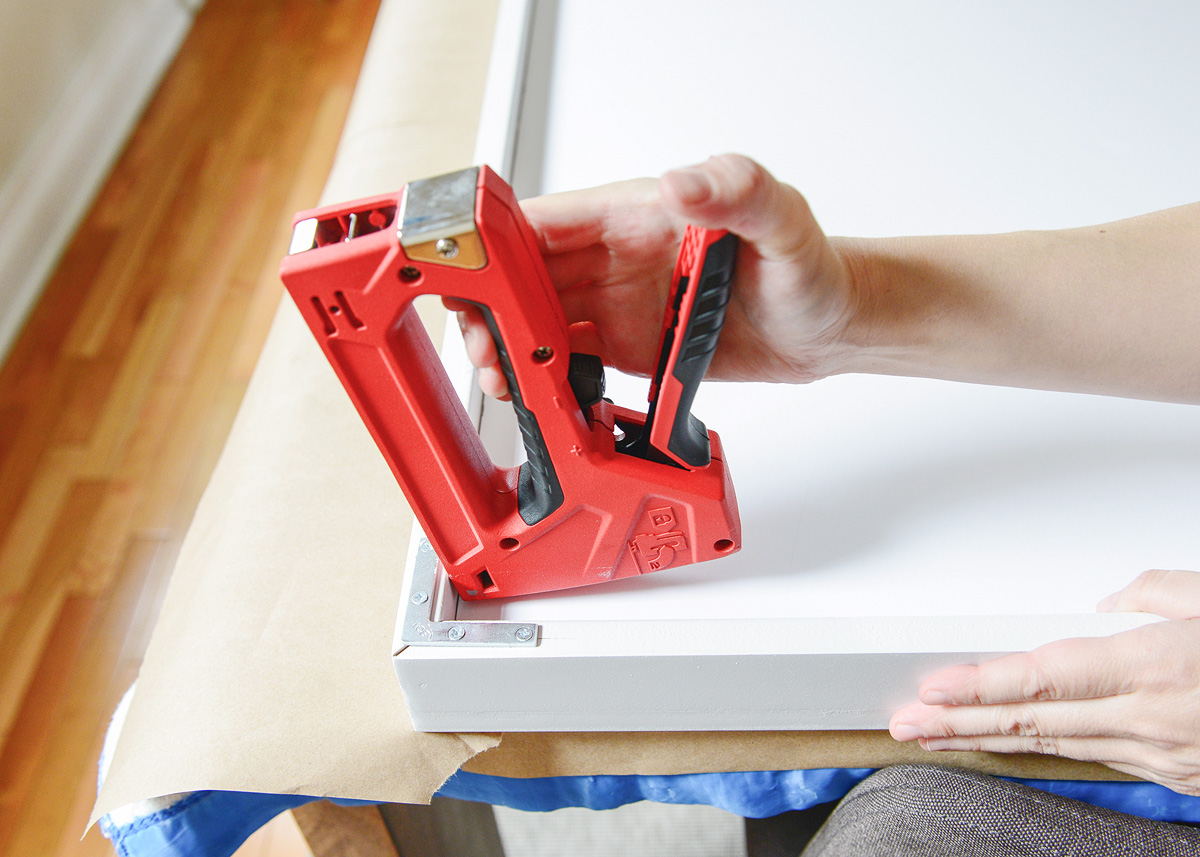
After placing the acrylic and print into place (making sure to work quickly to prevent any excess dust and debris), we laid the foam board in last. I used a staple gun every 8-10″ into the side of the frame to hold the foam board in place, which has worked well for me over the years on various framing projects! Any rogue staples can be pulled and re-done, and if your staple ends up too high, you can push them down with your thumb or a screwdriver to keep things snug.
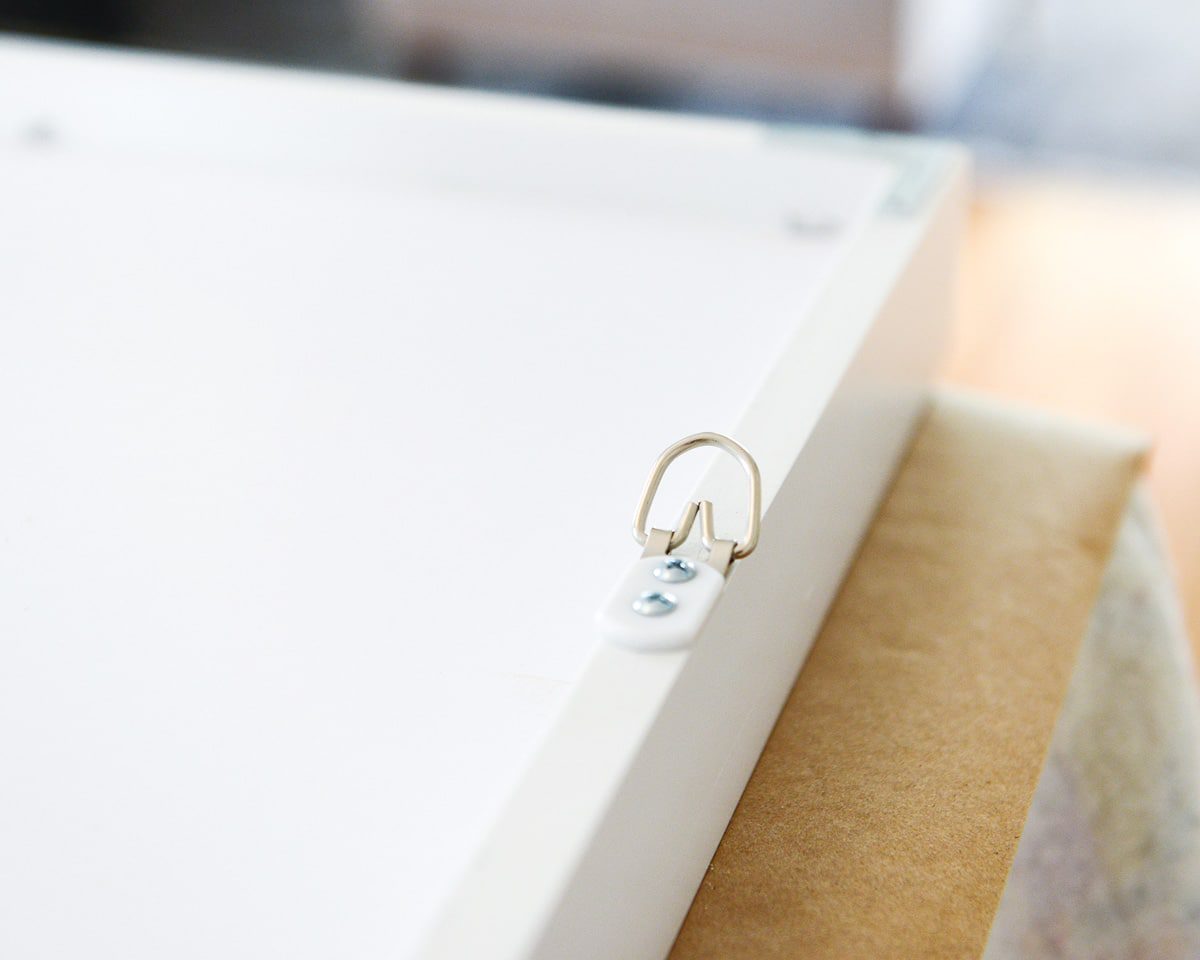
Even though the foam board and acrylic keep our frame light, we decided to hang our photo using two D-rings with one anchor per ring. Not only will eliminating a wire prevent the frame from tipping to one side or the other, this method will also keep the frame as close to the wall as possible!
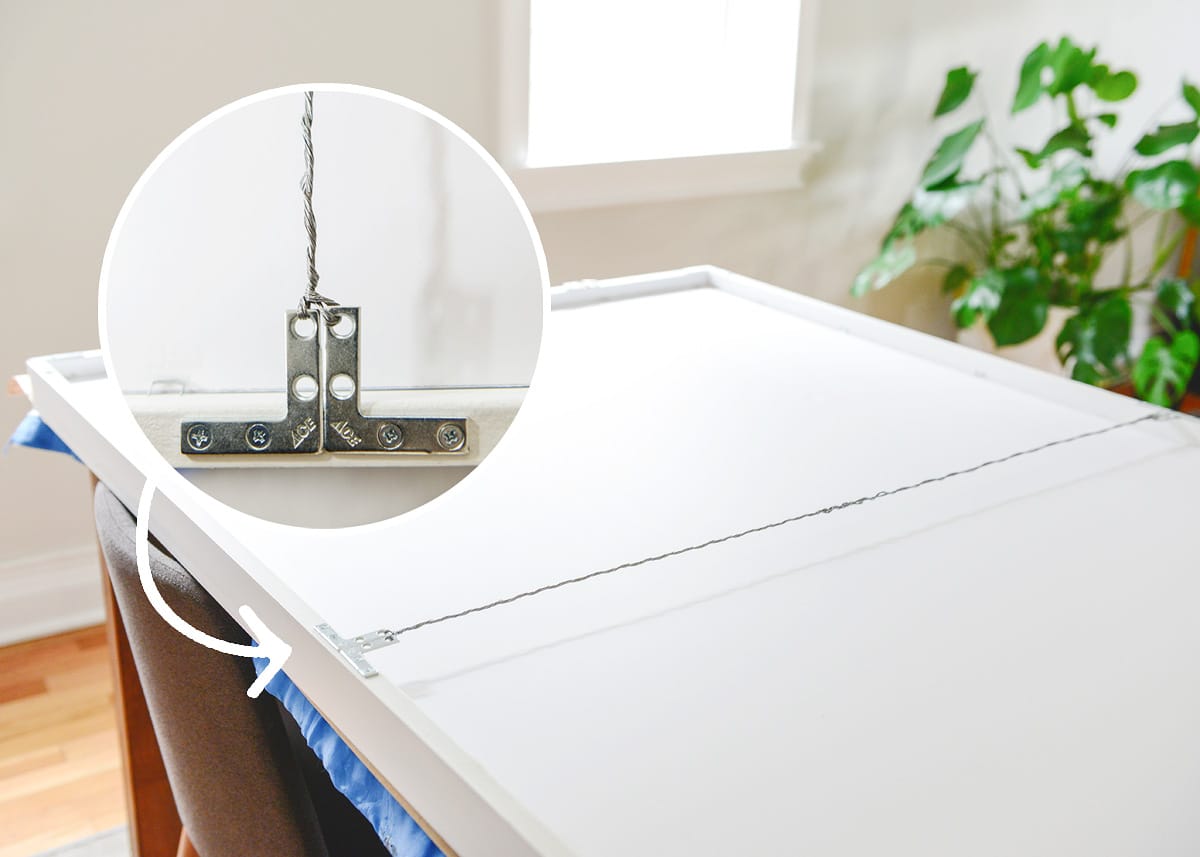
The last step before hanging is optional, but we recommend it for the longevity of your frame. Using the remaining 4 corner brackets, we create a T-shape in the center of the top and bottom of the frame. We had spare hanging wire from a past project, and we used this to string the two Ts together, pulling the frame tight. Down the road, you won’t see any sagging or bowing that is so common with large artwork!
Framing artwork is one of those things that’s so exciting to see come to life! After having a blank wall for months, we were amazed at how the room immediately felt cozy again. Knowing that this photograph was from a memorable weekend makes us smile every time we look at it, and the natural texture of the dune grass and sand lends a subtle warmth to the room.
Overall, the final profile is 2″ deep, reminding us of an oversized version of everyone’s favorite IKEA frame:
The dinosaurs were fun while we had them, but change is just as fun, we think!
Living room sources:


Awww- I loved the dinosaurs, I think I started reading around the time you did those. But I totally get moving on and updating and simplifying. I am so impressed with your frame building skills!
I absolutely love this one-it’s so zen and tranquil. I would totally just sit in the doorway and stare at it. :-)
Thanks for sharing! Your new print looks great. How/Where do you sell your home goods? I’m not a huge fan of Craigslist, so I would love to know if there’s an alternative. Thank you!
We just use Craigslist! Good photos go a long way, and pricing items to sell does, too. If someone needs to pick it up at our home, we always make sure that we’re both here together, and we’ll usually carry the item to our entryway (or the front porch), so they don’t need to go through our whole home.
I should also say, we’ve had some success with Krrb as well, but it’s more of a concentrated audience. We’ll list there if we’re looking to get top dollar.
Thank you for this! I have a wall itching for one big print and I was dreading having to fork over a billion dollars for a huge piece of art. This feels like a much more cost effective way to get the look I want!
Beautiful! May I ask what type of resolution you had for the photo? Would it be possible to blow up an iPhone pic and have it look this great?
I used a really high res photo for this size, but I’ve been people use iphone photos and create engineer prints (which are supposed to look less than perfect), and it’s turned out really cool.
damn! i came here with the hopes the dinos would be for sale, but alas someone beat me to it!
Doh! I feel like we’ve let you down a lot this week, Erica!
Awe, I loved those dinosaur prints! I totally understand wanting a change, though. It’s sweet you chose a picture that is meaningful to you :) It’s such a calming photo. Thanks so much for the fantastic tutorial!!!
Just a tip for those that are WAY less diy handy, art.com has a service called “photos to art” and basically you can upload any image ( I didn’t use a photo I used an image I downloaded from the Getty’s open content site) and get it framed (even with a mat if you want). The best part is that you can select massive sizes.. up to 56″x42″. It looks expensive online but they have crazy 45% off sales on every random holiday with free shipping PLUS coupon codes. I recently got a 33″x48″ framed print for under $100. The print quality is amazing and the frame is sturdy. It literally shows up at your house in a massive box ready to hang. Granted, you don’t get to tell your friends you MADE a frame ha!
Ohh, great tip, thank you, Laura!
We did DIY frames for a project on our site last year and I was shocked by how easy it was! Such a great money saving option since frames can be so pricey!
Paige
http://thehappyflammily.com
Equivalent of framed wallpaper IMO. Team dino! Great frame tutorial though!!
This looks so great! I can’t remember if this is the print I voted for. All I remember is I was on team Scott.
If you were on team Scott, this was NOT the one you voted for, haha!
Oh this is perfect! It looks fabulous and so easy to make :)
Best,
Kelly
[…] [source: Yellow Brick Home] […]
I love this frame tutorial, great work. That print looks awesome.
Would you please be able to share the source for all those materials? I am having a hard time finding a foam board of that size. thanks.
Thank you! The foam board can be found at an art supply store! We went to Blick’s for ours. Everything else can be picked up at a Lowe’s or Home Depot, including the acrylic sheet. Good luck!
Hi! Love this so much! Do you have a rough estimate of the cost for all of your materials, minus the print itself? Thanks!
Less than $50, I would think!
[…] Check out here another great giant wall art frame that is purely self-made and brings great décor statements to the targeted wall area! Here this frame is made of MDF, foam board with the acrylic sheet and comes with raised boundary all around! Finally, a high-resolution painting or photo print has been inserted inside to make a stunning looking wall art sign! Another cool large-scale giant art frame to make at home! Full project tutorial here yellowbrickhome […]
How does stacking two pieces of MDF help eliminate the need for a router in the frame-building process?
The inner piece is narrower than the outer piece. This creates a lip for the plexiglass to sit inside. Hope this helps!