

table | chambray shams | linen sheets | duvet | velvet pillows | bed | USB lamp
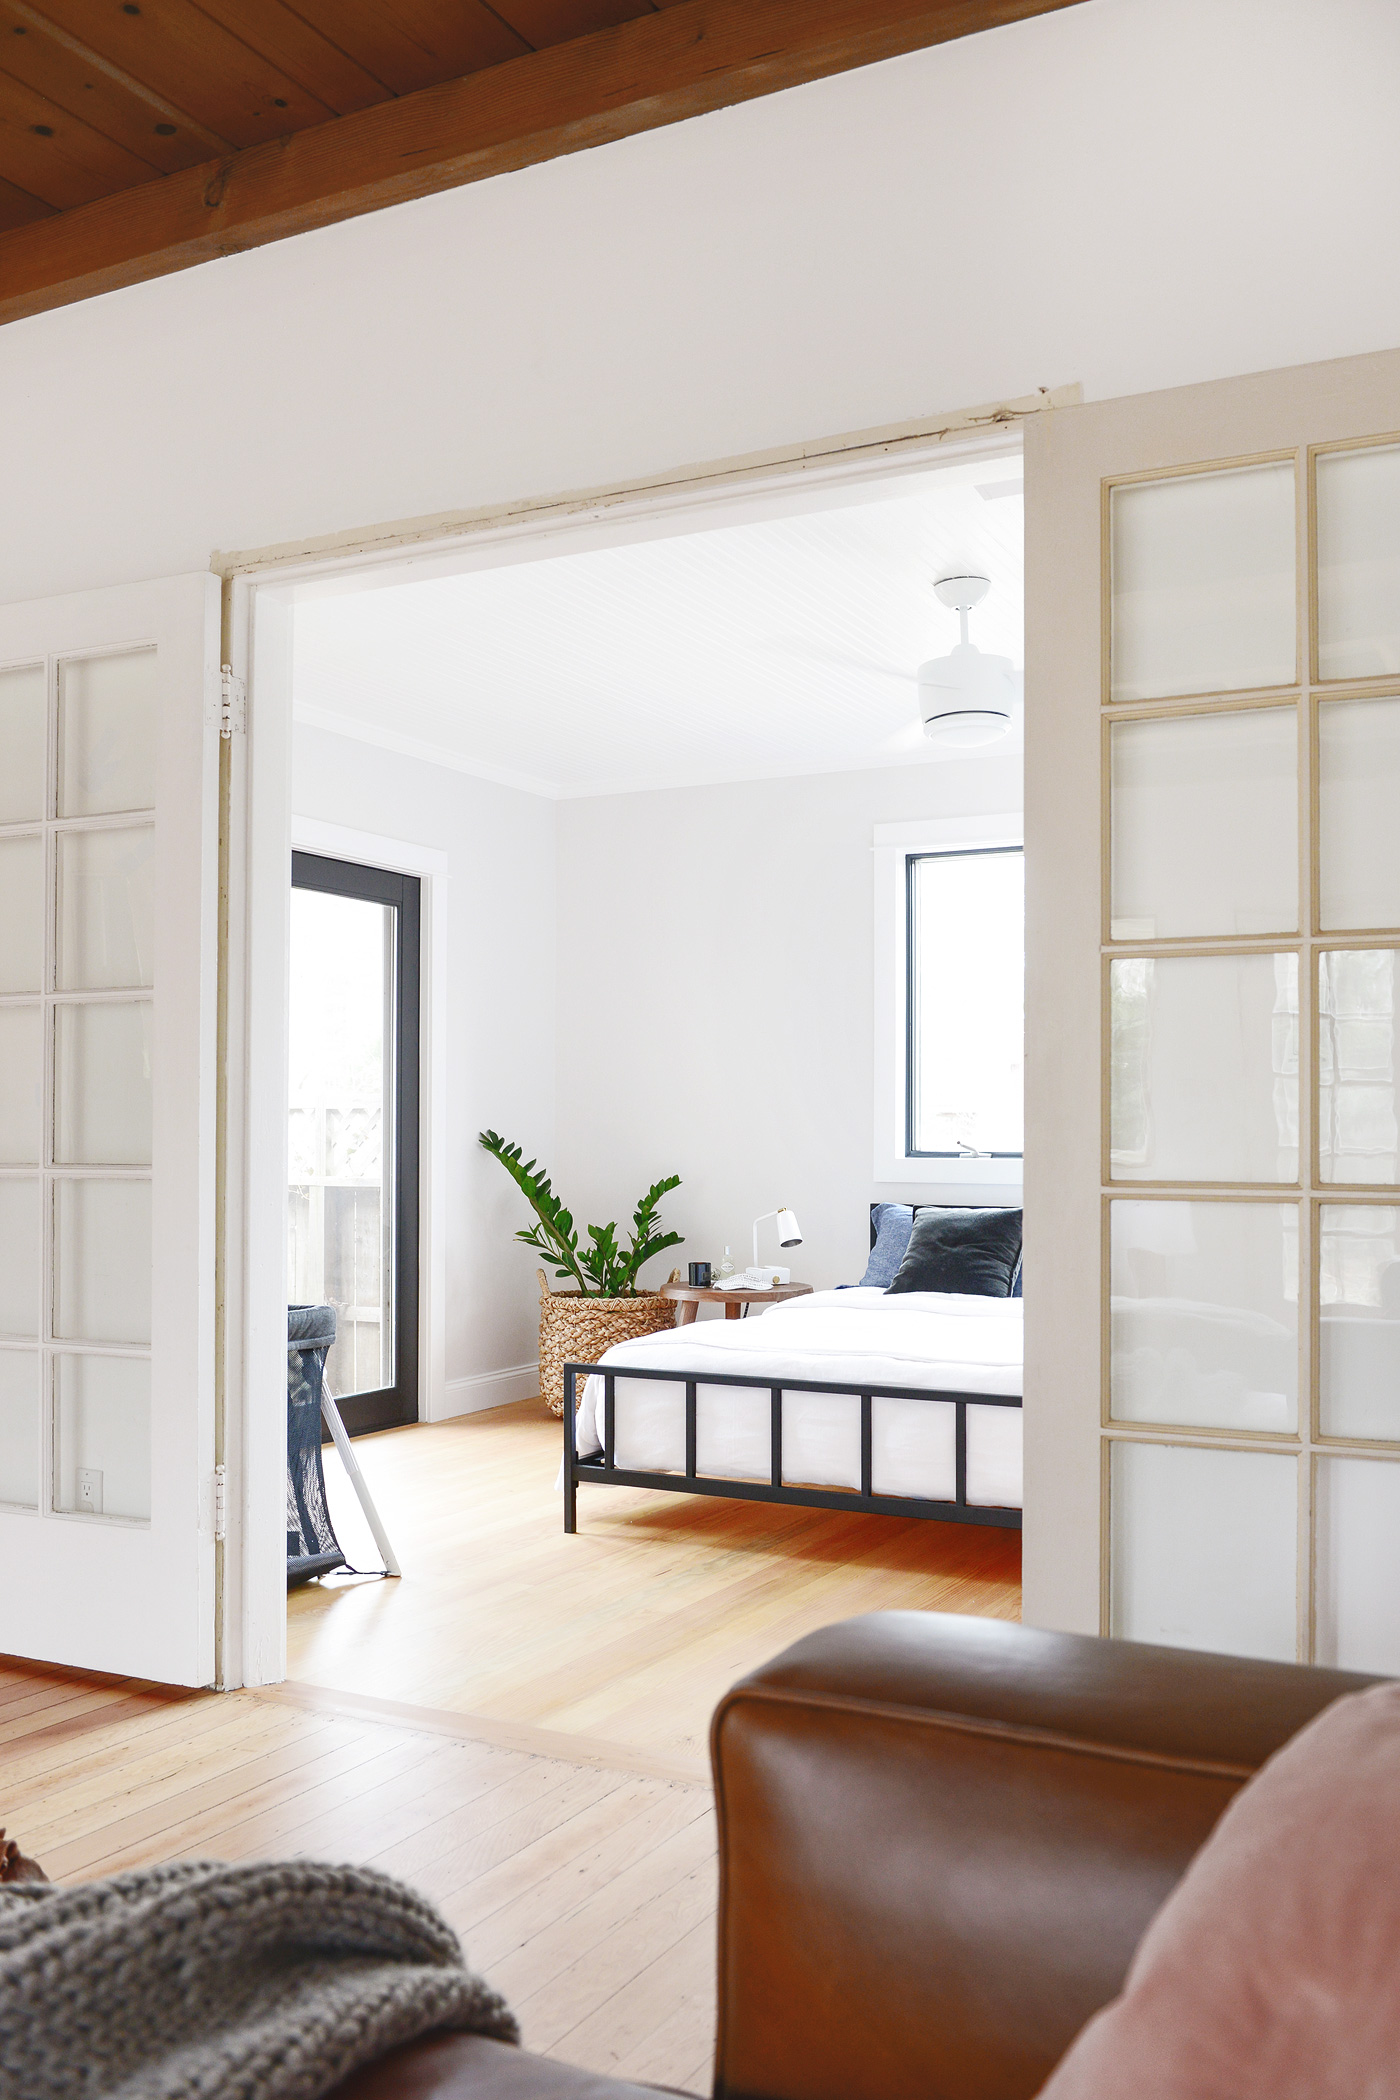
The master bedroom in Tree House has come so far! It’s the only space in the home that we could even consider (somewhat) complete, only in the sense that it has baseboards. And window trim! And painted walls! And, as of a couple of weekends ago, black windows and a black French door! Those first few strokes of black paint on white can feel intimidating, but my goodness, we are so glad to forged ahead.
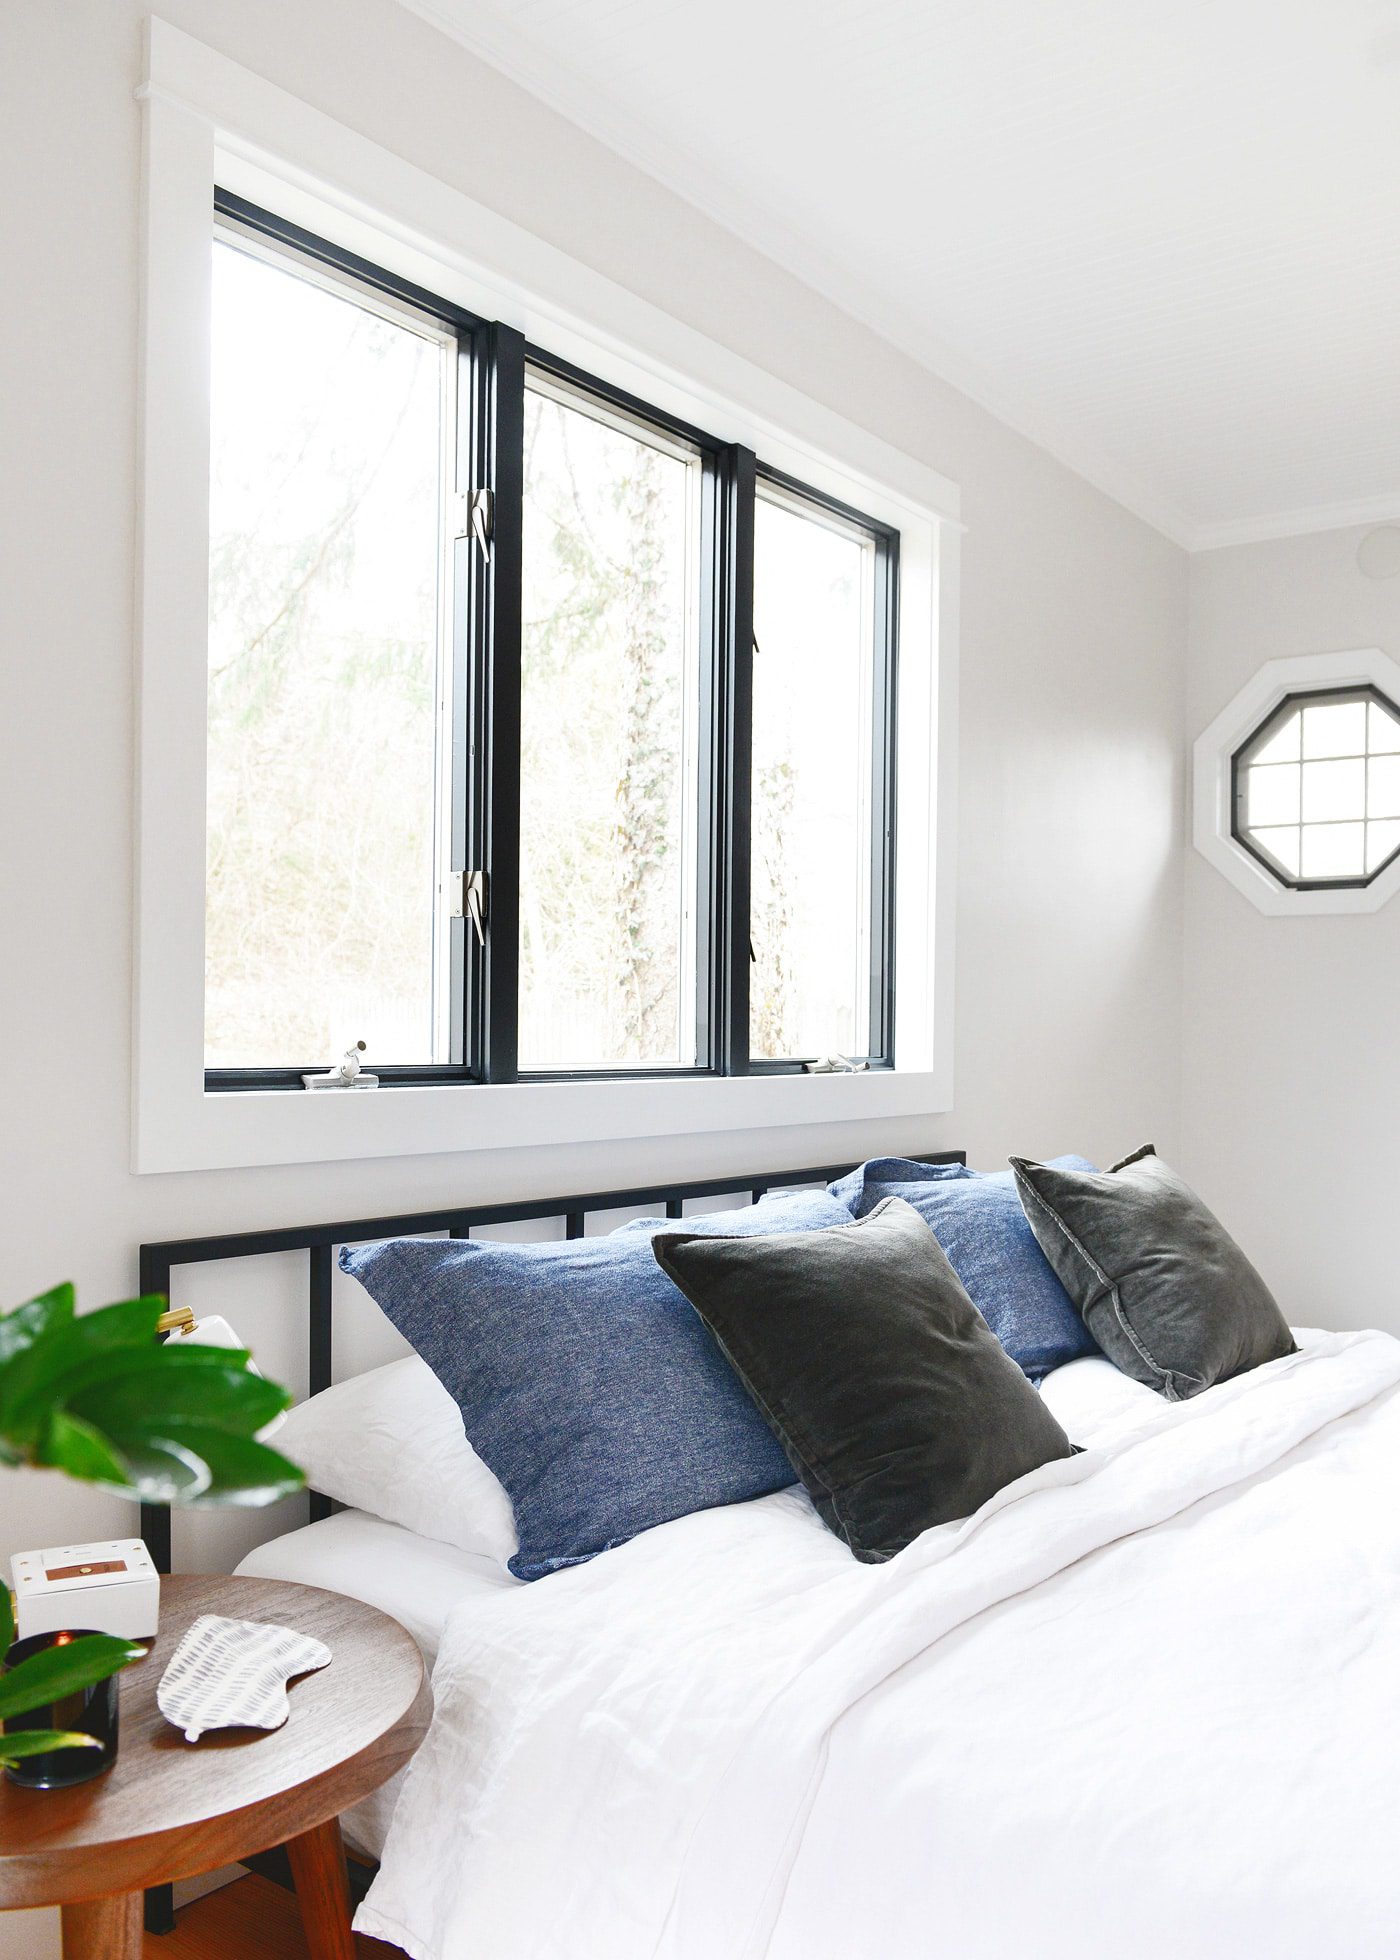
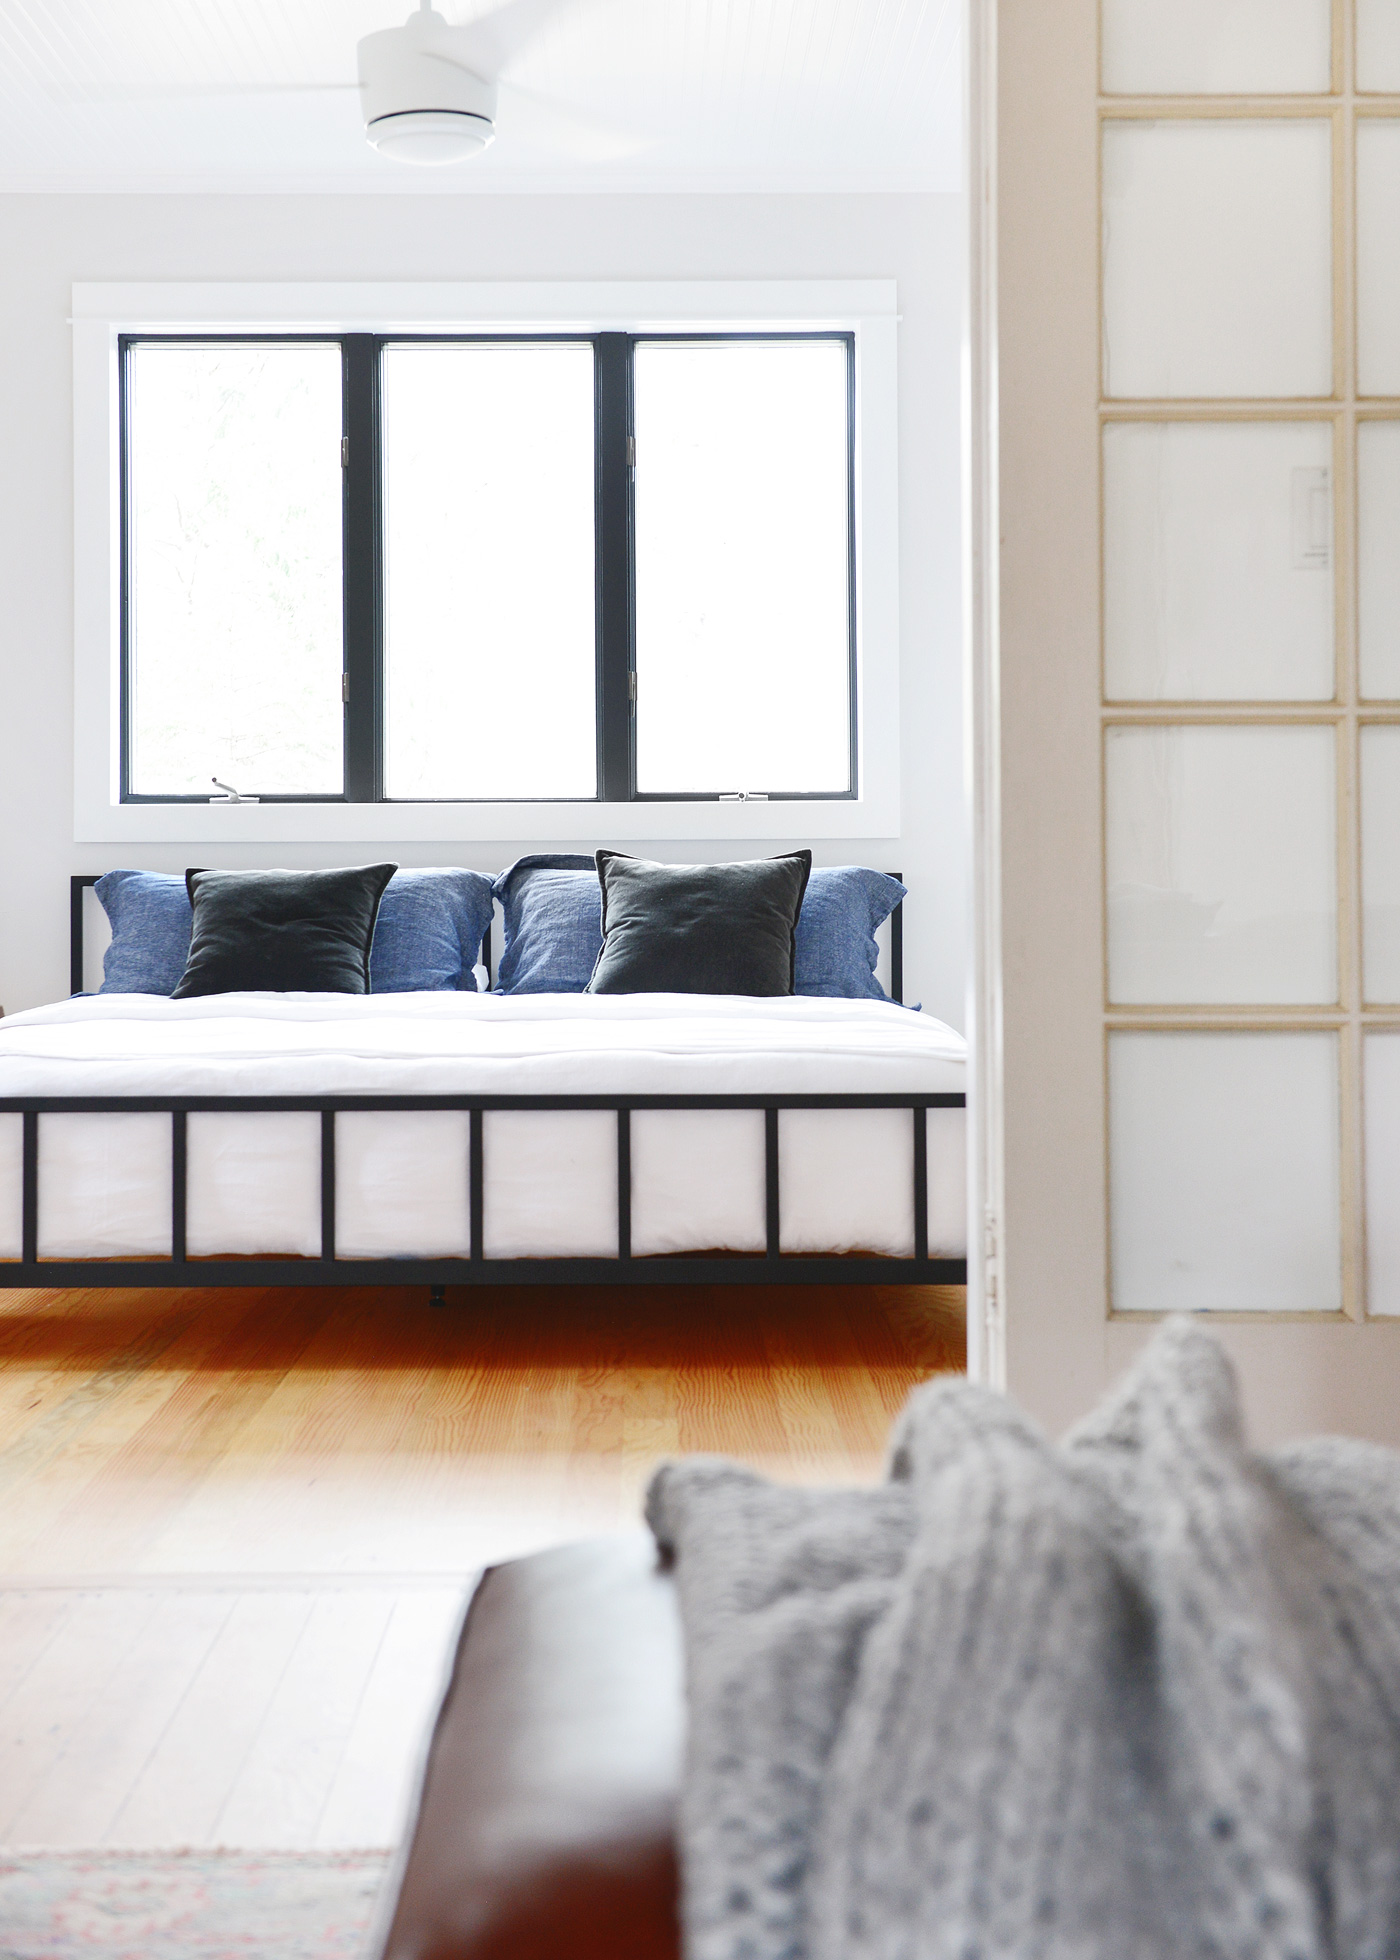
All the windows and doors in Tree House are wood, although some of the windows – including the one above the bed – are a more recent edition. There are two adorable casement windows in the guest room and bath, and keeping in the theme of our home, the new window for the kitchen(!) will also be wood. Only having owned homes with vinyl windows to this point, we were excited at the possibility of being able to paint our windows whatever color we wished – and by ‘whatever color we wished,’ I mean, white (like the trim) or black (for pretty contrast). Many of our inspiration photos showcase black window frames (we’re constantly bookmarking favorites as we scroll through our Instagram feed), so we turned to you and took an IG poll. Should we?, we asked. Overwhelmingly, you all said yes!

You’ll notice that after ripping off all the trim throughout the house, this bedroom has the new, beefier trim installed! While we were at it, we added beadboard and trim to the guest room, too. (Here’s a past tutorial!) Everything was caulked, spackled and painted white (by no means do I want to downplay the amount of effort that takes – phew!), and the following day, we taped off the windows and cracked open a fresh can of paint in the color Benjamin Moore’s Black Magic.
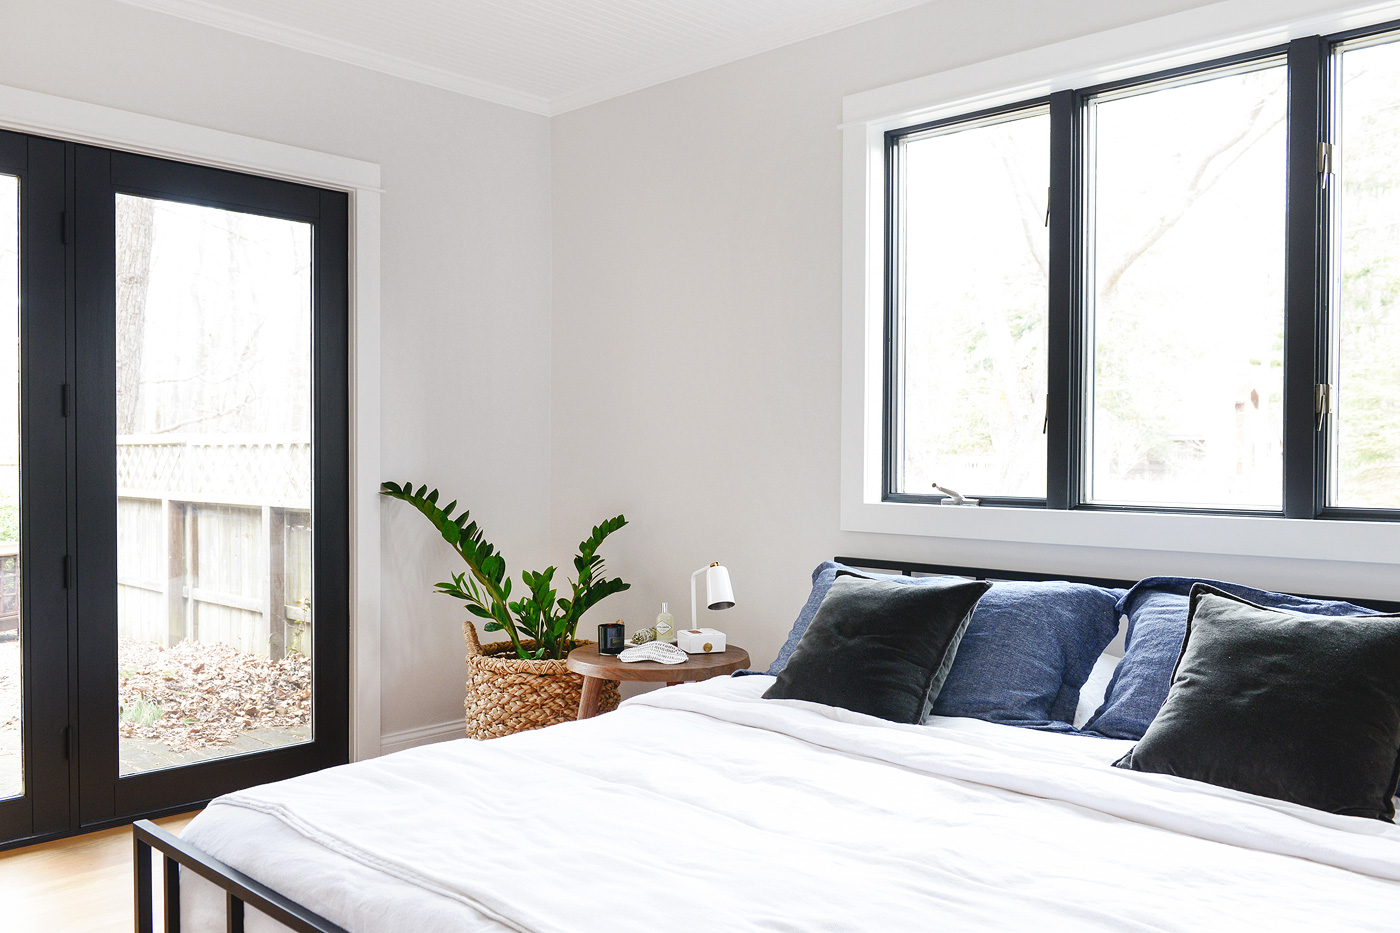
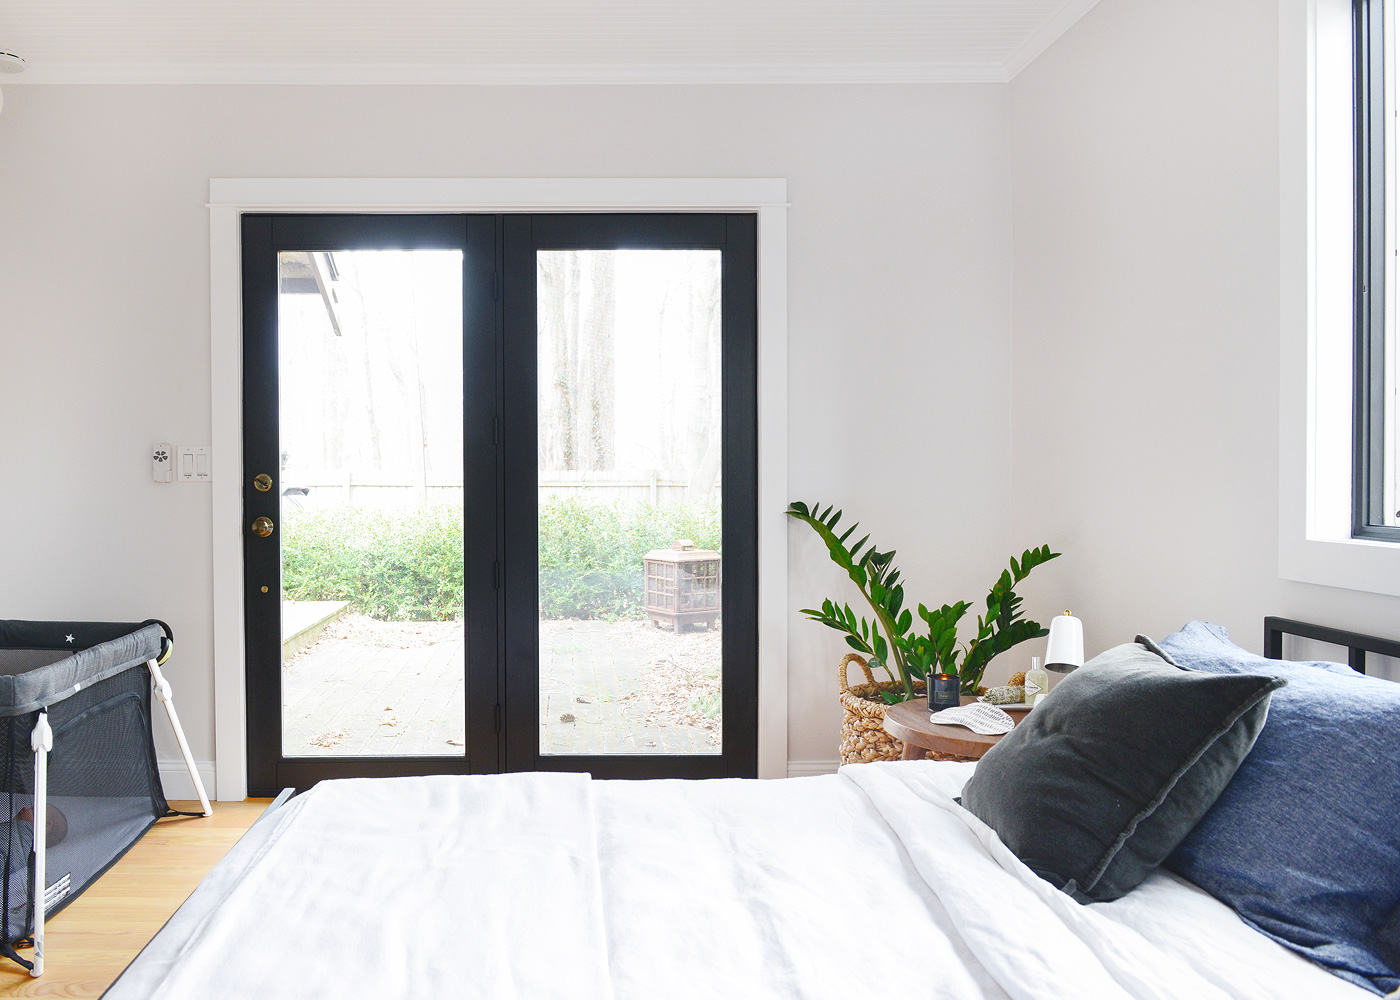
We shared a sneak peek of the progress on Instagram (by the way, we’ve been doing more in-progress shots over there on our Stories!), and we received a lot of questions asking about our process. Aside from carefully taping off the windows, hardware and day-old painted trim, I just used my favorite 2″ short handled angle brush to apply 2-3 coats of black paint over the course of the day. Although these windows and doors had already been painted in the past, lucky for us, the old paint was relatively clean and thin. When we move on to the French doors that lead into the bedroom, well, that’s another story for another day. (It’s gloopy and drippy, and that pair will require more attention when the time comes!)
We used Valspar Duramax exterior paint in a satin finish, and we had it color matched to Sherwin Williams Black Magic. Black Magic is just one step below a true black, and it leans ever-so-slightly warm, which we were looking for. It’s a gorgeous color! That said, I’m not convinced we liked the quality of the Duramax, but time will tell. It felt slightly tacky after several hours of dry time, which had (and still has) me worried. That said, we’ve used exterior grade Valspar Reserve with excellent results (Reserve, we love you so), and I wish we would have taken that route! Sadly, our store was out of the exterior Reserve, so we took a recommendation from the sales rep. Lesson learned.
For the doors you see below, I did something I swore I would never do, and that’s paint the hinges! I know, I know, but they were a bizarre shade of cream, and our thought was to paint them now – simply so they don’t stand out – and replace them with proper black hinges later. But once I finished painting the hinges, we were surprised at how well they blended in! You guys, dare I say that they looked pretty great? We might replace the hinges down the road, but it’s not a priority at this point. (Shame on us.)
Let’s do a quick before and after on this side of the room!
In This Post
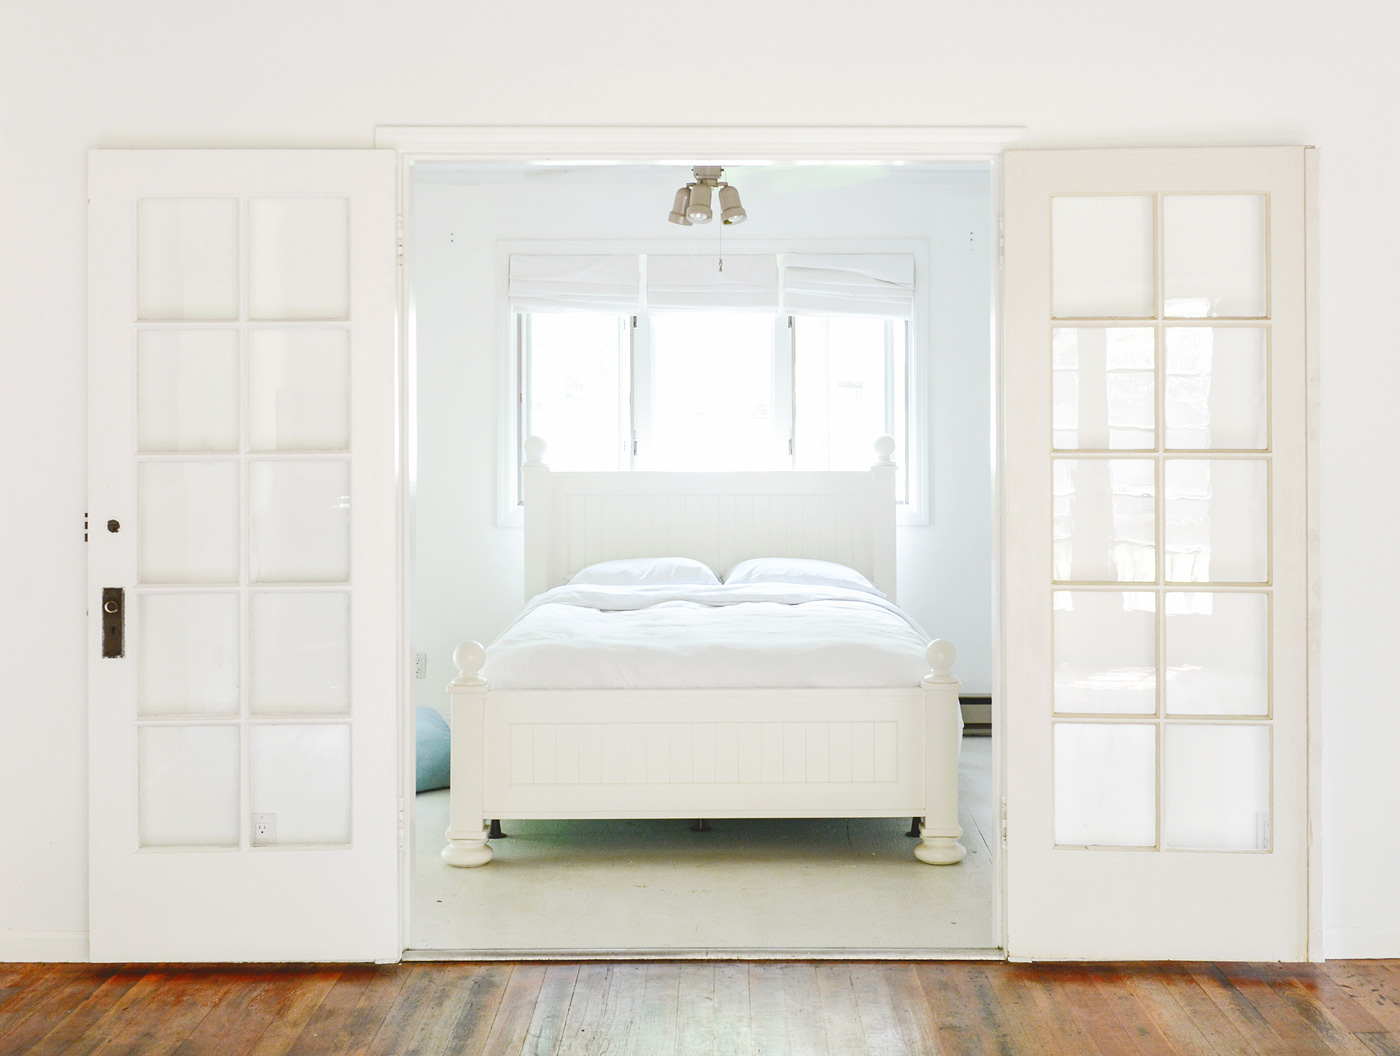
French doors before

French doors after
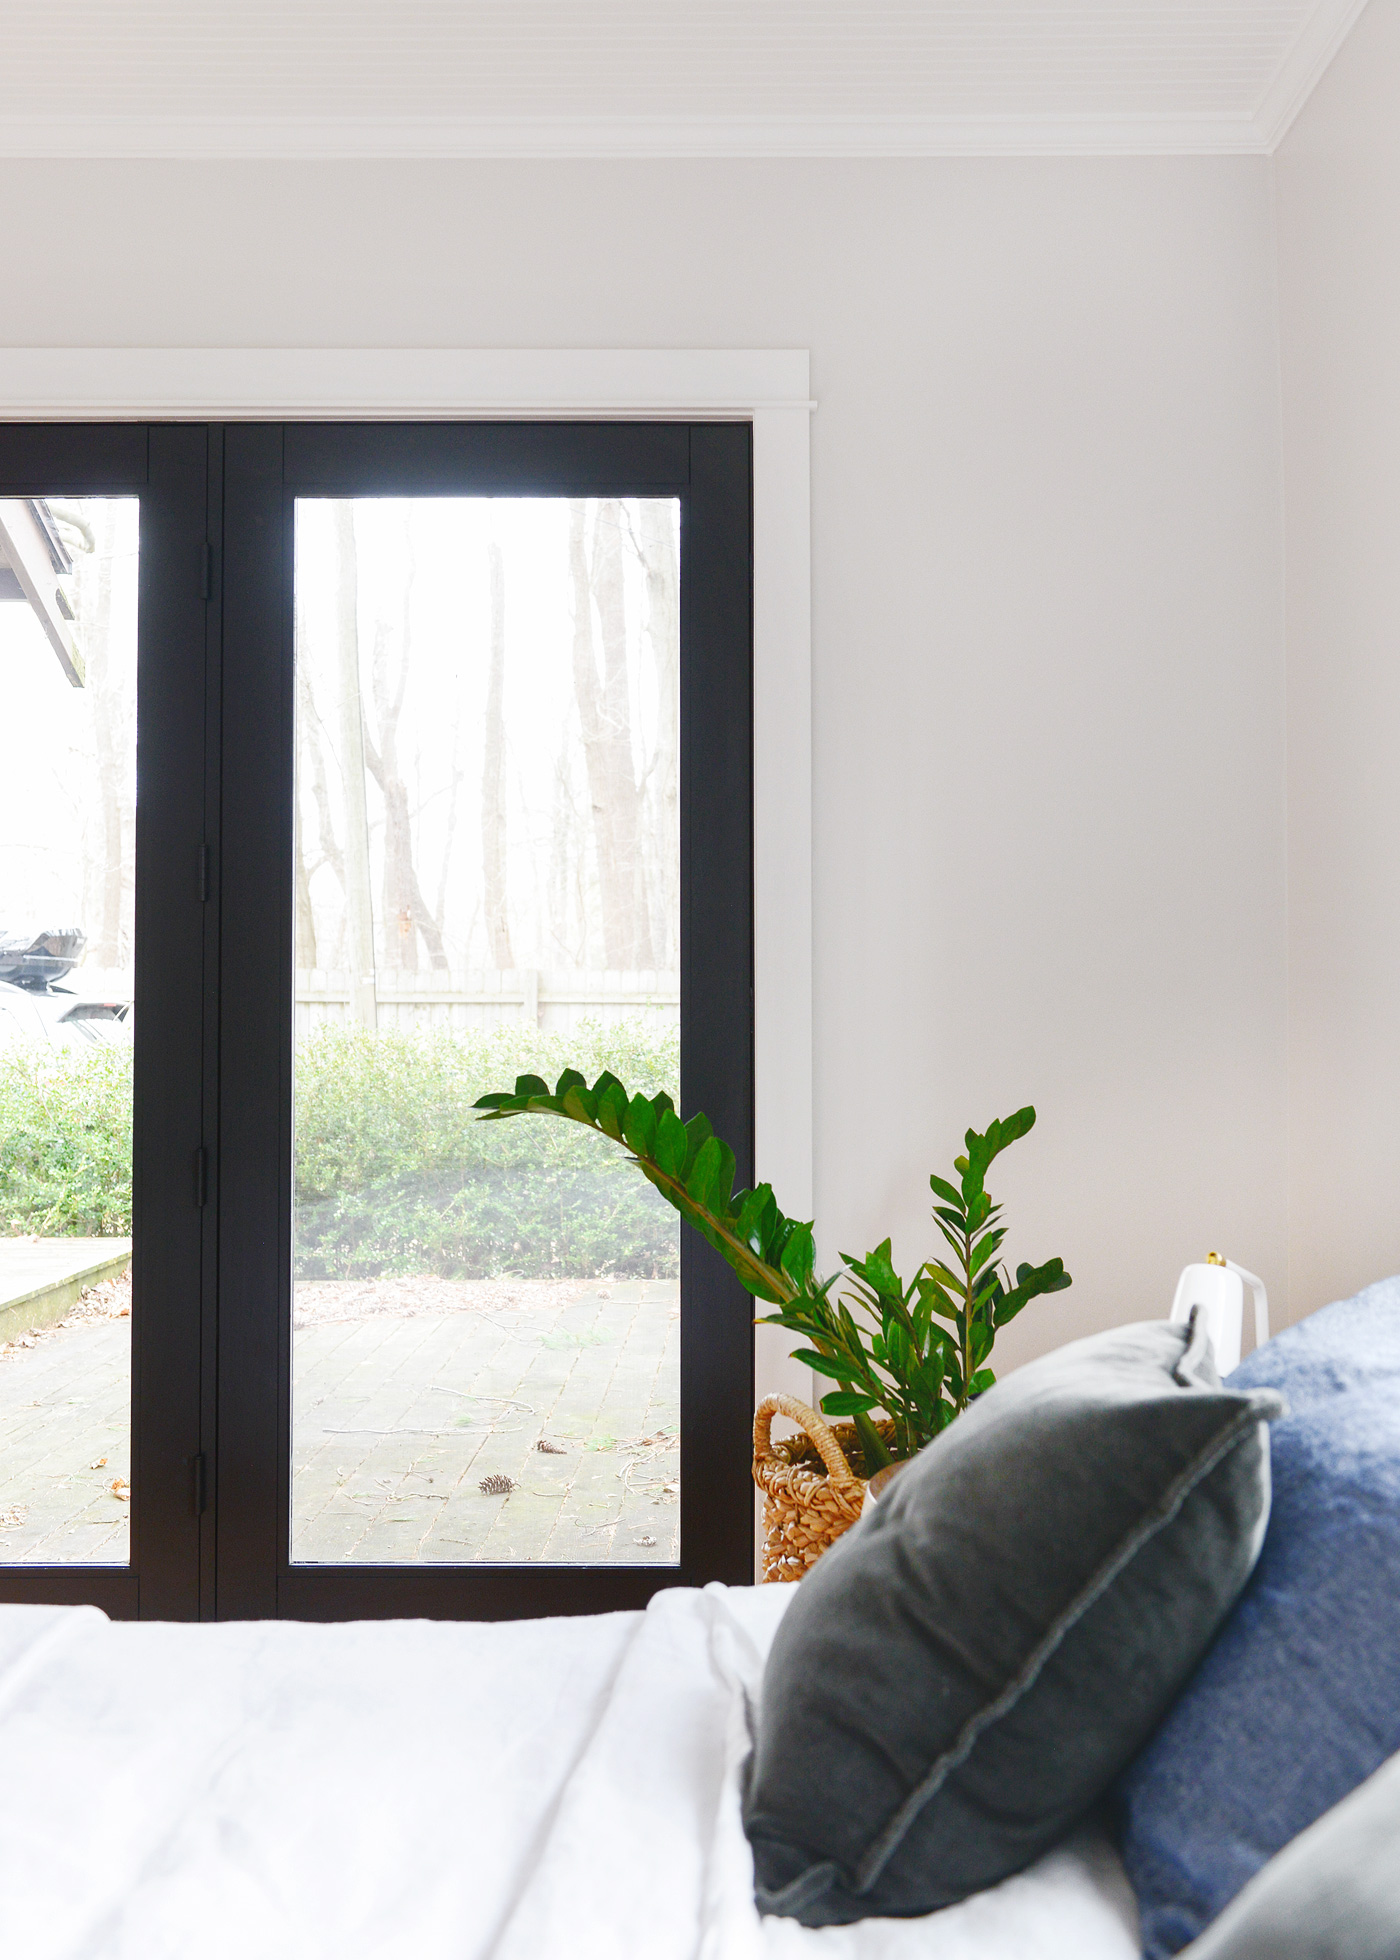
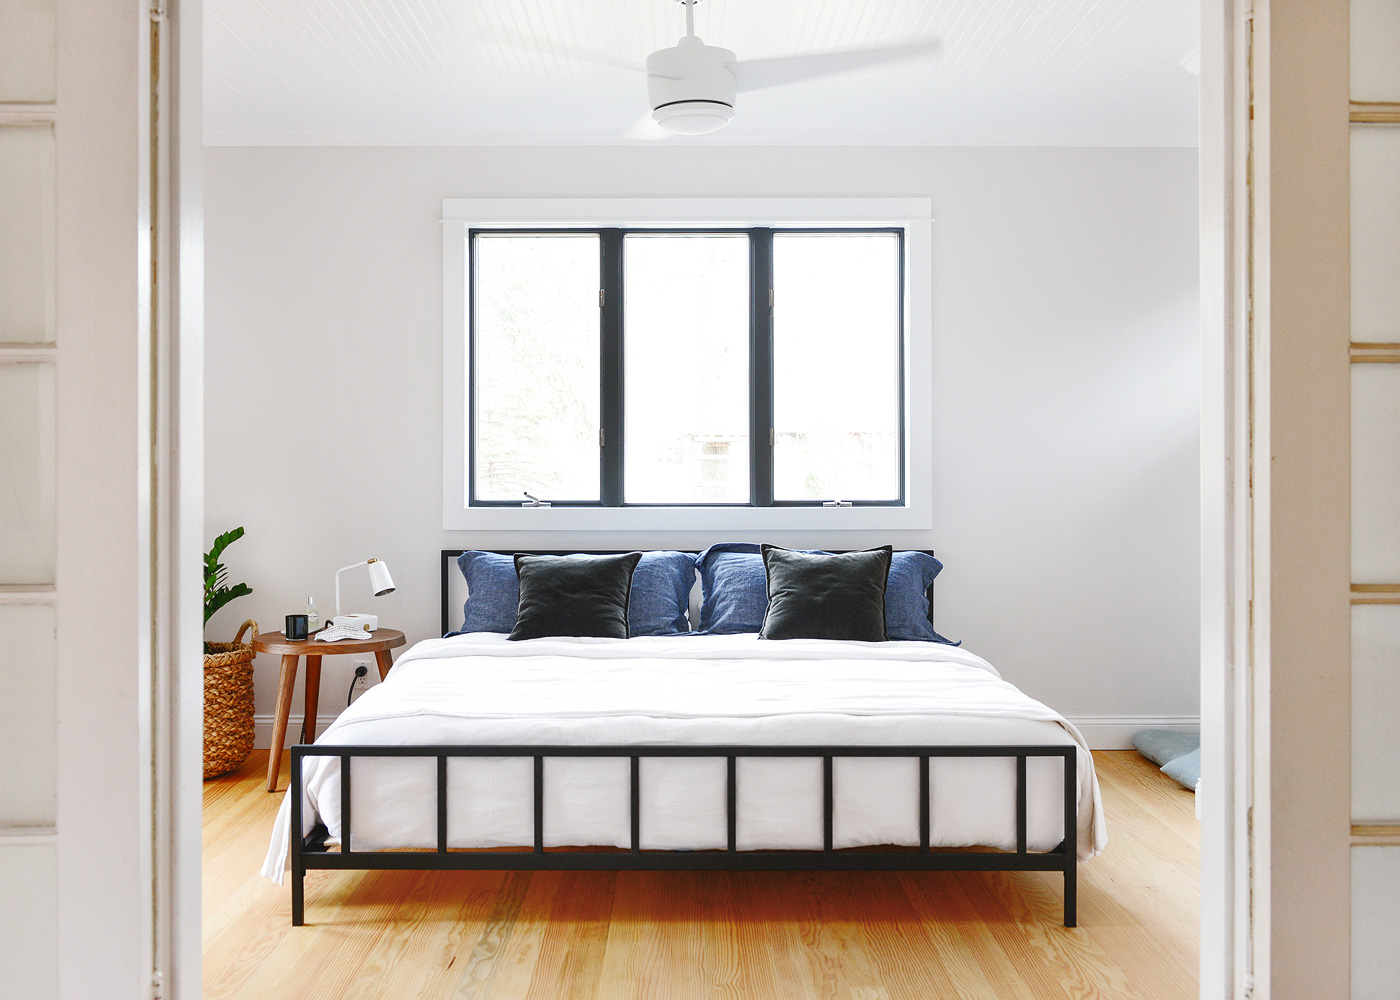
The windows were only slightly tricky because we needed to make a decision on where to stop the black paint. We used FrogTape to create a clean line along the interior casing, opting to paint the mullions black as well. We were looking to create a cohesive feel across all three windows, rather than painting the frames of each individual window:
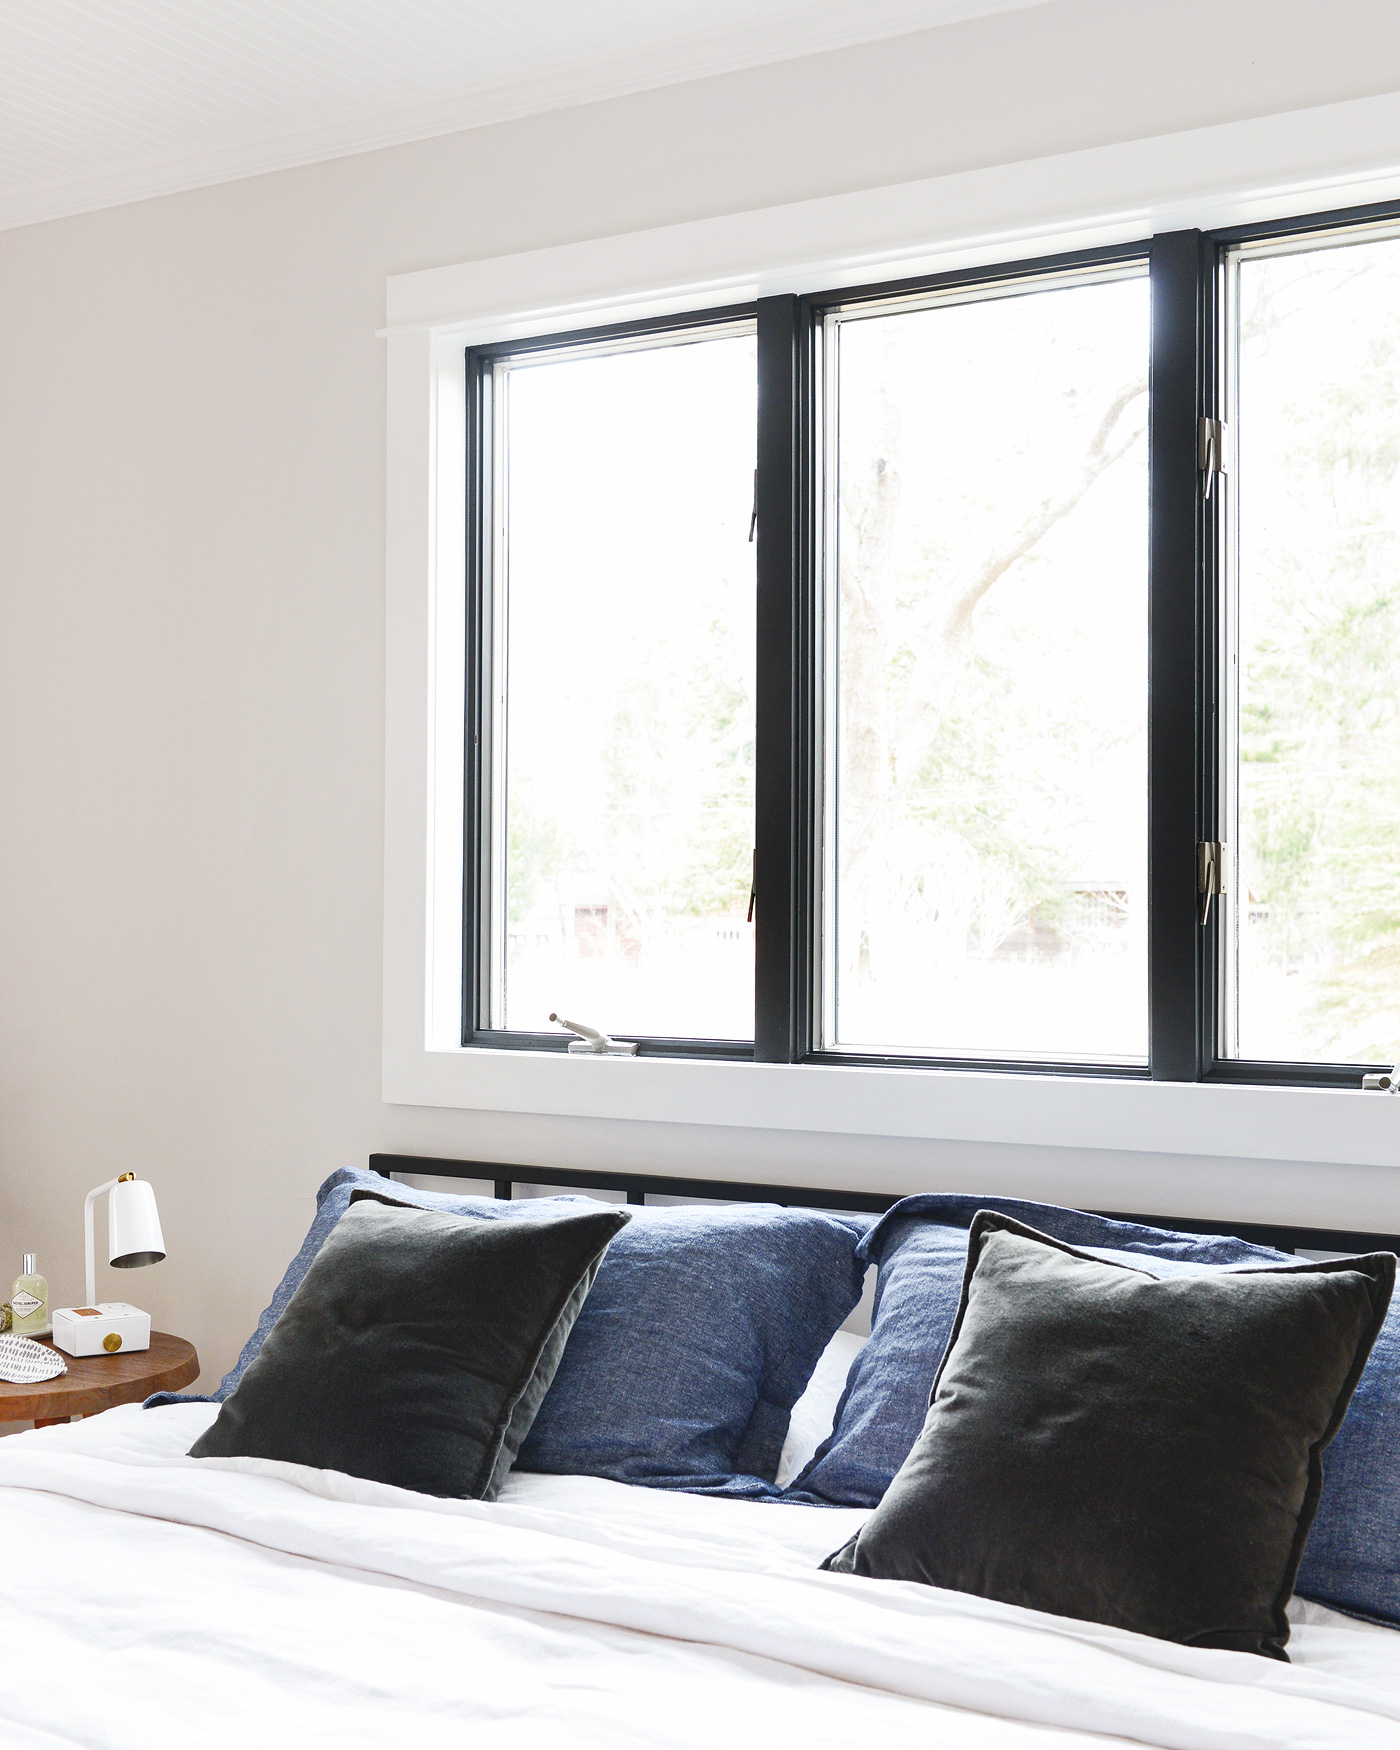
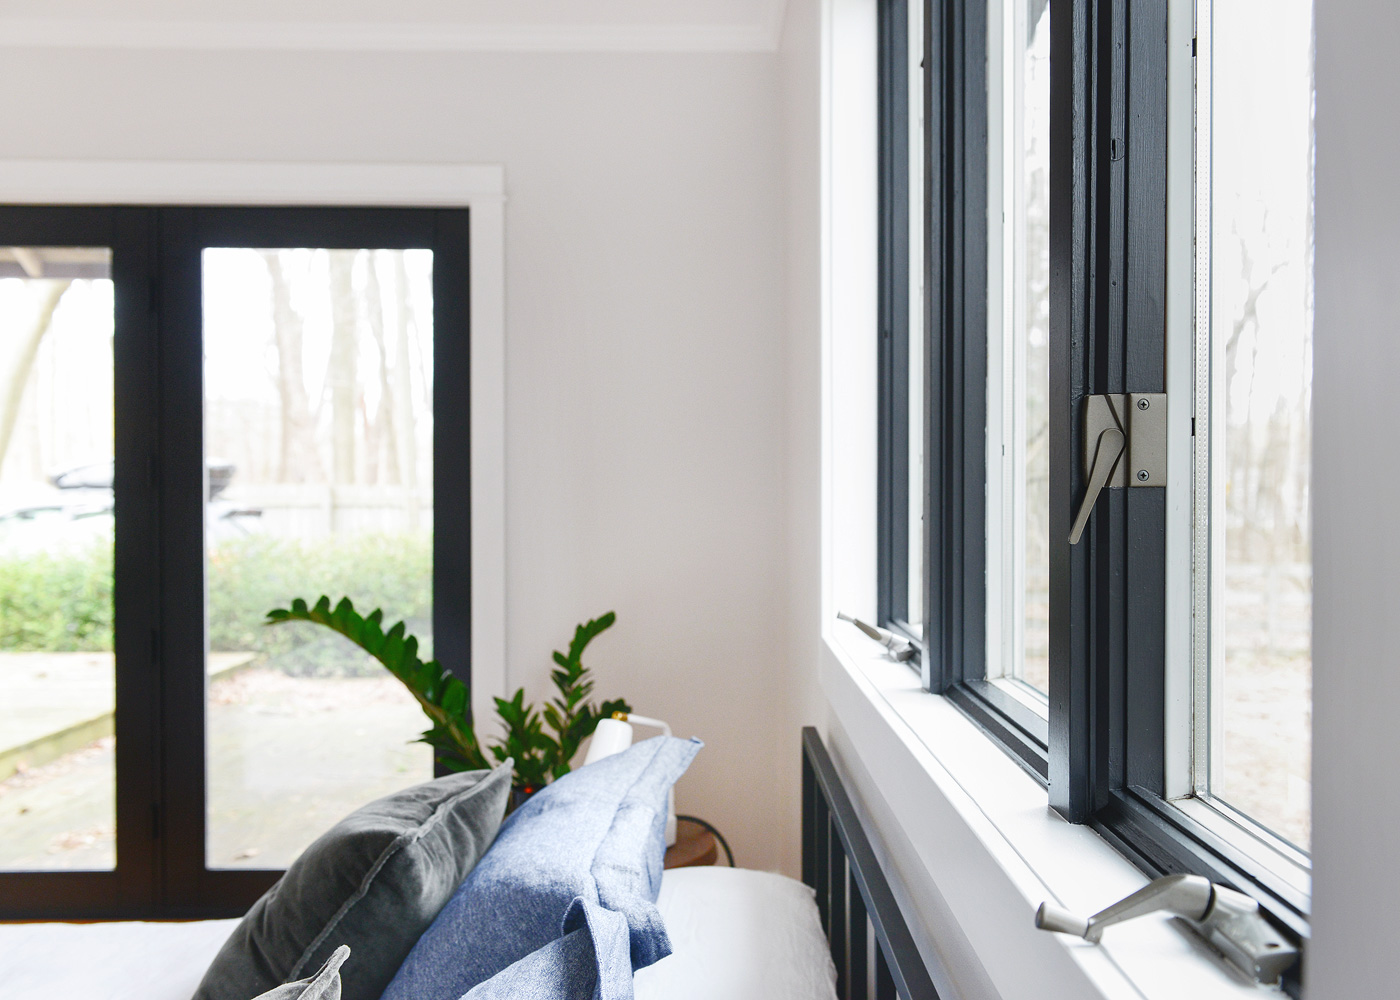
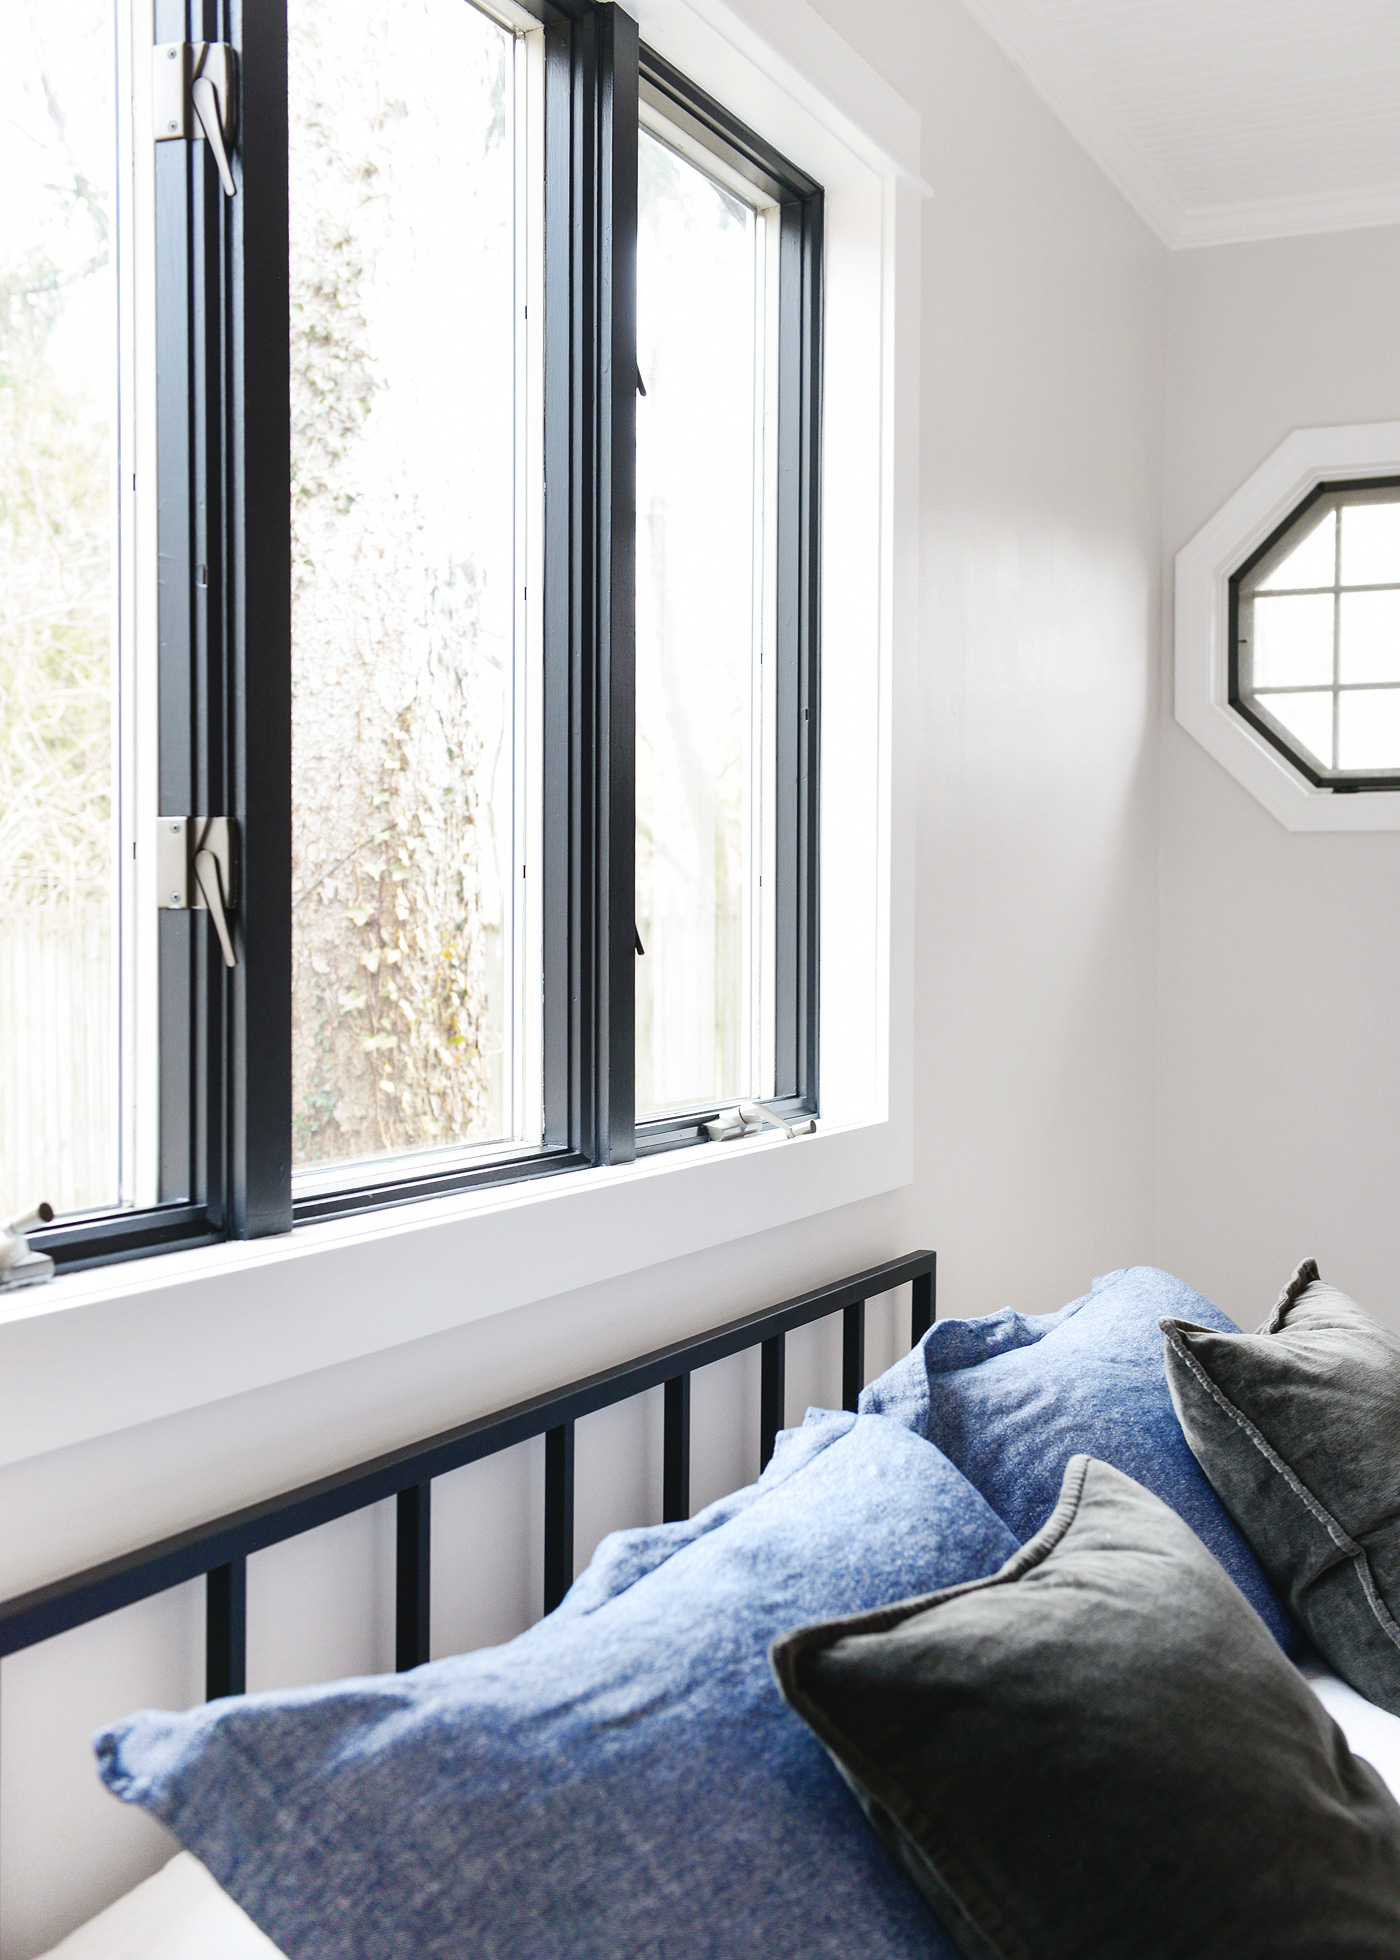
We thought the ‘newer’ hardware on the windows would bother us, but once everything was painted, we don’t mind them! And because this is a bedroom, we do have plans to add window treatments that will allow us to sleep in. (More on that in a later post – there was a lot to think about with that decision!)
Bedroom windows before
Bedroom windows after
Our plan is to carry the black-doors-and-windows-theme throughout the rest of the home, but we’ll take them one room at a time. The master is still very, very far from being rubber stamped – the closet doors conceal a mess of kitchen supplies and weekend necessities, we’re on the hunt for the perfect rug and dresser, and we have plans for a doggy nook in that funny recess – but it’s always a welcome retreat on the other side of the drive from Chicago.
Room Sources:
wall color: Valspar Heirloom Pink | trim and ceilings: Valspar Ultra White | black windows and door: Sherwin Williams Black Magic | king bed | linen duvet cover | linen sheets | chambray shams | velvet pillows | end table | USB task lamp | trinket tray | plant basket | ceiling fan
We’ve started a source list of items that can be found in Tree House right here, and we’ll continue to update it as we go. (Access it anytime under ‘Shop Our House’ from the menu bar!)


You can really never go wrong with black. For anything!
Agreed.
Your after shot of the French door looks especially lovely with the old baseboard heaters gone.
We recently replaced our French door to the backyard with a slider. The inswing door was always in the way on the warm days when we liked leaving it open. Have you had any issues like that yet?
Right?! Peace out old baseboard heaters!
We haven’t had a chance to enjoy ANY warm weather yet, but when painting the doors, we were wondering how annoying the swing of the door might be. Luckily, it won’t swing INTO anything or be in the way, but if it becomes a real issue, we may consider replacing it with a slider. This isn’t one of the beautiful original doors, so we wouldn’t feel too bad doing so. ;)
not that you need it, but the slider has more glass area so it lets in lots more light and a bigger outside view. we are very happy with the switch.
I LOVE everything you guys do!! And I know how hard things get when adding a little one to the mix! Well done!! ???
We’ve never worked as hard as we do now during those 1-2 hour naps! :D
Not that it looked bad before, but it looks WAY better now! Love the contrast!
Haha, we’re not good at leaving well enough alone!
I LOVE the black on the windows and door! Although, is that really a French door? It looks like the swing on the door is the wrong way…kinda weird.
Also, I think you guys picked THE PERFECT shade of blush for the bedroom. The black on the windows, door, and bed really make it stand out and brings so much warmth to the room!
Thank you! Although I’m still kicking myself that we didn’t go juuuust a bit more pink.
Oh wow, those look so awesome and you may have just kicked my butt into gear on getting mine done. We have aluminum storm windows because we live in FL. Would you suggest I spray paint or brush on the aluminum? Also, did you paint the outside of the windows and doors as well?
I find myself pinning just about everything you guys do-LOVE IT ALL! Thanks for being such an inspiration and it’s been so fun watching your family grow!
We haven’t painted the outsides yet (still too cold here!), but when we do the mug larger exterior makeover, we’ll address it then.
As for your windows, we’re not familiar with aluminum, so definitely do some internet searching for a proper tutorial! And thank you for the kind words! :)
It looks SO good. I can’t wait to see it through the rest of the house.
Is that a Guava Lotus travel crib I see peaking in that one photo? Do you love it? We’re looking at it for our own who is set to arrive in August.
It is, and we DO love it! Most importantly, Lucy loves it. It’s lightweight and easy to set up and take down. Make sure you purchase a fitted sheet too! And congrats to you guys!
I’m obsessed with black windows. Looks so so good in your home!
LOVE the contrast. Wish all of my windows weren’t vinyl. Can’t wait to see more.
This looks so good you guys. Major congratulations on achieving all this with a little one. I have two and it feels like even the simplest tasks take weeks to accomplish. So good for you!! Love your blog :)
Things take a lot longer, that’s for sure! She does great with noise cancelling headphones (when we’re using the air compressor, especially!), and the grandparents love to meet us at Tree House to help out where they can. :)
Those black frames give everything such a bold and streamlined look! I love it!
Paige
http://thehappyflammily.com
You did a stellar job on this. The windows and french doors look spectacular.
OMG there’s a baby in that cot! :-D
So sweet all bundled up like that- congrats again guys!
We didn’t want to disturb her nap, haha! Thank you!
Are you worried about any strong chemicals from the exterior paint being indoors?
I was wondering this! Also, did you do exterior for durability purposes? About to paint our kitchen window frames black and it hadn’t even occurred to me to use exterior paint.
Scott and I went back on forth on exterior vs. interior, but we went with exterior since it has better flexibility in temperature shifts. Because the paint was used on outside doors and windows, we felt more comfortable with the long term durability using exterior. We’ve actually discussed adding one thin coat of water-based Polycrylic in a satin finish to seal it up – especially since we weren’t in love with the dry finish of the Duramax. This is our experience, so definitely use what you feel comfortable with.
This makes so much sense. Thanks for taking the time to share your thinking. It looks lovely – congrats!
We’re in the middle of the same project and same color (LOVE Black Magic)! We have the same window hardware and we’ve spray painted it black and they blend right in!
Good to know! Does the hardware chip when you use it though?? Also what brand of paint are you using? We’re on the hunt for something better, obviously. :)
oh, I love that you painted the windows black but kept the casings white! Such a clean look and it does amazing things for the room. It’s really becoming a lovely home!
Do you guys have any tutorials on how to strip and repair wood windows? We have the same issue. All of our windows are painted closed and I’d like to repair them before a fresh coat of paint.
Oof, that sounds like no fun. Luckily, ours aren’t that far gone. We don’t have any sort of tutorial on that, but you might want to check out Manhattan Nest or Old Town Home! Both of them have provided some thorough tutorials in the past on repairing old house issues.
Beautiful. What are the dimensions of the window and how high off the floor is it to the casing?
The window is about 6′ wide and 3′ off the floor.
I love what you’ve done, it’s motivated me to do the same. I’m just curious as to why you used both Sherwin Williams + Benjamin Moore why not just one brand?
Hi! Have you kept the white color on the outer part of the window or you painted in black as well? If you kept both colors, would you mind to share some pictures of the result? Thank you in advance.
We didn’t paint the outside black, only the inside.????