

The first floor bathroom is finally underway! We’ve been in our Chicago home nearly 6 years and the last ‘untouched’ room in the house is in the midst of being renovated. Our contractors are hard at work, and they’ve made made a ton of progress already, so we need to catch you up!
We worked with a local designer (who also helped with our second floor bathroom) for architectural drawings, space planning, and code-compliance help. We knew right away that we’d need to reconfigure the space, and we feel much safer drafting up plans with someone who is an expert in this area. It also ensures that the vision that we had in our heads matched up with what was realistic, comfortable and safe.
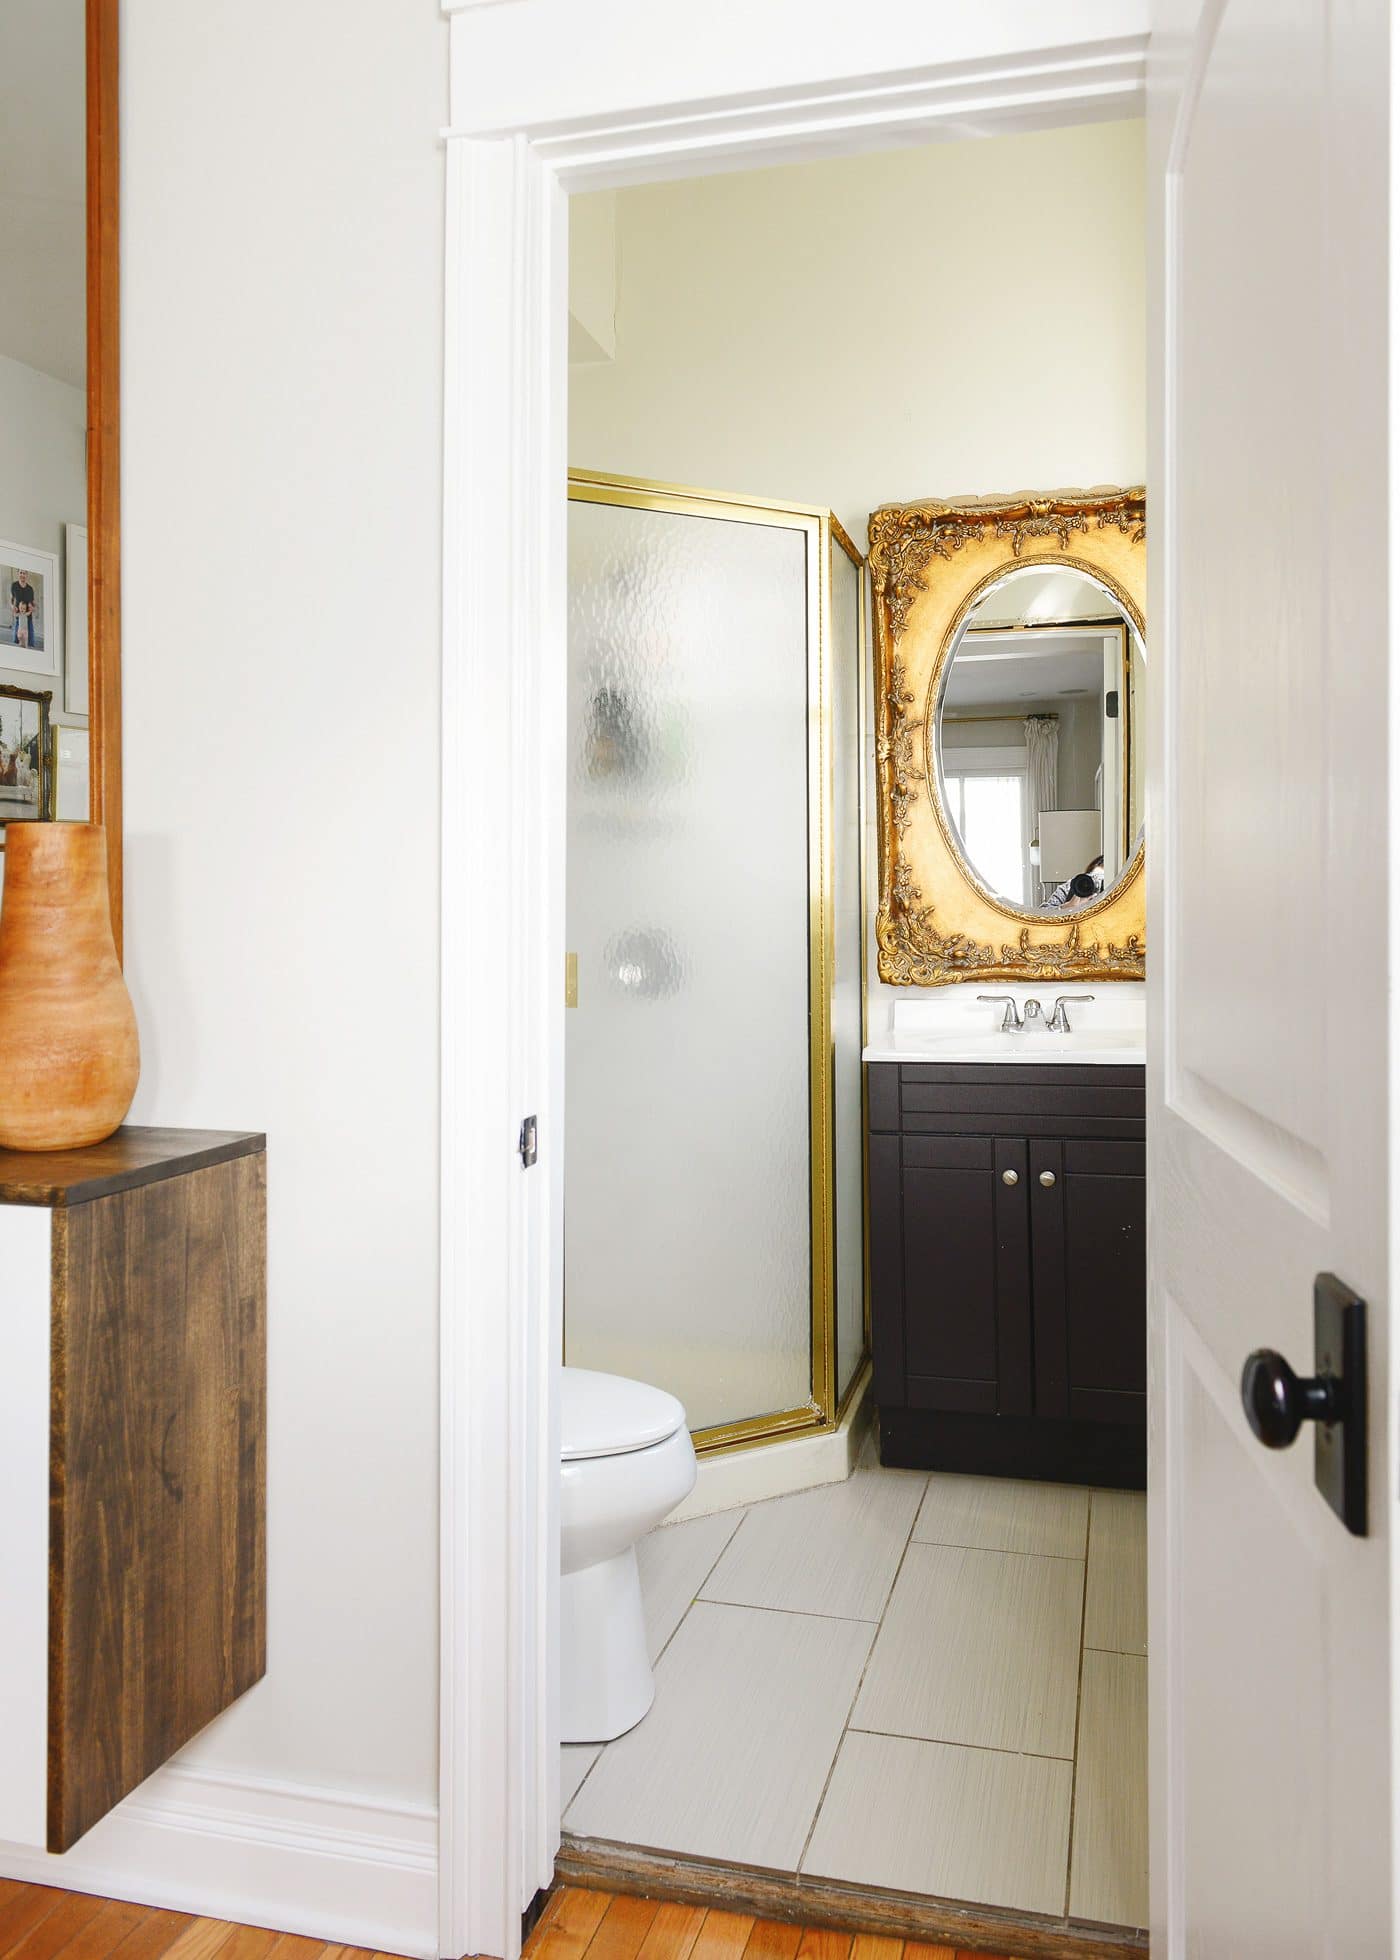
We knew the existing floorplan, above, would never allow for more shower space than the old phone-booth-sized corner unit, so the layout had to change. Because we’ve been noodling on this renovation for, oh, 6 years(!), it was an easy decision at this point to steal a few feet of space from our little indoor workshop. Several options were discussed, but we ended up sticking with our gut and narrowing it down to the two below. The first layout represents the current (now former) floorplan, and option 1 and 2 are simple variations on a theme. You can see that the only real difference between 1 and 2 is the placement of the vanity and toilet:
In This Post
Current Layout | Option 1 | Option 2
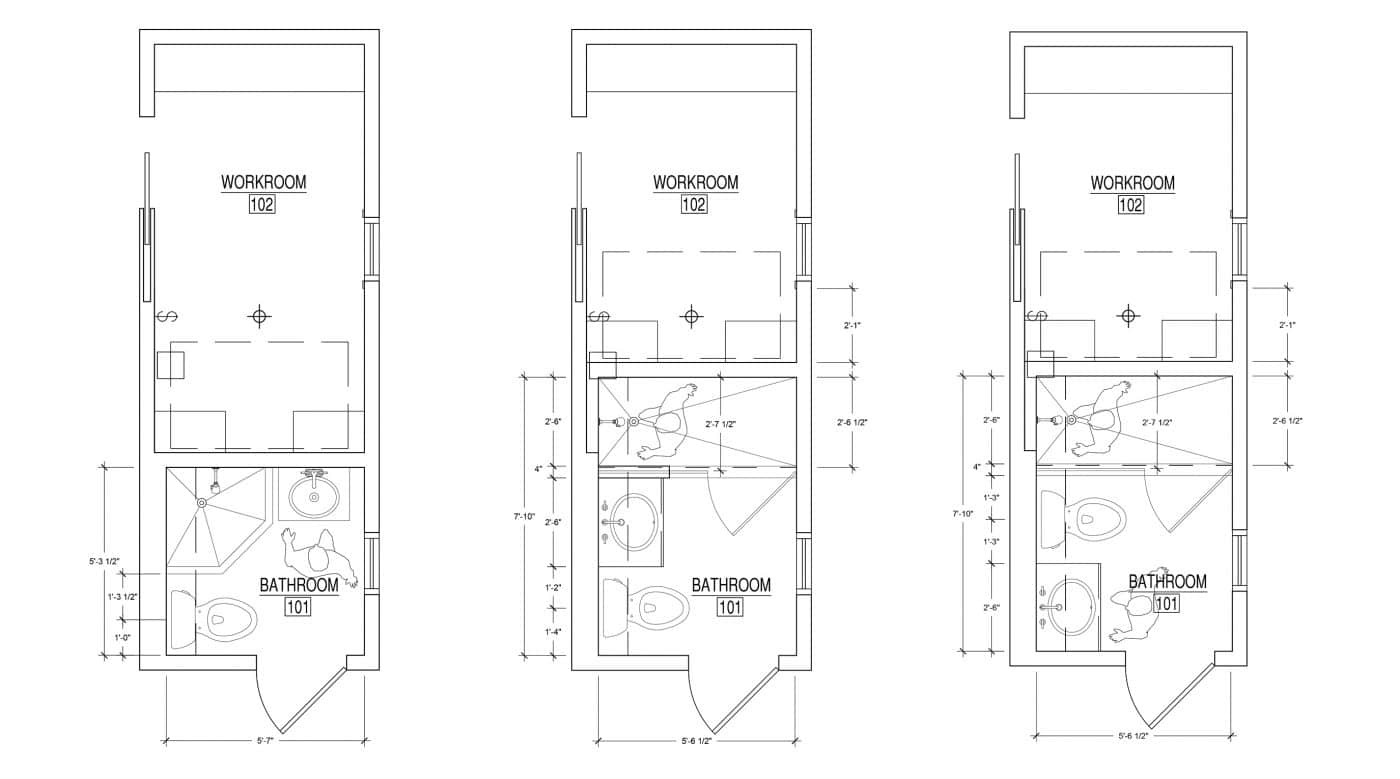
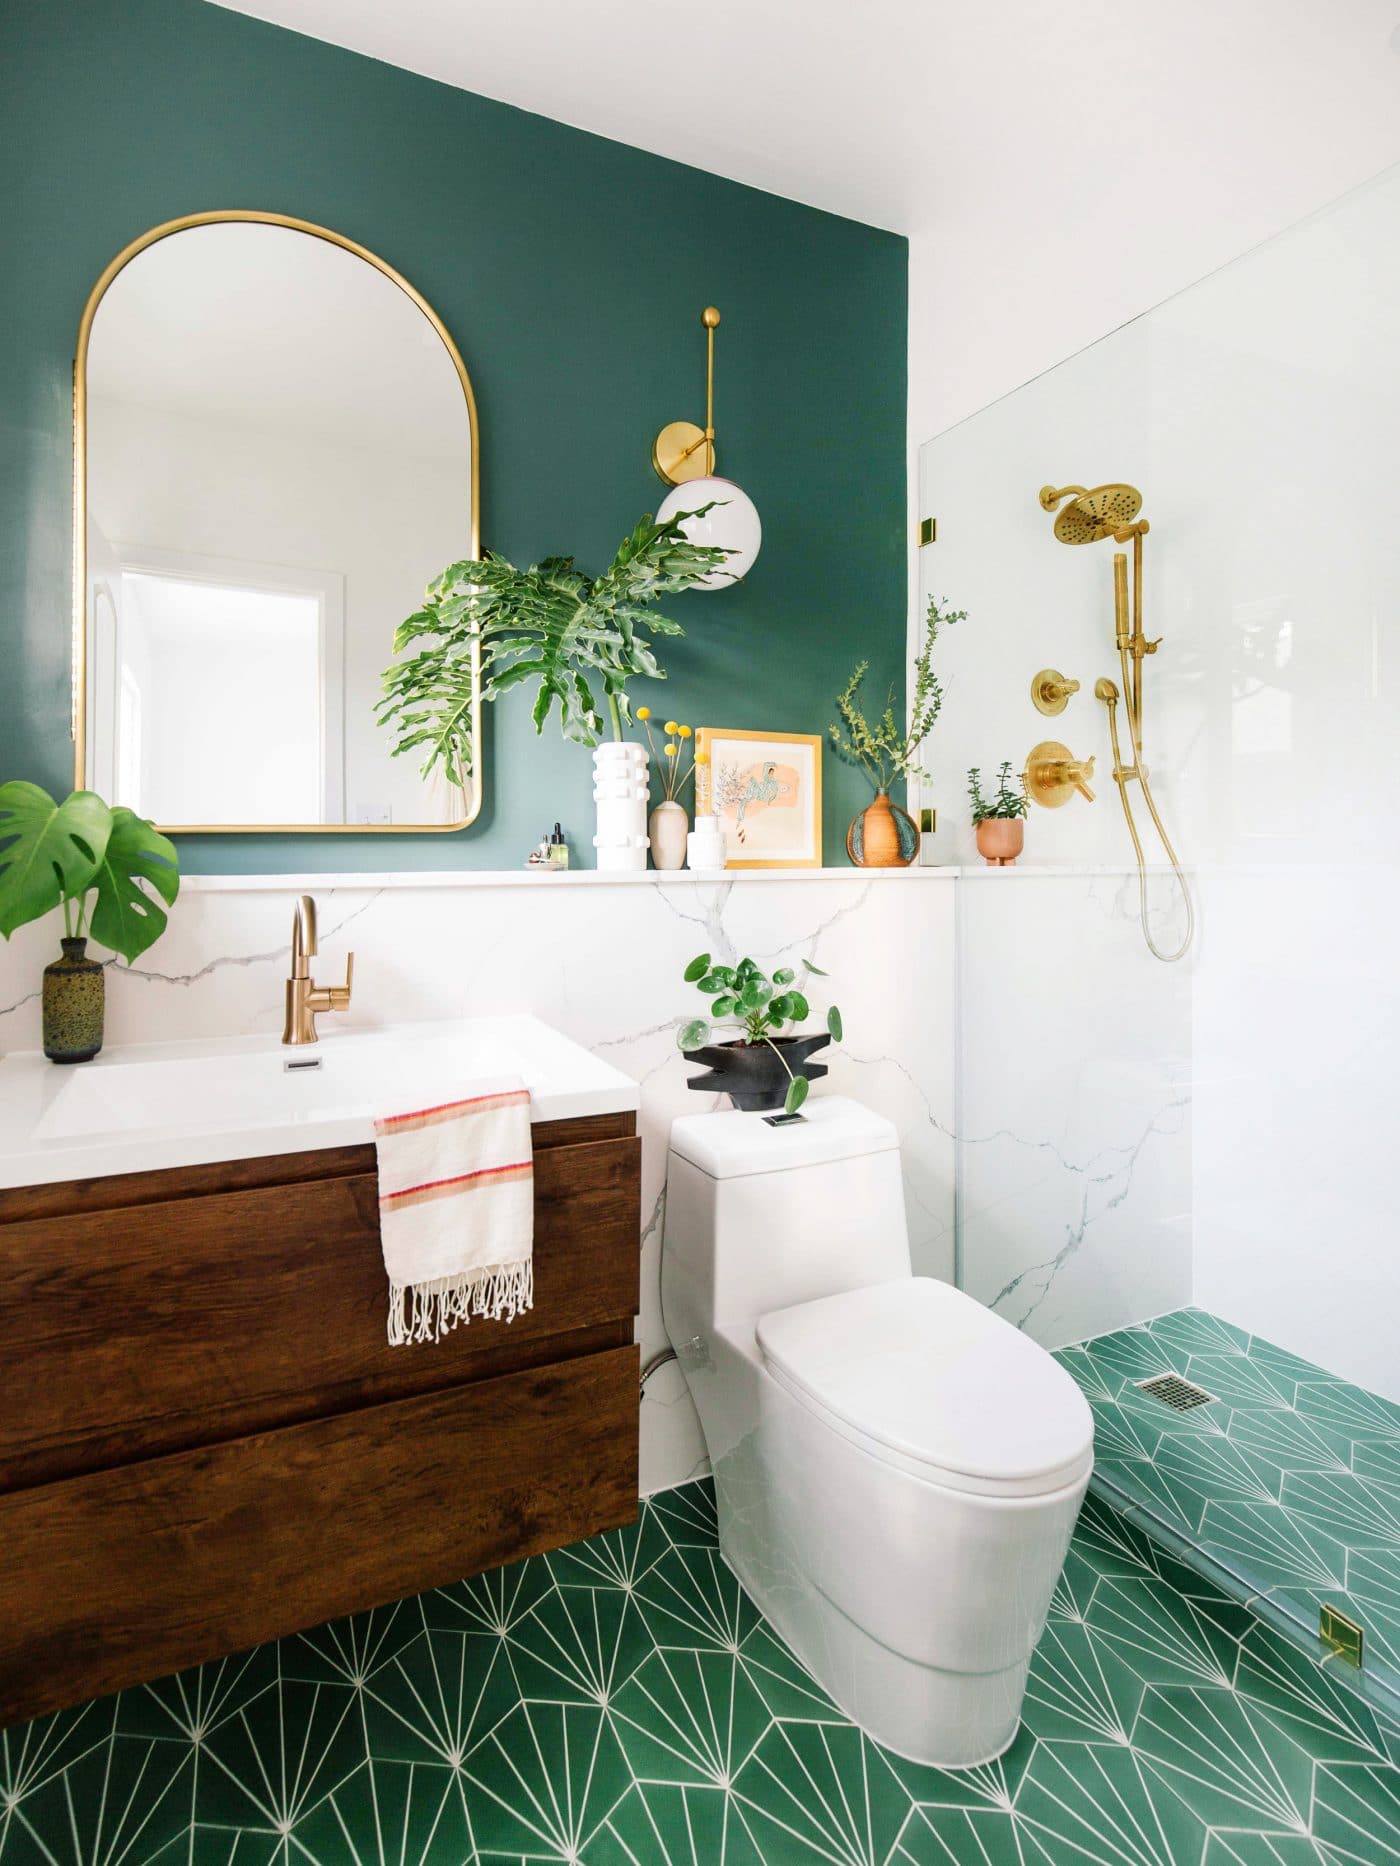
In order to keep the future glass shower wall from being blocked by the vanity, option 2 was selected (after also nixing a handful of other ideas and theories), and we were off and running! The new layout allows for a full size walk-in shower and swaps the locations of the toilet and vanity from what we had previously, and we’ll be adding a number of elements that will greatly improve the form and function of the room.
Transom + Stone
One of the changes we’re most excited about? The addition of a frosted transom window along the back shower wall! The workshop has an exterior window that is much larger than that of the bathroom, so the design will allow light to pass from one room to the other without sacrificing privacy. At the base of the transom, we’ll integrate a solid stone ledge that will provide the perfect perch for a couple of small potted plants.
That same stone from the transom ledge will also continue throughout the shower and above the toilet in the form of a narrow ledge for art (and likely more plants). We’ll also be adding a board & batten treatment to the bottom half of the room as well as multiple different lighting options that will improve on the previous scenario – which was nothing more than the dim light integrated into the bathroom vent fan, ha!
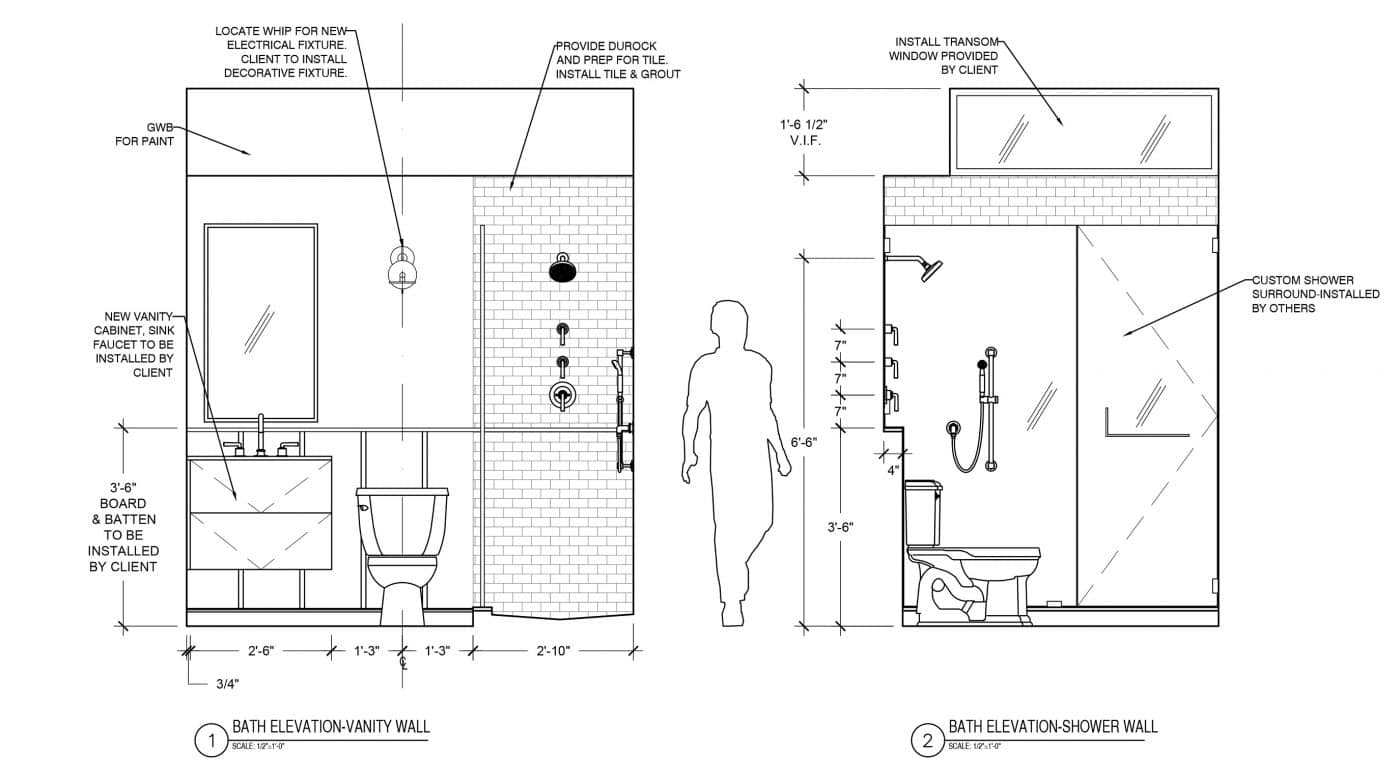
Above, you can see the elevation of the ‘wet’ wall, which also backs up to the sink wall in the kitchen. Hopefully this gives a great visual of how this will turn out in the end. A happy surprise that was brought to our attention on demo day was that with a couple of small HVAC duct changes, we were able to completely remove the existing soffit that spanned the length of the room! This will not only raise the ceiling height above the sink and toilet by almost 18″, but it will also allow the transom window to span the entire width of the room. This discovery also provides enough height above the recessed medicine cabinet mirror for an additional light fixture, which makes us so, so happy. It was a very pleasant surprise!
The window wall elevation (below, left) will see one small change in that the shower niche will no longer be located on the back wall of the shower. Since the wall is exterior, there was no safe way to integrate it into the space without comprimising the insulation and integrity of the wall, or without creating an additional bumpout that would cut further into the shower space. We ultimately decided that the niche will now be located directly under the shower controls on the ‘wet’ wall.
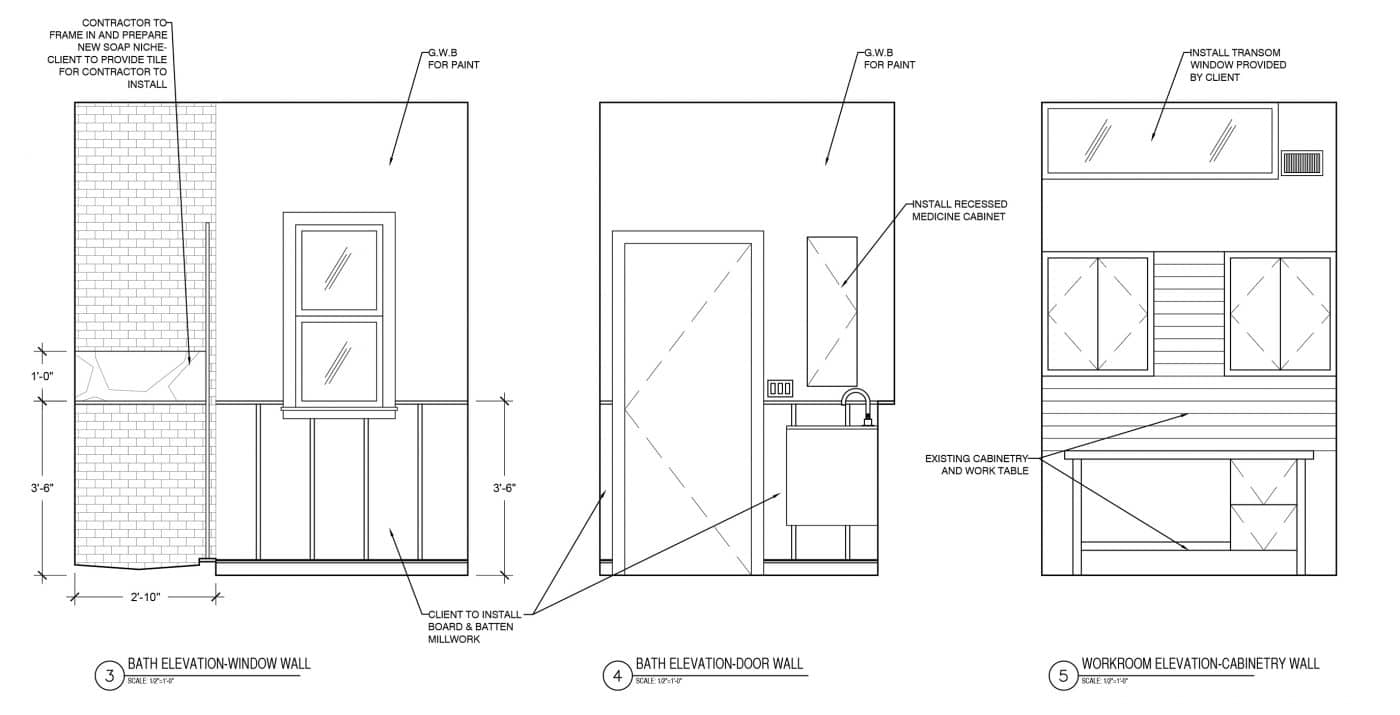
The elevation that faces the door (middle) will remain the same with the exception of the elimination of the recessed medicine cabinet flanking the door. Initially, we thought we might need some additional storage, but the mirrored medicine cabinet and vanity should handle our needs nicely.
The elevation showing the back wall of the workshop (far right) will see the vent in the upper right hand corner shift to a floor vent directly below where it sits currently. Again, this will allow the transom to span the entire width of the room!
Our Inspiration
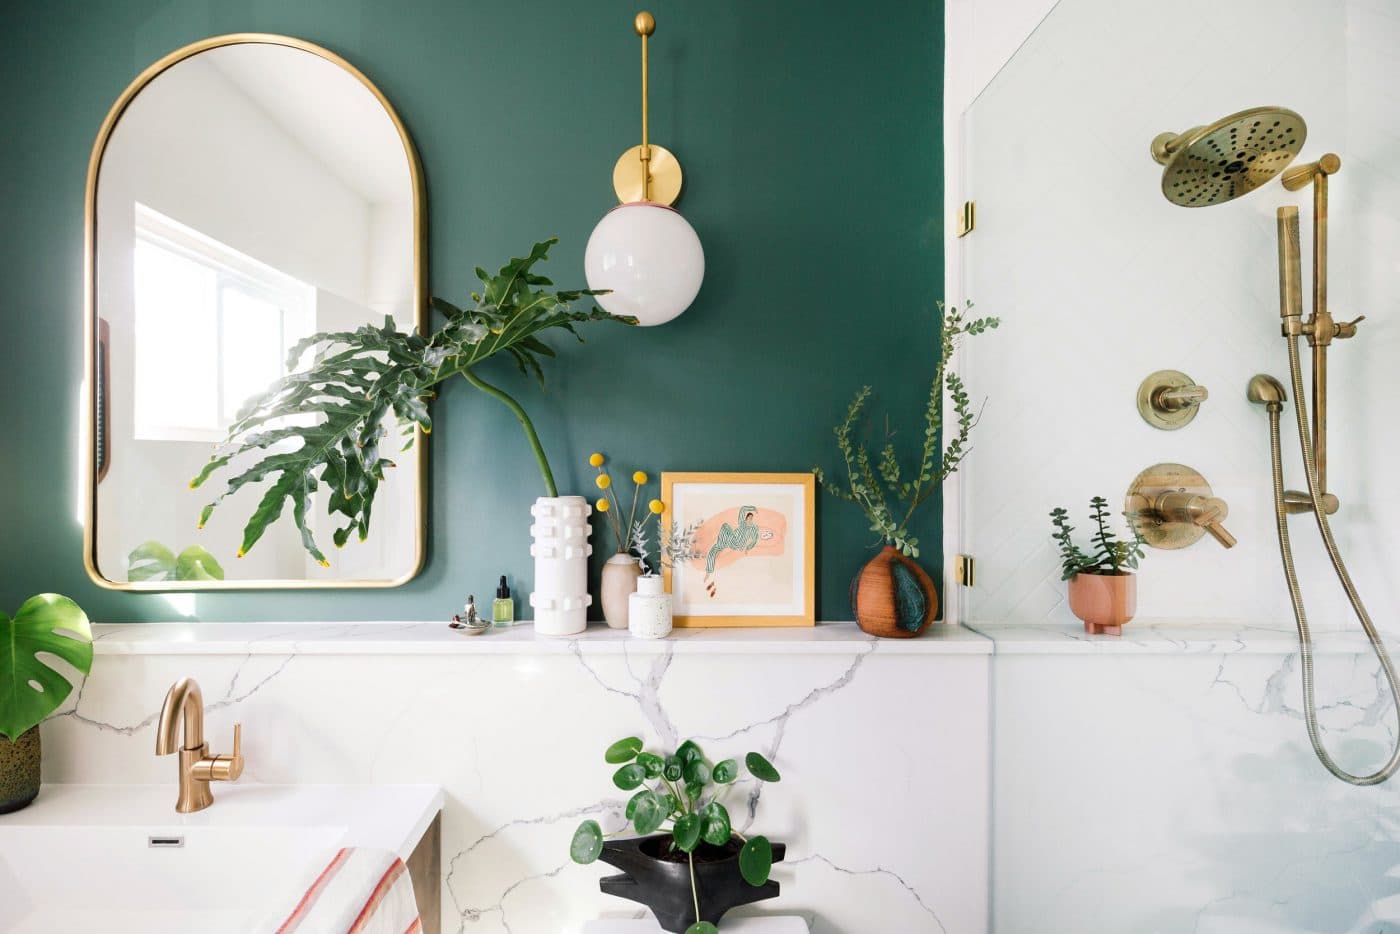
We drew a LOT of inspiration from Dabito at Old Brand New! Dabito tends to work with a much bolder color palette than we do (we’re scaredy cats tbh), but we love the continuation of the flooring into the shower and the ledge that unifies the main space and shower space. Our layout will end up nearly identical to Dabito’s (including sconce placement above the toilet), with one slight change – the center stack of our home runs direclty behind the vanity mirror, so in order to recess the vanity, we’ll run the ledge ‘bump-out’ vertically above the sink as well. This will allow for a recessed medicine cabinet and draw the eye toward the newly raised ceiling. As the renovation progresses in the bathroom, we think this will make more sense.
Throughout the design process, we referenced Dabito’s bathroom more times than we can count. It was so helpful to see a similarly sized space with a near-identical layout. When we were in doubt, we turned to Dabito!
Week 1 Progress
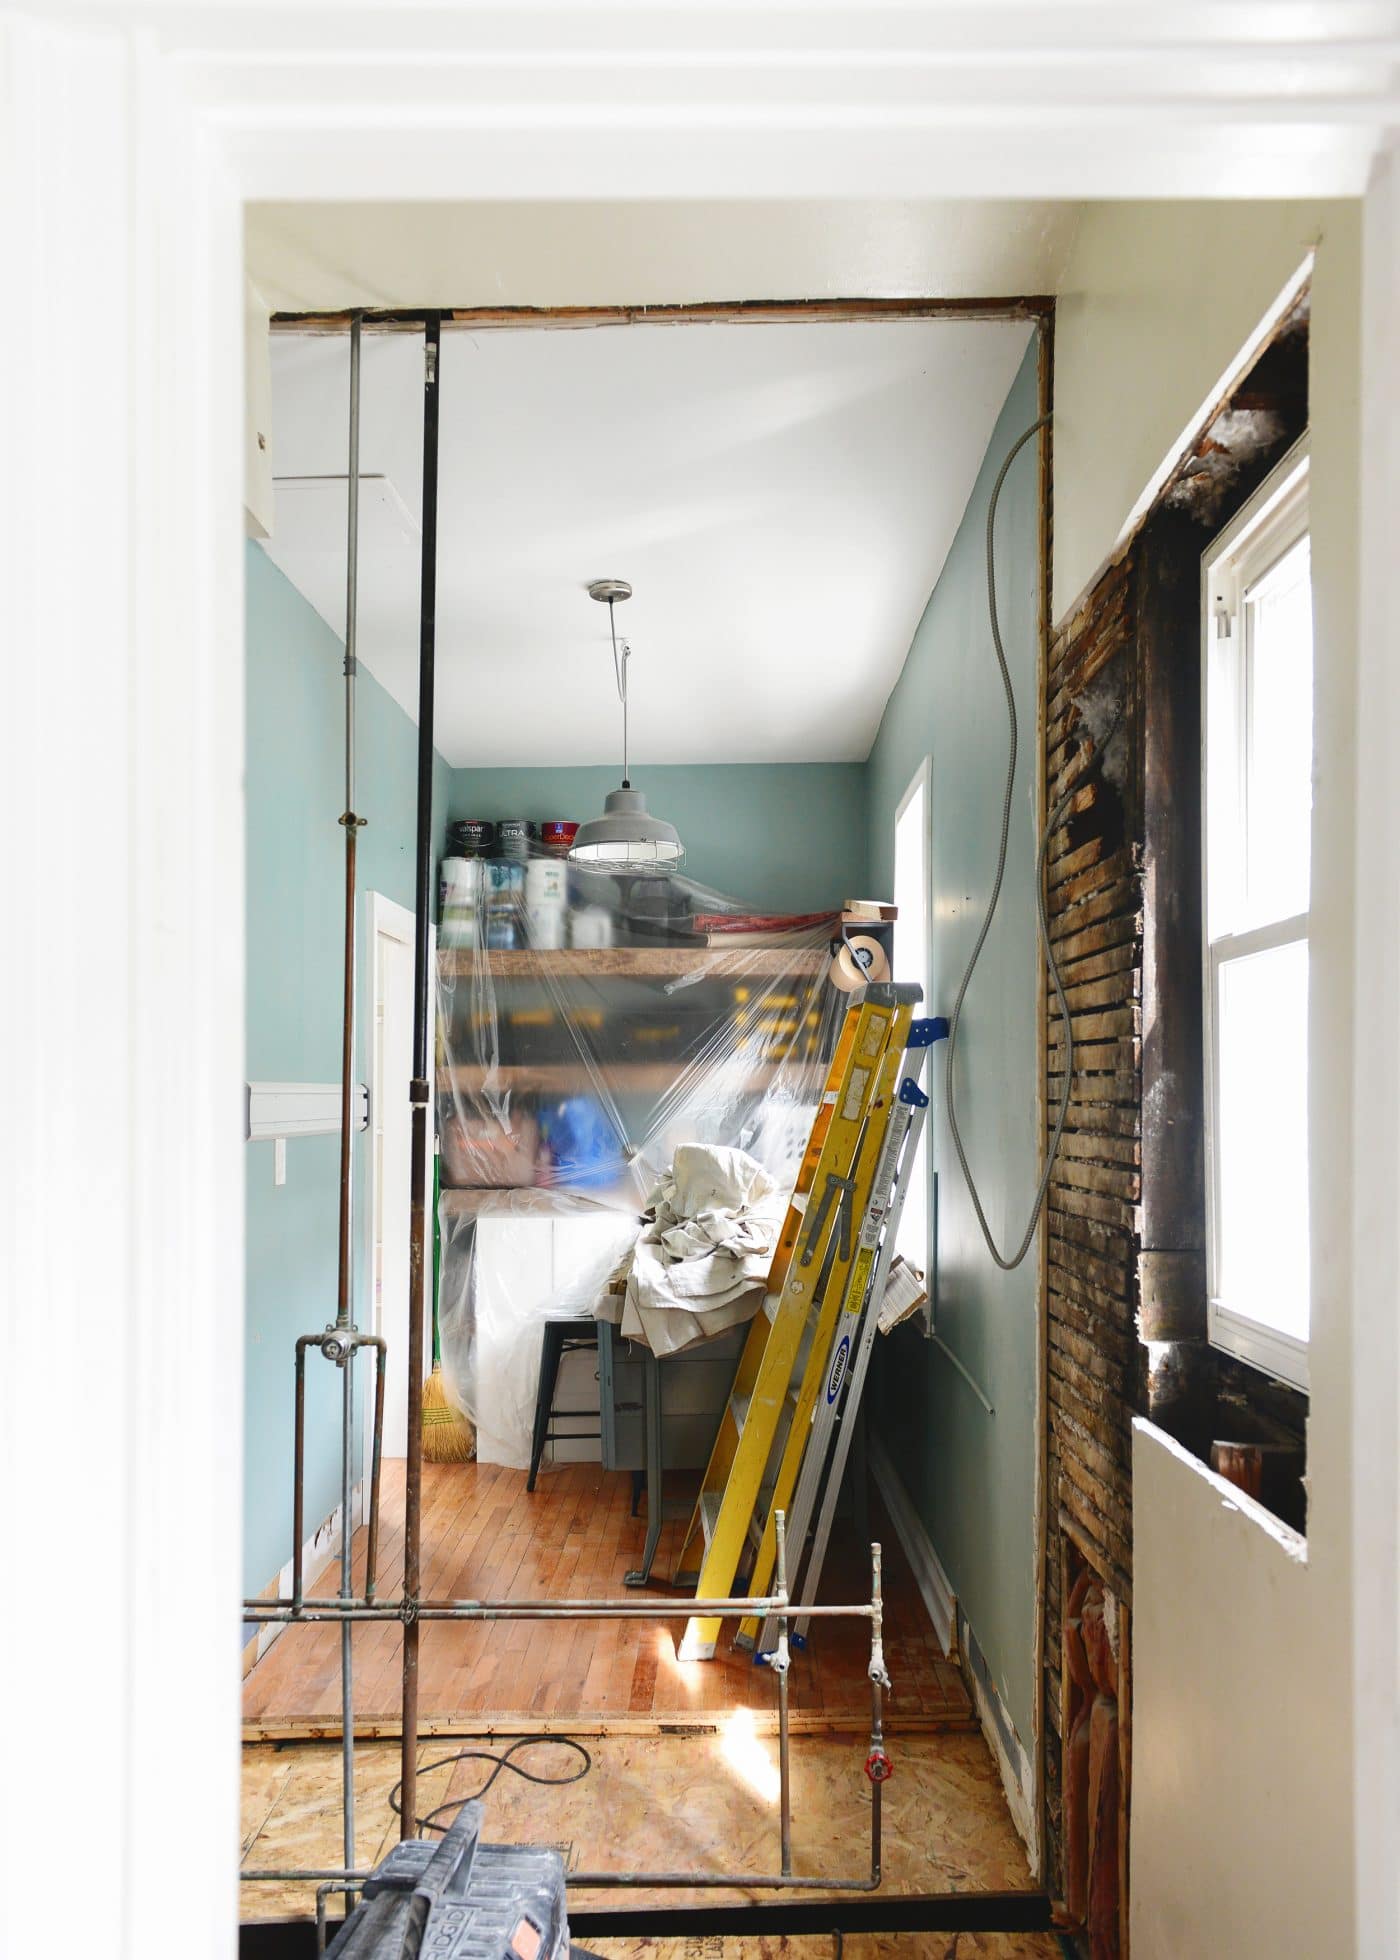
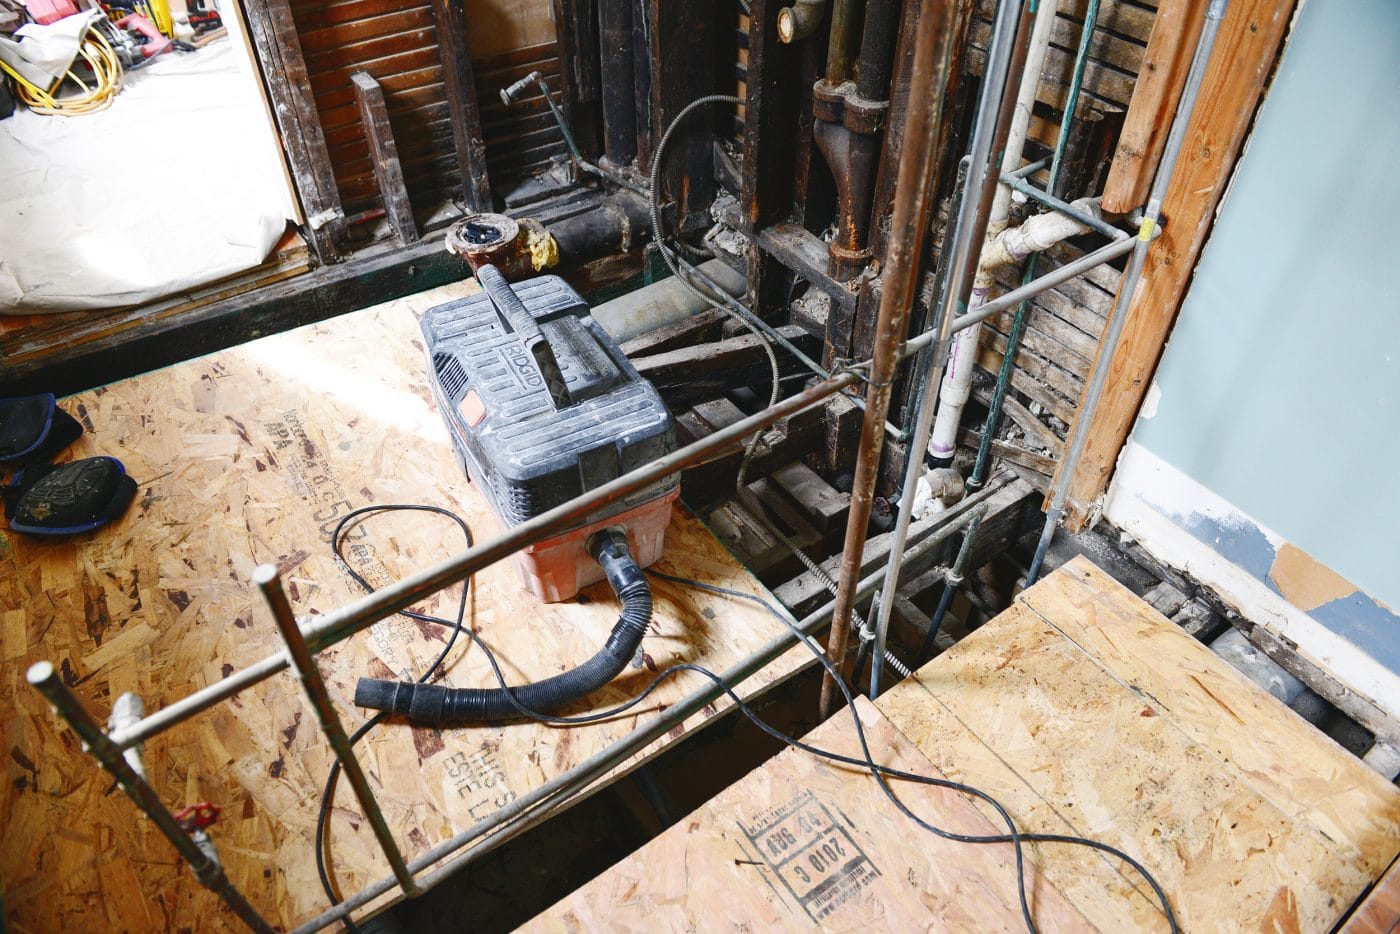
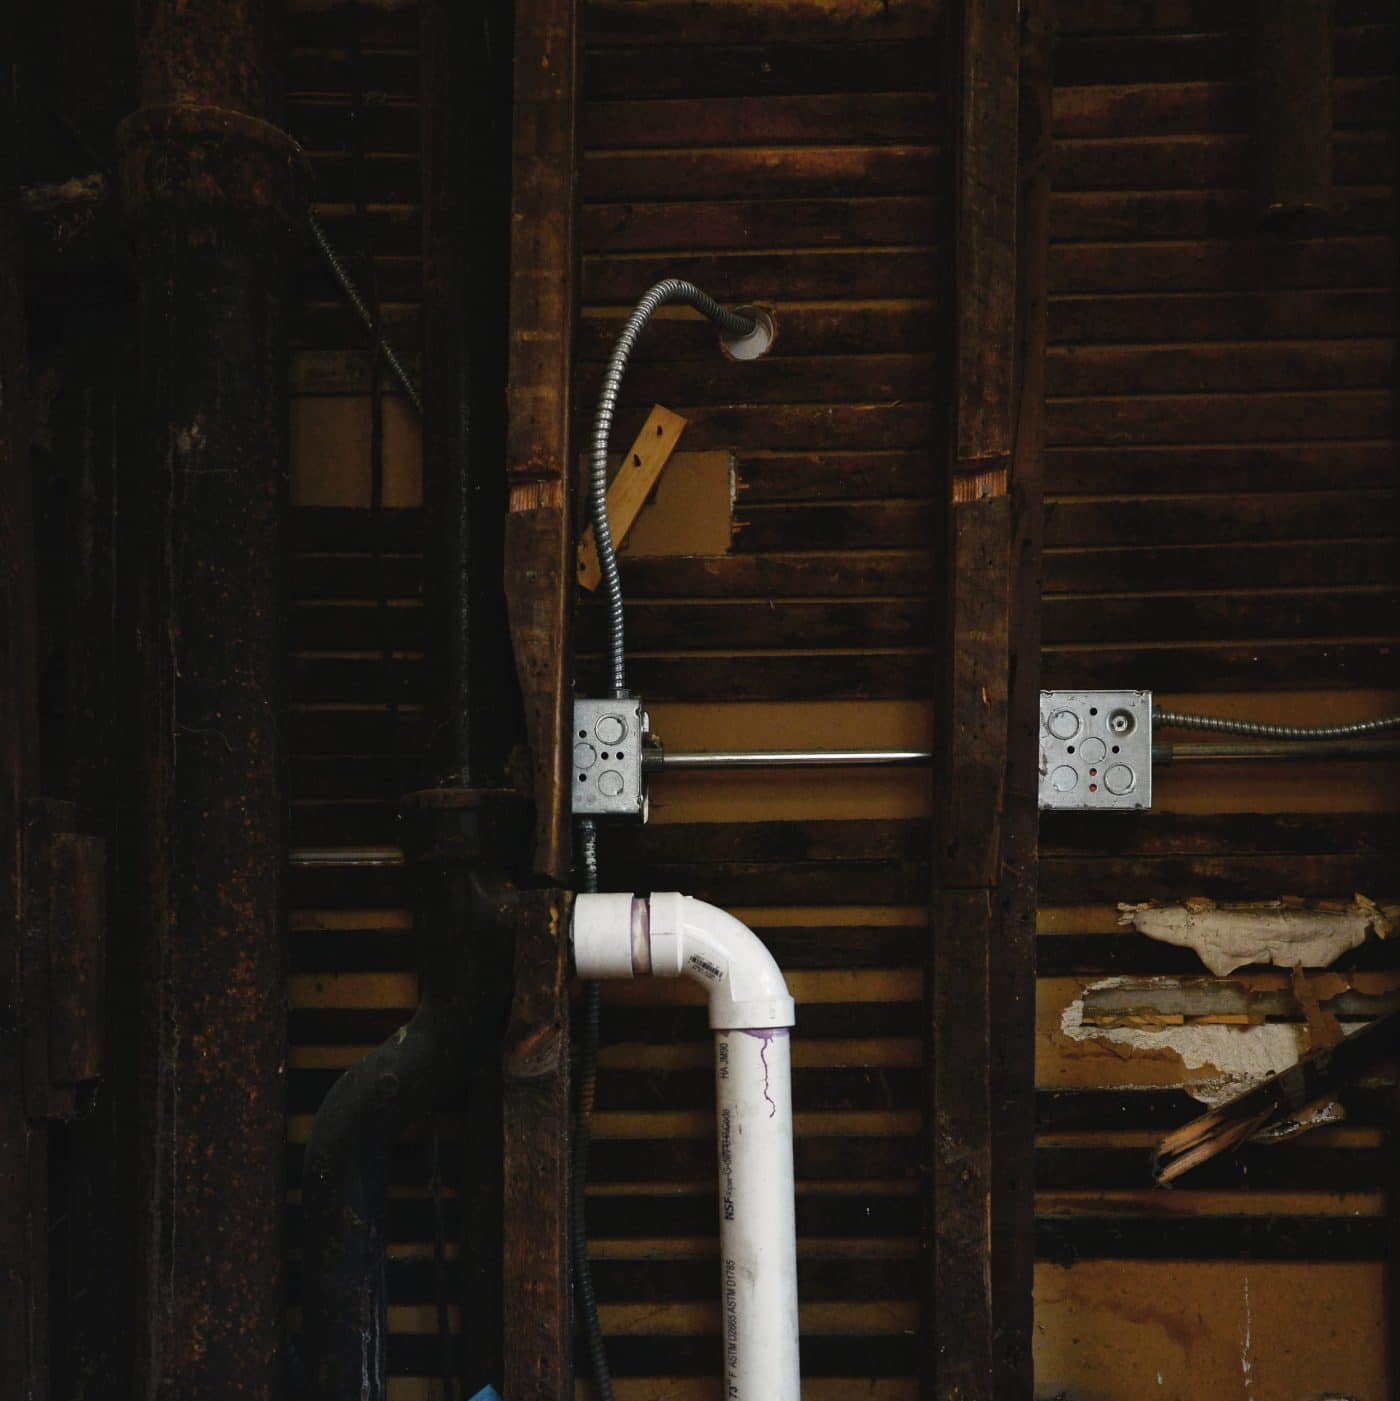
The current view of the bathroom is juuust a touch different than where we started. (You know, just a wee bit.) The wall that seperates the space from the workshop is gone, and all of the plumbing that it housed has now been relocated:
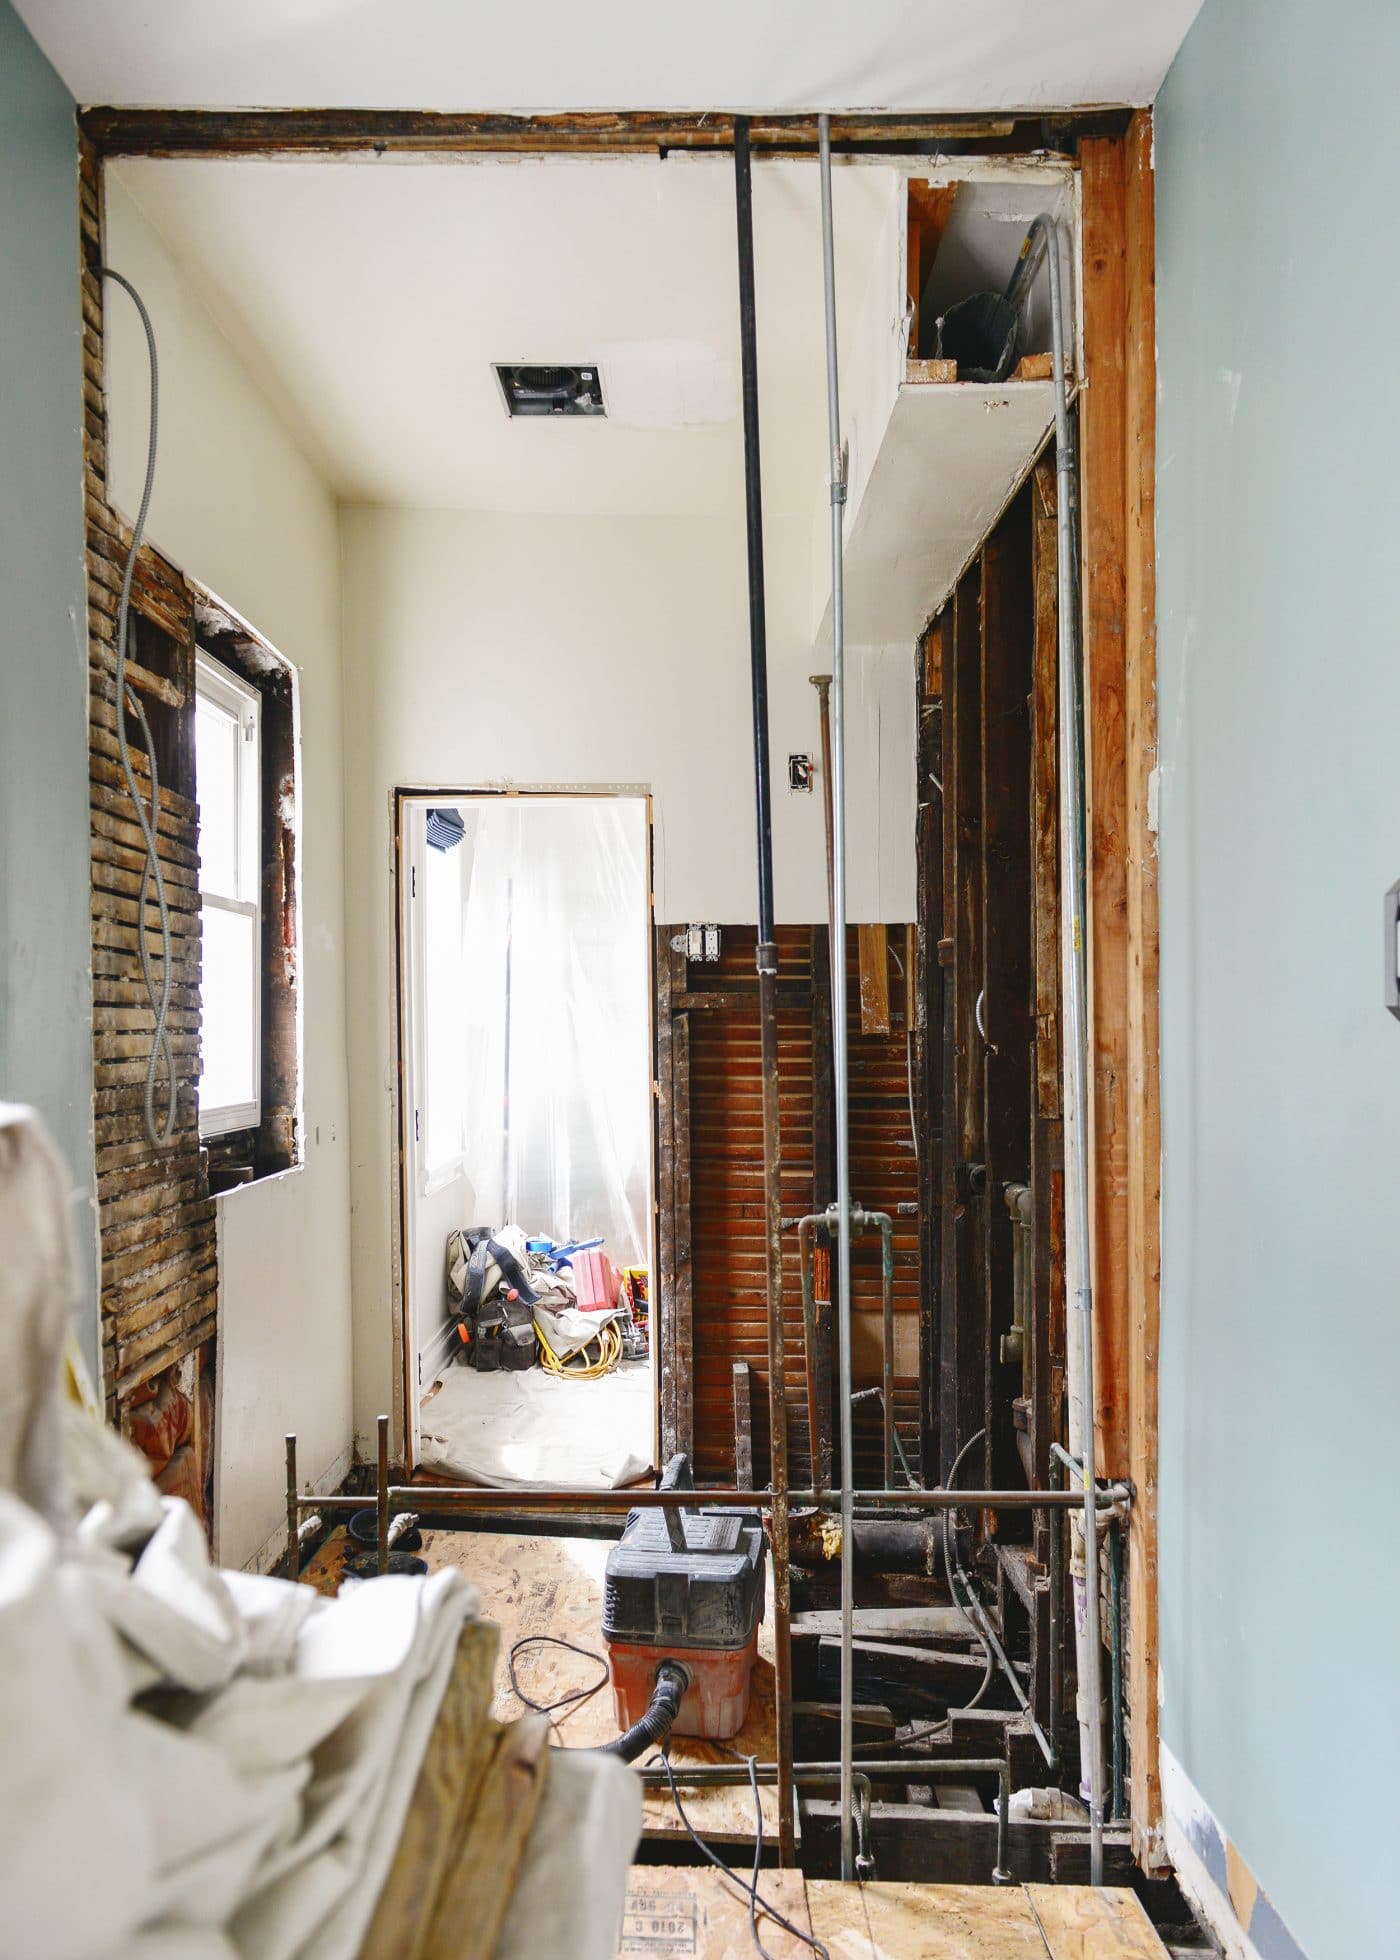
The flooring surfaces in our home are often not quite level (read: very, very unlevel), and the bathroom was no exception. Over the years, multiple layers of flooring and subfloor had been stacked on top of each other, resulting in a few inches of lost ceiling height! The construction team will sister in some extra joists to correct the uneven floor and bring things back to nice and level – at least, as close as possible. #oldhousecharm
Whle we had the wall opened up, we made the decision to replace the old window that never stayed open quite properly. We usually try to ‘future-proof’ our home and replace and upgrade things like windows, electrical and plumbing while the walls are open in order to avoid costly repairs down the road. This type of work is much easier and cleaner than doing it after all of your finishes are in place.

The First Obstacle
Another example of ‘future-proofing’ that we weren’t planning on was the discovery that our main plumbing stack was corroded and in need of replacement. While the wall was open, the project took an extra day and a half and ended up increasing our renovation bottom line by 5-10%. Oof.Had the job become necessary down the road, it would have involved destroying existing finish work and would likely have cost double or even triple what it did when the access was free and clear of obstacles. With this upgrade, we can now state that all of the plumbing in our entire home has been upgraded. Yay?!
While the down and dirty guts of the room are fun to share, the mood board is what will likely give a better idea of what the finished product will look like. (Hint: there’s pink. And flowers.) Stay tuned for more progress updates and a few spoilers of things to come!


Thanks so much for posting about the nitty, gritty of the design process. We have an old home (1877) that we plan to start renovating in a few years. It is very difficult in our area to find a reliable person to do the work so we’ve had to learn quickly and have done a ton of DIY including rebuilding many things like our whole front porch and 120 yo stand alone garage, we have no experience with changing the layout/ structural design. Do you work with an architect for the structural design process? Rely on your contractor? Or figure it all out yourself? What software have you used here (love the running man used for size!)? Thanks so much for sharing everything!
Our designer (if you’re in Chicago, we’d be happy to pass along her info!) did those drawings for us, and we hired her for her expertise on code, safety, etc. We also rely on our contractor throughout the process, as we’ve worked with him for many years, and he’s really familiar with our home! The trickiest part is finding someone reliable, but once you do, you stick with them!
Did you guys consider the placement of the shower controls? How will you turn on the shower without being sprayed with cold water??
Ooh that’s a great question, and you had us second guessing ourselves for a second! There will be a diverter so that we can choose the shower head or the handheld, as well as a temperature selector. The shower is big enough that you can stand off to the side and not get sprayed, but you can also leave it on the handheld while the water warms up and then turn it over to the shower head for a warm, steamy shower. :)
You could also opt to have a hole cut in your shower glass on the wall side where the controls are to reach in and turn the shower on. We did this on our shower and it’s worked beautifully. Ours is about a 6″ half circle hole, but I’ve seen more squared-off style holes in hotel settings.
I have seen a shower or two that has the handles on the opposite wall for this reason. I’ve used it once in an AirBnB I rented and it was pretty nice.
Tip: rainex your glass! Also, I know natural cleaners are the thing these days, but they were never able to get the water buildup of our glass shower doors. A little scrub with a clorox wipe was just the ticket.
Ooh, thanks for the tip! I remember Chris and Julia doing the same.
Can you explain what rainex is? I despise my glass shower doors because of the upkeep!!!
This is very exciting! Can’t wait to see your design choices. What a GORGEOUS inspiration bathroom. Randomly, what struck me is the out-swing door! All my bathrooms in this house and the previous had doors that opened right in front of the (small) vanities- so much for leaving a stool there for little kids to wash their hands, brush teeth, etc! Moving it back and forth, smacking into it when opening the door, just little irritations that contractors don’t think about I guess. (Also, in-swinging doors into TINY walk-in-closets—WHY??! Sorry, this sets me off ;) ) Anyway, you won’t have that issue when your cutie is bigger!
I’m so excited to see how this turns out! The transom is such an awesome idea. You could have some very happy maidenhair ferns up there!
Hi! Starting a similar project in Chicago and would love to connect with your team if you don’t mind sharing.
Just emailed you!
I have to admit that I am just a tiny bit disappointed that you are expanding the footprint because we have a master bathroom the same size as your original, and nowhere we can expand into – I’ve had so much trouble finding examples of truly tiny showers done well (honestly, who ever thought that a corner shower is sufficient? I whack both my elbows every time I wash my hair!). BUT aside from that selfish part of my brain that wanted inspiration, this looks like it is going to be a beautiful, functional new room and I love the idea of the transom! I really appreciate that you guys walk us through the process, it’s so helpful to really understand each step you are making decisions! You’re like the awesome friend that is willing to jump into all the scary (expensive!), adult stuff first and report back to the rest of us!
Haha, we’re happy to be the guinea pigs!
The second(number2, haha) plan works for me because the vanity is convenient for someone that needs a quick wash-up.
Very quickly this web site will be famous among all blog viewers,
due to it’s nice content